
Repair guides and support for gaming peripherals including joysticks, racing wheels, and third-party controllers.

404 Questions View all

How to repair the Audio Jack on this controller?

Hi Everyone , i am nee here and excited to be here.

I have a Razer Raiju gaming controller but I couldn't add it here so I chose a random one.

My problem is the Audio Jack is bad and not connecting well with headsets i have 1 Cloud String gaming headset and every time i play the sound disconnect and come from one end and very low.

But if i move the 3.5mm pin inside the controller it goes back to normal and repeating this solution every time i face it.

I need your help on this one Ifixit folks.

Thank you.

Update (11/23/2022)

Block Image

this the photo of my controller

Update (11/25/2022)

Block Image

Block Image

As you can see it's very small holes and there was a cooper wire running from bottom right pin on the audio ic to a tiny small ic q9 on the right side but the wire was cut

Update (11/25/2022)

Block Image

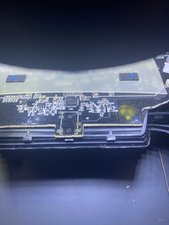
This connection place on the pcb

Update (11/25/2022)

Block Image

Block Image

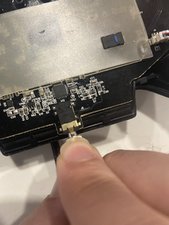
I trued doing this but it didn't work

Answered! View the answer I have this problem too

Is this a good question?

Score 0
Add a comment

1 Answer

Chosen Solution

Hi @meqg

The controller will have to be opened and the headphone port's connection to the motherboard checked.

Hopefully it will only have to be resoldered back onto the board.

Here's a teardown video of the controller that will help you to open the controller to see what needs to be done

Was this answer helpful?

Score 2

11 Comments:

Thank you so much Jayeff I appreciate your help.

by

The problem now is that the copper pads came of the pcb board and stuck on the pins of the Audio jack adapter.

Now on the pcb now is only glue and how to repair it i have no idea.

by

@meqg

Trace back where the pads were connected to on the board (hopefully there should be copper tracks leading to where the pads were and there should be other components connected to the track) and then run wires from the appropriate jack connections and solder them onto the board at the places where the pads were connected to and then glue down to jack to the board.

Make sure that it works OK before gluing the jack down

by

@jayeff but this means i need to drill holes where the original connection was on the pcb board it self?

I don't think i have enough space for wiring and i am a fried of short circuiting the board.

I don't have insulated copper wire

I will take some pictures and send it now.

Thank you so much for replying back.

by

@meqg

You don't have to do that.

Can't see it too well but it appears that one of the pad locations, front right in image goes to component Q9 another on the left side looks like somewhere near Q6. As I said follow the tracks that led to the pads on the board. If none on the top of the board, look on the bottom at the same place.

All you have to do is run a wire from the jack terminal that connected to the corresponding pad (or where it was on the board) and run it to where the track goes o a component and connect it at the component connection onthe board.

Do not apply too much heat when soldering the wire onto the connection point of the component as you don't want it to lift off the board.

Effectively you are bypassing the pad and connecting the jack to the same place as it would have been connected to if the pad was there.

by

Show 6 more comments

Add a comment

Add your answer

Abdulaziz will be eternally grateful.
View Statistics:

Past 24 Hours: 0

Past 7 Days: 0

Past 30 Days: 3

All Time: 151