
The Kenmore Elite HE3 is a washing machine by Kenmore.

668 Questions View all

F02 Error Code HE3 Elite Washer

The washer displayed the SUD error message, so I left it alone and eventually the message went away and was replaced with error code F02. After research, I found that this error code is due to not draining. I have done all the suggested things to make sure that drain is not plugged up or kinked etc. I cannot find any "clean out" on my model washer. The drum spins freely if I turn it by hand. Is there anything else I can try to get the washer running again? Do I have to get a service technician to come out and look at it?

Answered! View the answer I have this problem too

Is this a good question?

Score 14
27 Comments

I did it all 2 years ago I had the F02 code and did exactly what you said and buying a new drain pump fixed my problem. Now I'm having the same problem. I have checked the hose and all the fittings. I have put in a new drain pump and now it is still doing the F02. What can it be if it isn't the pump?

by

It's a computer, so have you found a way to reset it like you would a car after an oil change?

by

The best way is Don"t buy this Models at all,

I just want to add> I have so many issue with this Model # 11044832200 KENMORE ELITE he3 Residential Washers. This is so Far the worst KENMORE ELITE he3 in the Market>

Kash

by

very easy fix for me. The F02 code was for filter in the pump just open the pump by turning the knob and watch out, if you have water in your washer it will drain out. the filter/pump assembly was full of soap scum and lint all mixed up. Once I clean out, all is good. Sears wanted to charge me $100 to come out and try to sell me a new pump.

by

If you can't find anything in the coin trap & the hose isn't kinked, take a flashlight and shine through the bottom of the drum. Something small may have gotten under the drum and be stuck in the drain. You can see it with your light.

by

Show 22 more comments

Add a comment

26 Answers

Chosen Solution

F/02 error code potential causes

Check the drain hose and make sure it is not plugged or kinked

Check the electrical connections at the pump and make sure the pump is running.

Check the drain pump filter for foreign objects

If the above does not correct the problem replace the pump

I would start by taking the lower front panel off. There are two bolts, one on each side of the panel, remove those. Once you have the panel removed, you will see a white plastic unit, that is your pump assembly. You should also see a round plug with a plastic tab across the front. That is your coin trap. Open the cap by twisting it counterclockwise and remove it. It may just be clogged.

You can download the service manual from from here. and there is further information on here

Block Image

Block Image

Block Image

Was this answer helpful?

Score 41

48 Comments:

I just had the same problem. I did all the above including cleaning out the coin trap, the only thing I found was a small plastic thing about the size of a multi-vitamin and some gunk buildup on the sides, which i cleaned out, put everything back together and it seems to be working fine now. Doesn't seem like that small thing would have caused all that problem, but at least it's working fine now.

Thank you for your guidance. Sure wish there was a way to deal with the water that came out of the trap, I used a very shallow tray to slide under the washer to catch most of it, had to mop up the rest - oh well, floor is clean now :)

by

This site (and the people who contribute) are lifesavers. Thank you. Using the guidance above, I removed the lower panel (mine had three bolts) and coin trap cover (be prepared for water) and found a small amount of the expected debris in the coin trap. Not enough, I thought, to block the flow. Poking around, I felt something soft in the short pipe between the coin trap canister and the pump, which turnd out to be one of my wife's trouser stockings. Bottom line, the coin trap isn't a very good guard filter for the pump.

To be fair to Kenmore, this unit has been in routine use for more than nine years, and this is the first problem.

by

you are welcome :-)

by

I can't find any bolts or screws holding on the bottom front panel. Can anyone help?

by

JoAnn, I posted a picture with the screw location to the original answer. It is from the service manual that you can download, by clicking on the link in the original answer. Hope this helps, good luck.

by

Show 43 more comments

Add a comment

OK, I see many repeats of the same good advice and a few jerks telling those of us who either want or have to do the work ourselves to call a tech. Next time I find the place that the tech will work for free I will call them, for right now THAT is my budget.

To sum up and add (I am posting for I do NOT see mention anywhere of point #6 that I add in) to all the above, and if you have a problem, I hope you make it this far:

1) Unplug the machine

2) If it was not able to drain after at least 4 or 5 attempts, get those soggy clothes out of there and try to bail out all you can.

2.5) IF you can tilt the machine back, do so, but not so far that it closes in on wanting to fall back - if the front starts to slip forward, you could be in for a real unpleasant time.

3) Remove the kick panel - normally three screws unless you lost one like I have.

4) With many towels at hand, unscrew that strainer. Clean out anything there. Check the port inside the cavity and to the right (towards the motor). This is the direction of the waterflow. See that there are no obstructions in there. Should just be the motor's impeller.

4a) If you found junk in the trap, you may have solved your problem. Next if not-

5) When the unit runs, do you hear the drain pump run? That is the motor connected to the right of the trap you just examined. If not (at all) or if it sounds like a garbage disposal with a few coins in it, we might have a problem with electricity not getting to it (doubtful) or it has gone bad - Note if you smell something almost burning when it runs, and furthermore, if it was just running, this baby will be hot!. Yes, you can pay nearly $200 for one of these if you really try, but you should be able to find a good replacement on Amazon or eBay for under $90, including shipping (I paid $65.00). ALL you want is the motor/impeller assembly - you so very most likely do not need the plastic trap and all unless you have a problem with giant rats that like to eat that plastic - my point being: I can't imagine in normal circumstances how you would ever need that plastic assembly replaced. The motor is attached to the assembly by three easy-to-remove screws.

6) Before shelling out your hard earned cash on the motor, IF you have had the unit for a while (mine is 12 years old) you easily could have junk built up around the ball valve, which is located at the base of the tub in the accordion hose that comes off the left back of the strainer assembly if you are facing the front of it. Mine is black and goes from the back of the strainer right up to the underside of the tub. You will have to remove both clamps - one on the back of the strainer and one around the fitting of it around the base underside of the tub. If they were not cheap spring clamps, it would be very easy, but with a little fighting with a pair of pliers, you can get it done (easier off than on...). I found a couple children's socks and a whole load of gray-black slime in mine!!! Also, up in the inside cavity of where the black accordion boot attaches to the underside of the tub, is the channel water goes through which should be inspected (by feel) for any more gunk.

I had to post because in my reading I never found any mention of this rubber boot - ball-valve assembly, but as mine was logically the next place to check, and indeed, horribly plugged with junk from over the years, I had to add my 2 cent's worth here for all the other folk herein have helped me out tremendously.

Was this answer helpful?

Score 23

5 Comments:

This list worked for me... thank you!! Note: I bench tested the pump and it worked... so I didn't waste $ ordering one I didn't need. Try it but BE CAREFUL... connecting bald wires to a 110v pump can be dangerous and tricky. I used a plug bar to switch it on, after I made the risky connection. sjr

by

One additional observation - After finding that my motor did in fact work, though was not running, the two other possibilities I could think of were 1) Wiring, and 2) The main control (computer) board that with the top of the machine removed and looking down at everything is normally center-back. A service that offers to do diagnostics on these highly recommended that I send mine in to them for testing for they said that they never heard of the main board being the problem with a no-rum drain pump. Now, I was on my SECOND main board for I had just received a used replacement. Since I tested the wiring and it was all connected, I chose to try another board anyway. There is a nice place that sells refurbished GUARANTEED boards for about $85 out there (New, these buggers run a good $225 or so). Replacing the board solved the problem. Hmmmm, they, who test these boards day in and day out never heard this happening, but it happened to me on two boards in a row, what are the odds....

by

Great solution, thank you for sharing. I was 75% sure it was the motor. When I saw your post and found that the rubber drain hose may have a blockage I was hopeful. Sure enough a sock, a small rag, and the insert of a bikini top were enough to block the water flow to the pump! Took about an hour to resolve due to the small space and wet rug... Thanks for sharing.

by

Six years of pullin' baby socks out of the coin catcher but I never knew about the ball valve! Thank you for step 6 Bruce!

by

Thanks so much!! When i De-attached the drain pump motor I found a bead necklace wrapped around its fan with a bunch of hair and other gunk (I’d already cleared the filter trap of a bunch of stuff but that didn’t resolve issue). Now running a rinse/drain cycle.

by

Add a comment

The following is what fixed my washer.

1. Clean the drain filter, check all hoses for blockage. Including the main hose at bottom

where the pump is hooked. Basically clean the whole assembly.

result: got me to the wash cycle but still sud and then f02 when it's time to rinse.

2. Double check if the drain pump is working and verified at the beginning of the cycle

that it is efficiently draining water by looking at the outlet.

3. Based of my researh it seems like the sud will show up if it thinks that there are more

suds. You can tell this when you hear the drain pump run for about 5 minutes even though there are no more water. After this it will throw the f02 and will not continue to the rinse and spin cycle.

I read somewhere about the switch sensor could cause this if there is blockage. Switch sensor is located at the top right corner inside the washer. You will have to remove the top cover as well as the back cover to do this. (quite easy just screws). It has a little black drain hose. I disconnected this hose and follow where it is connected and viola there is a little canister attachment and it is full of gunk. There is only one screw holding it. Take it out and clean the gunk. Make sure the tubing are free of bubbles too by blowing air on it. Including where it attaches to the sensor. Make sure you have a pan when you take out that canister as there will be water there.

After doing this my washer worked like a charm! The key is to do all the steps to save you from buying anything else until you are absolutely sure which part is the problem. I know the sensor switch is working because it switches with other steps except when it detects the sud. This alone is an indicator that it is somehow clogged.

Was this answer helpful?

Score 14

10 Comments:

The switch sensor/little black drain hose/canister was my problem. Took off the back panel, removed the canister, and it was packed full. Blew on the little black hose to clear the system, and the washer clicked into action. Cleaned all the gunk out of the canister, hooked everything back up, and works like new!!! Will also say I cleaned behind the circular rubber gasket around the door (nasty!), and also cleaned out the trap attached to the pump, prior to cleaning the canister. Those two other cleanings did not fix the problem, but needed done anyway. Also disengaged all the hoses, and made sure they were clear. The hoses were fine. An easy fix, thanks to this website, and saved a nice chunk of change.

by

Thank you Jason, the switch sensor was it! THANK YOU THANK YOU THANK YOU!!!

by

Bless you Jason! I found your post by search black slime or black gunk. Those adjectives sure help. We were black slime all the way up to the ball joint which like you said wasn't mentioned anywhere else. Ditto. Our culprit may have been a small plastic tooth pick which kept the ball out of position. So say my husband! Jason your instructions were well stated and laid out. But it was the first mutual project (I do the internetting and my husband does the black deslim-ing.) Actually I did a bit of that too. But he went to MIT so he should do more of the grunt work.

by

Thank you Jason! F21 and 5ud errors plagued our washer. Replaced water pump, cleaned ball valve, and replaced water level pressure switch. Still had them. Finally cleaned this canister. It was clogged to the max. No more error codes!

by

The small black hose that runs to the sensor on top runs down to a clear (opaque) plastic canister. I can’t see anything in the canister and the hoses won’t come loose.

Any thoughts?

by

Show 5 more comments

Add a comment

One additional tip: set up a bucket under the filter trap housing (say, in the utility drawer underneath the washer) before you open it up, lest ye piddle water all over the floor.

You'll need to unseat the filter/pump assembly and then tip it forward to allow the water to clear the floor of the washer chassis. On the HE3t, it's secured to the chassis floor with one T20 screw.

No need to disconnect the hoses or plugs; there's enough slack to keep everything connected.

Remove the screw, slide the assembly forward out of its mount, then tip it down a little. (There's a bunch of wires in a plastic frame running laterally in front of the pump/trap assembly. But don't worry: you already unplugged the power cord, right?) Unscrew the trap cover a little (Don't remove it completely!) and let the water out. Tighten it back up to stop the flow so you can empty your bucket. (Ours took three or four trips to the slop sink to drain all the way.)

When it's empty, remove the cap and clean out the trap. (Our trophy: one very old, very nasty facecloth.)

Slide the pump/trap assembly back into its mount, replace the T20 screw and the lower front panel, and you should be back in the laundry business.

Was this answer helpful?

Score 5

1 Comment:

If you have a shop vac, set that up and turn on, then slowly open the filter trap partially, and let the shop vac deal with the water. Then remove the trap completely to check it.

by

Add a comment

Things I tried:

1. Trap clean out

2. Cleaned all drain tubes

3. Snaked the drain line

4. Drain pump bench test

5 2' Black hose clear

6. Reservoir with single screw. That's the one.

The reservoir was clogged. Thanks to the previous post.

Moral of the story:

1. We're switching to HE soap. (Duh)

2. Use a very bright light to see if tubes are clogged.

Was this answer helpful?

Score 2
Add a comment

One last thing. Make sure you are prepared for the water that will flow out of the COIN TRAP. I would suggest gently pulling the rubber (red) tabs and lifting the trap up and placing a funnel to drain into a 1 GALLON bowl. I used a plastic cutting sheet to slide under the trap so that the water flowed into the bowl. THERE IS A LOT OF WATER. After it drains there will be an assortment of lost items and goo that will empty into the bowl. I am frankly surprised the thing still worked. I had $1.79 in change and 7 LEGO pieces and about 40 airsoft pellets 5 color catcher sheets along with 1 EURO!. I am still missing a lot of socks.......

Was this answer helpful?

Score 2

2 Comments:

Its a mystery where all those socks go! I picture them running around a beautiful meadow together saying "we are free, we are free!!! I dont have to be a pair. I can be matched with whomever I want! Blue argyle knee sock paired with a shite tube sock. Oh yeah!!! I can even go solo!!!"

by

This was it for me! Thank you for the free help. I took the bottom plate off, unscrewed the coin trap and whooosh! I got wet! but it did solve my problem. My four years olds sock was in there! If the last minute of a wash cycle takes about twenty minutes you may want to check that plug. We save about 15-20 per load now just because it drains so much better now. Thank you thank you thank you!

by

Add a comment

I position a trash bag under the pump and let the water run into that. Works well

Was this answer helpful?

Score 1
Add a comment

It was the second time in 8 months that the f02 code was displayed but this time I had the sud message to. First time I cleaned the trap that was really clogged (after 9 years). Second time, opened the trap to find almost nothing so did a little research on the web to find out it was possible the pump or other pipes could be clogged to. I removed the pump, the big black bellows, the evacuation pipe that goes to the drain and cleaned them all. I was surprise about the amount of sh... there was in those (we use he3 soap), put everything back and test ed it, code is back???? Finally, the only pipe I did not remove was the small one that goes to the sensor on top of the machine. This little hose goes from the sensor to a small reservoir behind the tub, it was completely clogged so the sensor never had a good reading about the water level in the time frame set by the control unit. I cleaned this small reservoir (don't forget to re-attach the wires to it to prevent them to get in the belt) and my washer work perfectly now. Thank's to every one who posted there experiences, I probably save a few hundred dollard bills just to clean deposit.

Was this answer helpful?

Score 1
Add a comment

I've found pennies or dimes in the drain hose that passed by the coin catcher. If its flat against the pump, it stops the water from pumping out. If the change is standing straight, the water drains fine past the coin. The coins will change position which some times allows it to drain and other times not. If thats not it, you may/probably/most likely need a new pump. Once removed, If it, (the pump) moves freely, wobbles or is noise when in use it is worn out. @ $80 off ebay, $140 through sears parts direct. Good Luck and I hope this helps.

Jim Farrell, Your Handy Dandy Home Man

Was this answer helpful?

Score 1
Add a comment

F02 Error Code HE3 Elite Washer

Solutions to the F 02 error code that’s not in the manual and missed by most tech’s.

Don’t replace anything until you do these 3 things.

Performing these steps, will most of the time correct the fault causing the F 02 error code. Most technicians and help videos suggest replacing the pump after checking for kinked or blocked hoses and cleaning the LIF(Large Item Filter). More times than not, it’s $150.00 for a new pump that didn’t correct the problem.

I’ve done a lot of searching and digging to solve my F 02 error, and I have found what most people, even Technicians, miss. I’m sharing my findings for no gain other than knowing this is going to help someone, (hopefully you).

Sorta legal stuff here, some of it might be good for a chuckle though (what I outline here is not a step by step, every step detailed to its max for dummies procedure manual). I offer it for competent, knowledgeable people who understand there is risk of injury involved while blah blah blah… I assume no liability for anything or anyone, and no responsibility for anything, damages or Acts of GOD or anything resulting from, too, or as a result of whether imagined or real, before, while, or after attempting to apply what I describe here. The following information is for educational purposes only.

At the bottom, I’ve included a video (not mine), that has some useful information and good visuals of the items I’ve mentioned here.

Tools needed (and a few suggestions to make this easier).

# T10 & T20 Torx bits. or a 9/32 nut driver (fit all my screws)

# An electric screwdriver (a Dewalt) helpful but not an absolute must, a hand driver will work.

# Good pair of slip-joint pliers.

# Rubber gloves.

# A few cotton swabs.

# A couple of large towels. There is going to be some water present when you make some disconnections.

# A shallow plastic container that can hold a couple of gallons of water.

# Large disposable Pie Tin.

  1. Inside the cabinet, stuck to the side, is a manual for your particular machine (unless someone has removed it). It has useful information. It describes procedures related to running diagnostic checks to the electronics of the machine, and other useful information. You’ll see it once the front or back cover is removed. Both covers will need to be removed to perform the following steps.
  2. Let’s get started.

# 1st, unplug the power cord.

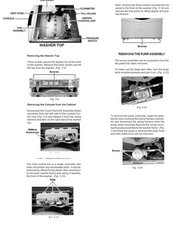
  1. Remove the 3 screws from the front panel, there at the bottom, then remove the panel by pulling on it ( a nylon spatula works well to aid in popping it out).
  2. You’ll see the pump assembly with a round cap. That’s the LIF, (Large Item Filter) and it turns counterclockwise to remove. The Water In The Tub WILL DRAIN when you remove the LIF. Clean the LIF and inside the housing where it goes. Reinstall it.
  3. Next, we need to access the back of the washer. If the hoses are long enough to allow pulling the washer out far enough to get behind it, you can leave them connected (for these maintenance steps).
  4. The rear panel removes by removing a handful of screws. Removing the Top of the machine is NOT NECESSARY, but you will need to remove the two screws holding the top of the rear panel that slides under the top cover (it’s easier than it sounds). There is a screw on each side that do not need to be removed as you can see the cutout around them. Remove the screws in the center of the panel.
  5. At the very bottom of the tub is a black accordion-like, drain hose that goes from the bottom of the tub to the pump. Using slip joint pliers, at the bottom of the tub, release the clamp and let it slide down the hose. Water will drain when the hose is removed, Rubber gloves, the shallow plastic container, and towels are used here.
  6. Removing the hose from the pump is not necessary, but it can be cleaned better if removed. I left mine attached to the pump. Clean the inside of the hose that connects to the drum. There’s a plastic ball (Eco-Ball) inside the hose. This ball must not have any water inside of it. If it does, replace it, since if something gets stuck there, this can wear a hole in the ball.
  7. Clean the area around the ball thoroughly. There is a Bypass Hole that should be unobstructed. I used the cotton swabs to clean the groove in the hose that attaches to the tub. You can roll the bottom of it back under to help drain any remaining grit out of the groove.
  8. Clean inside the bottom of the drum. Reach your fingers up inside it and feel for anything (gunk). Clean the mating surface where the hose connects. Once everything is cleaned, slip the hose back on and secure it with the spring clamp (holding the clamp up as high as it will go, using the pliers to squeeze it and work it up in steps). Verify the clamp is installed correctly.
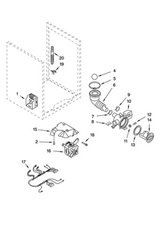
  9. (Still working in the back) At the bottom edge of the drum is the Water-Level Pressure Switch Air Trap. (W-LPSAT)This has a 1/4 “ black hose connected to it that goes up the cabinet’s left side to the pressure switch, & a couple of green wires attached/wrapped around it.
  10. Correct wire routing must be maintained. Taking a picture or 2 can be helpful here.

# The W-LPSAT is held on with one screw at the bottom (T10) and a tab to release the (W-LPSAT). Remove the Torx screw (you might have to lay on the floor to see the tab). Release it and gently pull it out (a little water will be there) and unhook the wires and hose. Clean the W-LPSAT thoroughly and reinstall Paying attention to correct wire routing.

  1. CAUTION DON’T BLOW into the switch! you can rupture the rubber diaphragm.
  2. GENTLY puffing/blowing into the rubber hose that goes up to the pressure switch, you should be able to hear the switch making and breaking contact. The switch should hold light pressure also.
  3. I test ran the unit. A full wash cycle completed successfully without any errors. I then installed the panels.
  4. Good Video(not mine) visual of the W-LPSAT tab and other good stuff. I didn’t see anything I haven’t covered —-> https://www.youtube.com/watch?v=tCaHsu8R...

# IF this solved your F 02, I know your days looking brighter, help someone else enjoy a better day…Give a thumbs up or a YES- IF this solved your F 02— and to help this article rise in the ranks of search returns, so it can help other peeps in need :)

signed by——> Nobudyin Particular

Was this answer helpful?

Score 1
Add a comment

You can try to blow on the drain line and dislodge what maybe keeping it from draining.

Was this answer helpful?

Score 0
Add a comment

In addition to emptying out the trap, my holes were clogged a bit so I had to scrub that as well

Was this answer helpful?

Score 0
Add a comment

I had the code too. My problem was a failed pump. It was making a racket and running so hot it smelled like melting plastic. After shutting it down and dismantling the pump I stuck my finger inside to feel the impeller and it was shifting around in a way that didn't seem right. I think the shaft broke.

The good news is the pump was easy to replace myself. I ordered the assembly from Sears Parts Direct for $180 with priority shipping. Got it in 3 days. All parts needed for complete replacement were included. Replacement worked great.

Note that you will need to open two heavy duty hose clamps so be prepared ahead of time. If you have car radiator type hose clamp pliers then you should be set. Otherwise you'll need something like small locking vice grips (what I used). You probably won't be able to do it with simple pliers because you won't be able to get enough hands inside to make the hose changes.

I was really ticked that the pump only lasted about 4 years on this lightly-used high-end unit. However the ease of repair and part ordering somewhat redeemed Sears. $180 was a bit pricey for this plastic assembly I think but it sure beat $500+ and a 10 day wait to have Sears service fix it. (I have a not so happy story with a Sears dishwasher.)

Was this answer helpful?

Score 0
Add a comment

Wow, my husband and I just got done with the process. It saved us $1500, I was ready to pay out for a new set, but this really does work. Our machine kept getting the error, we took the front piece off and unscrewed the trap and cleaned it out and it is running great. But the one thing that I will say, when the previous person said have many, many towels, be ready to have every one that you have, because we practically flooded out entire laundry room. It is a nasty cleaning but it will save you a bundle. Thanks so much for this wonderful advice, it is so greatly appreciated.

Was this answer helpful?

Score 0
Add a comment

Ours did the same thing as Darin's machine. When you are standing in front of the machine look to the back right of machine there is a approx. 2 ft. long black tube. It was filled with water. My husband blew into it to clear it out and then the machine started working perfectly again. Now before doing all this we cleaned out the trap too but there was nothing to speak of in it. GOOD LUCK!

Was this answer helpful?

Score 0
Add a comment

Before opening the filter trap use a shop vac to suck out the water remaining in the unit by sucking it through the drain hose at the wall. It will save you from a big mess.

Was this answer helpful?

Score 0
Add a comment

We followed the advice here a few years ago when we first had this problem (today is our second time with this code) and you saved us so much. Our culprit was those delight all in one cloths that Purex came out with. You put the cloth in the washer, it had soap in it, then transferred it with the laundry to the dryer. Apparently they also fit nicely through the little drain in the tub. We of course stopped using the sheets and notified Dial (the main co.) After that first time the machine has run perfectly until this week. This time my husband dragged the washer outside and tried to drain it there. Finally while cleaning it all out he found a handful of those sheets really wedged in one of the hoses. We haven't used them in years! So I guess like others have said a thorough cleaning may be needed more often! As a preventative measure!!

Was this answer helpful?

Score 0
Add a comment

Thank you so much for the help. However, somewhere in the beginning of this thread, there should be a flood warning or a picture of Noah in his Ark next to a washing machine, some kind of hint. Man socks are so mischievous they escape from the laundry and now they've learned to clog washers. What next, take over the world?

Thank Again.

Harvey

Was this answer helpful?

Score 0
Add a comment

Great advice. Followed all directions and hints given above. Trap was clean and no signs of any blockage anywhere. Pump ran, but was making a little noise and giving little flow out the discharge hose. Spent the $162 for pump and motor assembly and works like a champ. Very easy to install.

Thanks for all the help.

Gary

Was this answer helpful?

Score 0
Add a comment

Followed the directions and cleaned the trap with success. I don't have mine with the utility drawer underneath so I used a shallow pan to (slowly) catch the rinse water still in the system (once I dislodged the assembly and tilted it forward). There will be a few gallons, so be prepared to cycle through emptying the pan into a nearby bucket. Also be prepared for the crap you will find in the trap (ugh).

Thanks

Peter

Was this answer helpful?

Score 0
Add a comment

We've had our Kenmore Elite for almost 11 years and 2 months ago it started throwing the F02 error. We called Sears and then cancelled to try and fix it ourselves. We pulled the washer away from the wall and tipped it back to reduce the amount of water that would come out when we opened the trap. We cleaned the trap and got a lot of gunk with toothpicks and some small screws in there. Put it back together and that wasn't it. We cleaned the outside drain hose and found gunk that was so thick, it looked like rubber. That still wasn't it. Cleaned the inside hose. Nope. Cleaned the rubber boot with the ball in it. Still no love. While the boot was out, I reached up in the hole and felt a thick wire and it seemed to be loose and rusty. It was not real bendable but I got it out. It was an underwire from a bra. Back together and again, not it. We decided to buy the pump motor from Amazon. $72 with 2 day shipping. Got the water out of the trap and took out the one screw for the pump but left the hoses attached. Removed the 3 screws holding the motor on and transferred the black seal washer to the new motor. Put it back together and it's finally working. Fixed in time for Thanksgiving. The clothes were beginning to pile up. Thanks for the help from everyone in the thread.

Update

I just want to remind everyone that this error is about "time". The time it's taking to drain is too long for the programming. That's and you need to be 100% sure there are no obstructions and that the pump motor is not only working, but working at full speed. Our problems (described above) was that the pump worked too slow. Replacing it worked for us, but we had already assured ourselves that the rest of the drain path was clear.

Was this answer helpful?

Score 0

1 Comment:

Thanks for the update. My HE3 was getting to 1minute left in a wash cycle and taking 20minutes to finish. Black tube that goes to the sensor was the problem.

by

Add a comment

This was incredibly helpful, thank you so much. Turns out we experienced almost all of the above. At first we thought it was the heavy gunk and debris at the "coin filter", then the fairly clogged drain line. Finally after going back through the posts noting that the F02 code is a slow drain compared to the timer, we found a bra liner clogging the main drain hose (black flexible pipe under tub). Fair warning - even after draining the water at the filter, when I pulled out the clog the floodgates opened.

Was this answer helpful?

Score 0
Add a comment

Thanks so much for the answers guys. I was able to take off the front cover, unscrew/drain the coin trap and find a disgusting sock in there, completely clogging it! Cancelled the appliance repair guy just in time. Catching the water as it comes out of that trap is tricky, and I missed a lot of it. There's probably a better way, but I just stuck folded towels under the plug as I unscrewed it.

Was this answer helpful?

Score 0
Add a comment

This was great help to me. I wasn't able to download the repair guide, but the blow-out parts document gave me what I needed with a bit of studying. Mine was fixed by cleaning out the screw-out drain - and I found about $3 in change to boot! Thanks to all

Was this answer helpful?

Score 0
Add a comment

BEFORE YOU DO ANYTHIGN— CHECK THIS FIRST!!!

—CHECK THE DRAIN HOSE ON ''OUTSIDE ''OF the MACHINE!!!

I went thru all the above and mine still would not drain (could hear drain pump working)

turns out the DRAIN HOSE ON BACK was totally clogged with sludge of 15 years of washes

cleaned it out and all is good!!!! (it wasnt any of the other items people mentioned)

Was this answer helpful?

Score 0
Add a comment

call a service technician, a real pro will have your washer up and running, fast.

Was this answer helpful?

Score -1

1 Comment:

I did call a "Pro". He took the pump filter out to take a look and declared that I need a new computer board! I then saw the advice here, cleaned the sensor canister and now it's happily working again.

by

Add a comment

Add your answer

jkiran37 will be eternally grateful.
View Statistics:

Past 24 Hours: 24

Past 7 Days: 109

Past 30 Days: 437

All Time: 255,535