What you need
Video Overview
-
-
The dawn of another day in the Land Down Under brings us what we've all been waiting for: the new iPhone 5!
-
A big thanks to MacFixit Australia for letting us use their digs in Melbourne for this teardown. They stock Mac and iPhone upgrades/accessories, and also carry our iFixit toolkits.
-
-
-
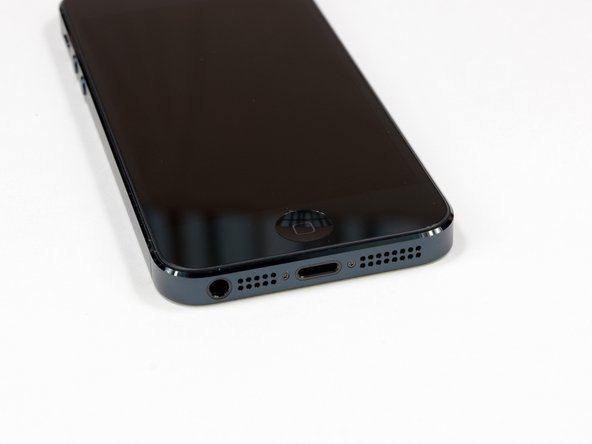
There won't be any mistaking an iPhone 5 for an iPhone 4 or 4S. A lot has changed on the outside of the iPhone.
-
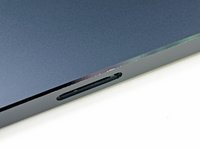
The most obvious alteration to the bottom of the phone is the exchange of the large 30-pin dock connector for the diminutive Lightning connector.
-
The headphone jack is now on the bottom of the iPhone, right next to the updated
speakermicrophone grille—a series of holes rather than a mesh-covered slot. -
Other notable differences are the slate bezel, as opposed to the stainless steel that wrapped around the 4S, and the chamfered edges between the bezel and the front/rear cases.
-
-
Tool used on this step:P2 Pentalobe Screwdriver iPhone$5.99
-
Pesky pentalobe screws! Good thing our 5-Point Drivers still work on them.
-
It's incredibly convenient that Apple used the same pentalobe screwhead that they've been using for the past two years on the iPhone 4 and 4S. The screw shafts are slightly different from the screws in our iPhone 4/4S Liberation Kit, so we made a new iPhone 5 Liberation Kit!
-
The unibody back case is reminiscent of the iPhone 3GS, while still retaining the square (though now chamfered) edges of the iPhone 4.
-
-
-
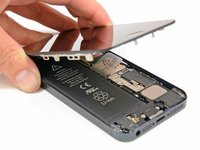
What's this? A suction cup? We haven't needed a suction cup to get into an iPhone since the 3GS!
-
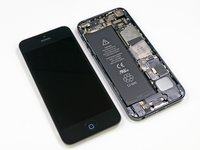
Because the iPhone 5 is opened front-to-back, replacing a cracked screen is going to be easier than ever. Thank you, Apple!
-
Compare this to the iPhone 4S, where it took 38 steps to isolate the display assembly, and this iPhone may be the most repairable iPhone we've seen in a while.
-
-
-
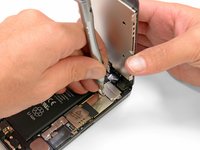
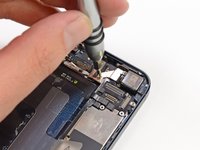
The display connector is held firmly to the logic board by a few simple Phillips screws.
-
Our spudger makes quick work of prying up the display connector, and poof! the display is free.
-
We're having iPhone 3GS flashbacks with the easily accessible display assembly.
-
Screen crackers and screen fixers rejoice!
-
-
-
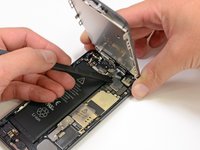
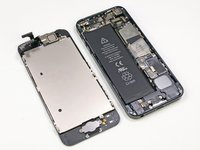
The iPhone 5 ditches its lid to show us all of the juicy bits inside.
-
So, what can we see from here? A bigger battery? Antenna connections? A single speaker? Cameras? Vibrators? Home buttons?
-
Never fear, our faithful iPhone delivers; we'll be sure to take a closer look at each of these components as we remove them.
-
-
-
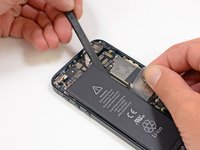
As always, we disconnect the battery first to prevent electrifying anything, including ourselves, as we dig deeper.
-
Three Phillips #000 screws and a metal bracket hold the battery connector to the logic board.
-
Hmm, this is beginning to feel very familiar.
-
-
-
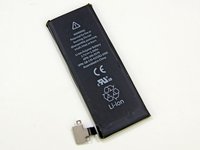
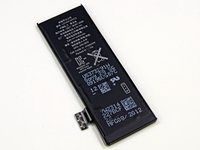
We use the Battery removal tab to pull up the battery. Never try to pry soft pack batteries as this could lead to a thermal event!
-
For the iPhone 5, Apple has switched to a different battery chemistry, with a higher voltage and slightly larger capacity than the iPhone 4S. Let's see how the battery specs stack up.
-
iPhone 5 Battery: 3.8V - 5.45Wh - 1440mAh. Talk time: Up to 8 hours on 3G. Standby time: Up to 225 hours.
-
iPhone 4S Battery: 3.7V - 5.3Wh - 1432mAh. Talk time: Up to 8 hours on 3G. Standby time: Up to 200 hours.
-
Samsung Galaxy S III Battery: 3.8V - 7.98Wh - 2100mAh. Talk time: Up to 11 hours 40 minutes on 3G. Standby time: Up to 790 hours.
-
On the back of the battery we notice "MFR Sony," and "Cell made in Singapore." A bit of googling and it looks very likely that Sony is manufacturing this battery.
-
-
-
There are all kinds of metal-to-metal contacts inside the iPhone 5.
-
Spring contacts make for easy repairs, but mandate careful attention to cleaning all the parts before reassembly. Finger oils can get in the way of these metal contacts and cause frustrating component failures.
-
This contact connects the metal frame around the front-facing camera to the frame around the rear-facing camera. Maybe this frame is some kind of an antenna? Only time will tell.
-
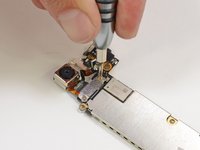
Speaking of antennas, a spudger easily pries one end of an antenna connector off of the logic board near the battery.
-
In the iPhone 4S, this antenna location was reserved for the cellular antenna. We won't know for sure what this antenna's purpose is until we uncover more.
-
-
-
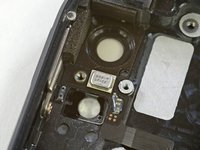
Near the top of the case, we find a few antenna connectors firmly screwed to the inside of the case.
-
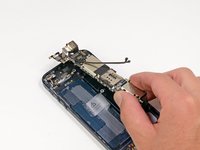
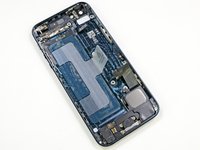
Finally free of its constraints, we lift the logic board up out of the rear case.
-
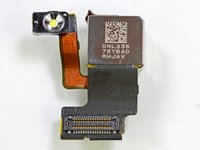
The logic board and 8 megapixel iSight camera come out together, leaving several components behind in the rear case—another win for modularity.
-
+1 for repairability.
-
-
-
-
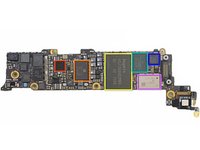
The underside of the logic board is teeming with components.
-
Skyworks 77352-15 GSM/GPRS/EDGE power amplifier module
-
SWUA 147 228 RF antenna switch module
-
TriQuint 666083-1229 WCDMA / HSUPA power amplifier / duplexer module for the UMTS band
-
Avago AFEM-7813 dual-band LTE B1/B3 PA+FBAR duplexer module
-
Skyworks 77491-158 CDMA power amplifier module
-
Avago A5613 ACPM-5613 LTE band 13 power amplifier
-
-
-
More chips on the underside of the logic board:
-
Qualcomm PM8018 RF power management IC
-
Hynix H2JTDG2MBR 128 Gb (16 GB) NAND flash
-
Apple 338S1131 dialog power management IC*
-
Apple 338S1117 Cirrus Logic Class D Amplifiers. The die inside is a Cirrus Logic device (second image) but it does not look like the audio codec.
-
STMicroelectronics L3G4200D (AGD5/2235/G8SBI ) low-power three-axis gyroscope—same as seen in the iPhone 4S, iPad 2, and other leading smart phones
-
Murata 339S0171 (based on Broadcom BCM4334) Wi-Fi module
-
-
-
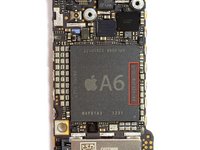
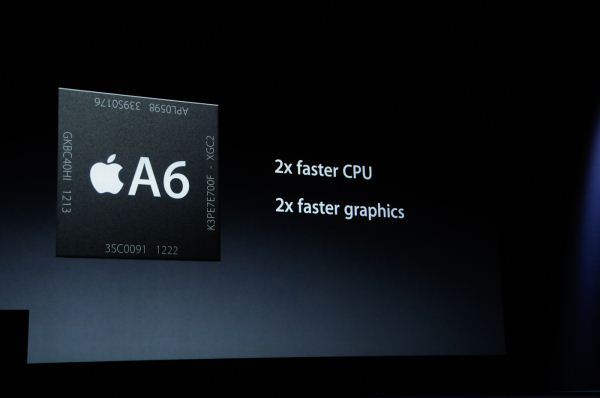
Now for the plat de résistance: the A6 application processor.
-
The A6 processor is the first Apple System-on-Chip (SoC) to use a custom design, based off the ARMv7 instruction set.
-
Because the A6 is not an ARM-specific CPU design, this gives Apple the ability to tailor the A6 towards their needs.
-
According to Chipworks, the B8164B3PM silkscreen label denotes 1GB Elpida LP DDR2 SDRAM.
-
Contrarily, the infographic presented during Apple's Keynote clearly showed Samsung RAM (K3PE7E700F) in the A6.
-
Not too long ago, Apple decided to reduce the number of RAM chip orders from Samsung. Time to invest in Elpida? Or is Samsung lurking in the next phone on the shelf? That's for you to decide.
-
-
-
Chips on a board. Kinda like ants on a log.
-
STMicroelectronics LIS331DLH (2233/DSH/GFGHA) ultra low-power, high performance, three-axis linear accelerometer
-
Texas Instruments 343S0628 touch screen SoC
-
Broadcom BCM5976 touchscreen controller
-
Apple A6 application processor
-
Qualcomm MDM9615M LTE modem
-
Qualcomm RTR8600 Multi-band/mode RF transceiver, the same one found in the Samsung Galaxy S III
-
-
-
An iPhone with 4G connectivity? It's more likely than you think.
-
We can now confirm that the Qualcomm MDM9615M is the 4G LTE modem powering this new feature.
-
The Qualcomm MDM9615M is a 28 nm LTE (FDD and TDD), HSPA+, EV-DO Rev B, TD-SCDMA modem.
-
The MDM9615 allows for multi-spectrums, multi-mode LTE support. It is responsible for transmitting simultaneous voice and data transfer on LTE (provided the carrier has the infrastructure to allow simultaneous voice and data transfer.)
-
We also find the Qualcomm RTR8600 multi-band/mode RF transceiver. The RTR8600 is paired alongside the MDM9615 to support various bands, including 5 UMTS bands, and over 5 LTE and 4 EDGE bands.
-
-
-
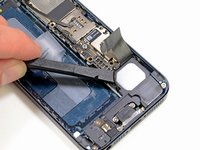
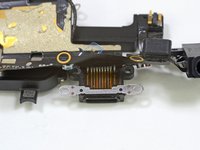
After completely dissecting the logic board, we turn our attention back to the rear case.
-
Not even a healthy heap of adhesive can stand up to our mighty spudger!
-
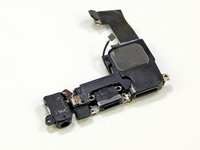
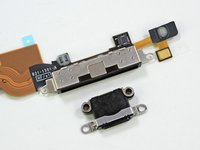
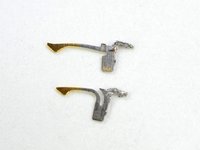
The Lightning connector assembly, which includes the headphone jack, loudspeaker, and lower microphone, comes out next.
-
It appears that the Wi-Fi antenna is also embedded into the assembly. The iPhone 5 now includes support for 2.4 GHz and 5 Ghz.
-
Antennas are sized to be fractions of full wavelengths, so the 1.23" of a quarter 2.4 GHz wave is close enough to the 1.18" of a half 5 GHz wave that a single antenna can serve both frequencies.
-
-
-
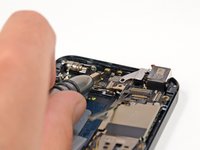
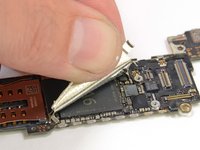
The first of three microphones comes out of the iPhone 5 along with the Lightning connector assembly.
-
It is safe to assume that the microphone located at the bottom front of the device is used for voice commands and voice calls.
-
-
-
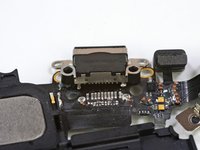
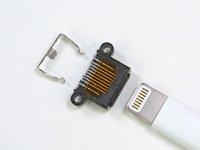
The Lightning connector looks like it could be swallowed by the the 30-pin dock connector.
-
Here we can clearly see the eight leads in the new Lightning connector.
-
While there hasn't been any official word on the pin-out for the Lightning connector, we can confidently say that two of them will be used for power and ground. As for the other six, well, that's anyone's guess.
-
Update: We now know what the pin-out of the Lightning connector is.
-
Apple claims that the Lightning connector is all digital. However, they also claim that the iPhone 5 supports analog audio-out and VGA video, indicating that there may be some kind of digital-to-analog conversion going on inside the cable.
-
-
-
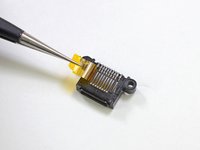
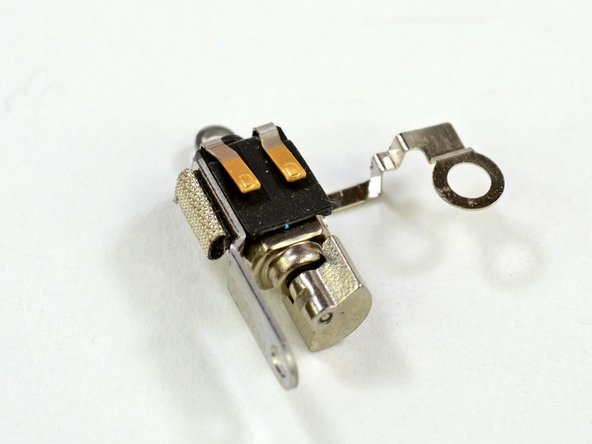
Further investigation into the Lightning connector shows a neat array of pins and a clip to hold the cable in place.
-
As can be seen in the 2nd high res picture, there are are two outermost pin that are inset from the others. This is standard practice to insure that all other signals and power are connected before the ground or power (depending if Apple decided to supply power via the outer metal shield or ground.
-
Normal practice is to connect signals and ground first and then the power is applied via the shorter pins. Time will tell and someone with a DVM as to which is the power (pin or shell).
-
Each pin (shown in the third picture) is springy and gold plated on the end to ensure good conductivity between the Lightning cable and the socket.
-
-
-
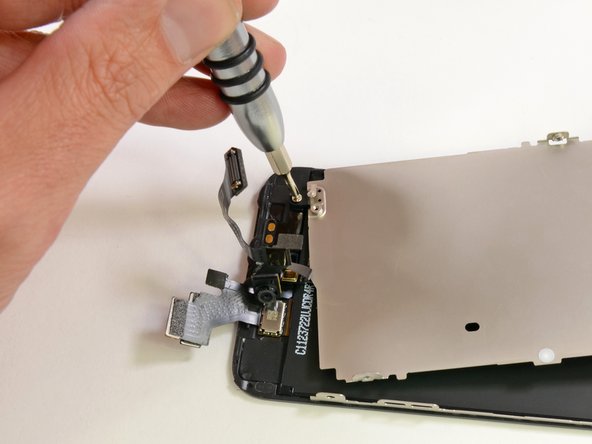
The ear speaker comes out easily with two screws and connects to the display assembly with spring contacts.
-
The speaker in the iPhone 4S was adhered to the fragile power button ribbon cable and required a lot of work to remove. Now it pops right off the display assembly—another hooray for repairability!
-
-
-
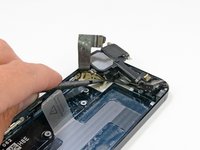
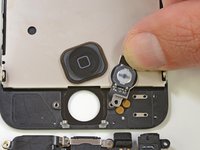
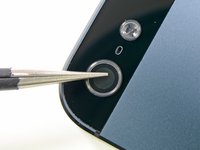
Apple's newest iteration of its classic home button sports an integrated metal support bracket, which we hope will greatly strengthen the oft-used switch.
-
Many iPhone 4 and 4S users have experienced the woes of a faulty home button, but haven't been brave enough to attempt the repair. This new design should not only increase longevity, but also make replacing the home button a lot less of a hassle.
-
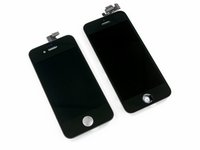
A side-by-side comparison of the iPhone 4 and iPhone 5 display assemblies. The iPhone 4s has an integrated home button.
-
-
-
What first appeared to be part of the LCD assembly is easily removed after the turn of a few screws.
-
This plate is likely used for shielding and heat dissipation. The spring contact near the screw suggests that the plate could also be used for grounding.
-
We've had some inquiries if this shield was made of Liquidmetal. Sorry to disappoint, folks, but it doesn't seem to be that alloy. The plate has the same resistance of stainless steel and is slightly magnetic, just like stainless steel.
-
-
-
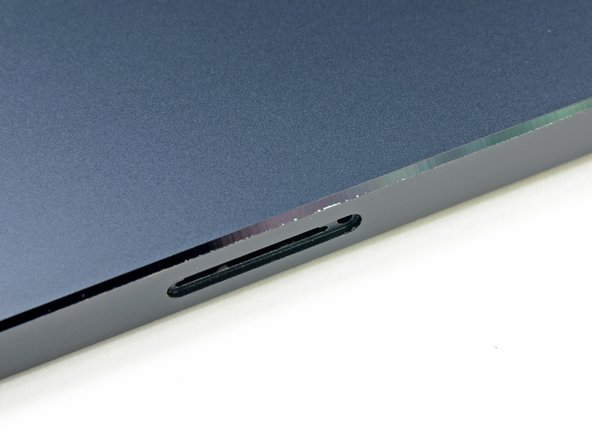
Based on a user request, we looked into the concerns about "Scuff Gate," the fear that the black coating scuffs off too easily.
-
We found that the side is pretty tough, but the chamfered edge can be susceptible to scuffing, making for a shiny streak on the side.
-
Moral of this story: be careful, or get a case. Or be free like the wind and just don't care.
-
-
-
One of the iPhone 5's biggest selling points was the updated 8 megapixel iSight camera.
-
Although it's hard to see many differences between this camera and last year's model on the outside, Sony made some significant upgrades, including improved low light performance and 40% faster image capture. iPhone 5 camera is on the left.
-
Will your pictures be this good? That depends—will you take the time to snap photos of something besides your dinner?
-
-
Tool used on this step:Tweezers$4.99
-
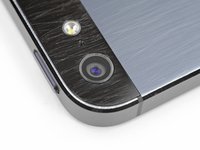
Apple was very proud of the fact that they are using a sapphire crystal in their new-and-improved camera.
-
Since sapphire is such a hard material, it would be sensible that the outermost element of the camera is made of sapphire.
-
We tried scratching the clear cover with a pair of steel tweezers and the lens remained scratch-free.
-
While this doesn't confirm that the protective cover is made from sapphire crystal, it does mean that it is quite hard and scratch resistant.
-
After giving it some thought, we decided that a few passes with a pair of tweezers wasn't a sufficiently thorough scratch test for the camera lens coating.
-
The rear case of the iPhone 5 doesn't hold up well to a barrage of sandpaper and keys, but the lens cover remains crystal clear. Wow.
-
-
-
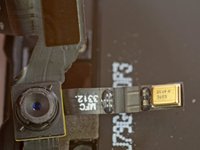
We have found them! Just as Apple promised, there are more microphones residing in the top of the device.
-
First, we find the front facing top microphone, presumably for FaceTime and speakerphone capabilities.
-
And on the back? It's starting to look like a triple microphone! The rear-facing microphone partners up with the rear-facing camera for recording video, and is also used for canceling out background noise when on calls.
-
-
-
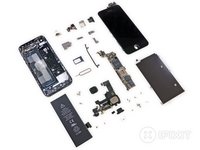
iPhone 5 Repairability: 7 out of 10 (10 is easiest to repair)
-
We're quite happy that the glass/display is the first thing that comes off the iPhone 5. The majority of iPhone repairs are due to a shattered front glass.
-
The battery comes out with a bit of prying once the front panel is removed.
-
The iPhone 5 still uses Pentalobe screws on the exterior, making it more difficult to open the device.
-
The front glass, digitizer, and LCD are all one component, thereby increasing cost of repair.
-
Lots of smaller components are soldered to one ribbon cable, increasing the cost of repairing just one component.
-


34 Guide Comments
Keep it coming guys...great.
Great job .. this is what exactly i was waiting for
AMAZING! Thanks for getting this out there! I've suspected that this phone was going to be easier to replace the screen ever since the leaked parts started pouring in.
Thank God it's not like the iPod Touch 4th Gen display.
When are you going to do a tear-down on the 5th Gen iPod touch?
cool and looks so nice too