Introduction
Dr.Wreck has finally worked up the courage to tear apart his Brand New Motorola Droid! What's inside?! Keep it locked to PhoneWreck to see the details as they arrive!
This user-contributed teardown is in response to iFixit's Droid bounty offer.
What you need
-
-
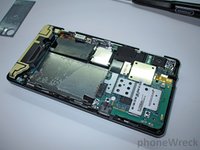
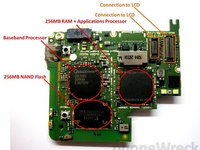
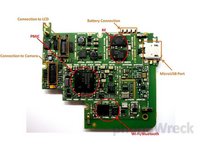
Thar she blows! Keep it locked on iFixit and PhoneWreck to see all of the details as they become available!
-
-
-
-
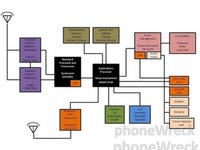
THAT'S IT! WHAT HAVE WE DONE!?
-
Stay tuned to http://www.phonewreck.com for a full teardown analysis!
-


3 Guide Comments
Headphones were tugging or yanked enough to wear out the connection, and I found these instructions invaluable. It was enough for me to get the back panel off.
The back panel has the headphone jack (visible in your last image). I stretched the spring connectors out to give more pressure, but the real problem were the pads on the flex connector -- a couple of them had holes worn in them. I applied a light coat (a dab, followed by a touch from the desoldering braid) of solder to the pads, reassembled the unit, and it works like a charm. I hope this helps anybody who has a flaky headphone connection.
Another good note would be to mark what "Droid" your making a manual for. You did fairly well but please remember Droid is only the brand and there are literally tons of models for example there is the Droid X2, X3, Droid Razr, etc. and when I was looking at this I thought it would help but this guide is absolutely useless when trying to open or fix my Droid Maxx HD since they are completely different.
I am attempting a digitizer replacement on my a855. The phone is disassebled (screws all accounted for luckily) and just got the glass piece re-taped into the bezel. Having trouble finding where the connector for the digitizer reconnects? The phone came apart and I could not see the connection point for the digitizer ribbon connector.
Thanks