Guide Introduction
Introduction
When you create a new guide or click Edit in the top-right corner of any guide, you'll be taken to the Guide Introduction.

Choose a Guide Type
To get started, choose the type of guide you’re creating from the drop-down menu. Your options include Replacement, Disassembly, Teardown, and Technique.

Category Name
Use the Category Name field to choose the category that this guide will display in. For example, if you are showing people how to add a hand brake to a Razor scooter, your category would likely be "Razor Scooter."
Introduction
Provide a basic outline of your guide in the introduction field. Advice, anecdotes, and important safety protocols all belong here. The introduction may be as brief or as lengthy as you want.

Flags
Flags tell the user about the status of a guide. A detailed discussion on the specifics of guide flags can be found on the About Flags Help Page. By default, the “In Progress” flag is added to any new guide. You may add or remove most flags by returning to the Guide Introduction tab at any point. Some flags, such as “User Contributed,” can only be removed by an administrator.
To ensure quality in all guides, any member can flag another member’s guide for any number of reasons. Some of these reasons include incorrect grammar, off-topic material, offensive text, or low-quality images. Flags are intended to point out opportunities for continuous improvement.
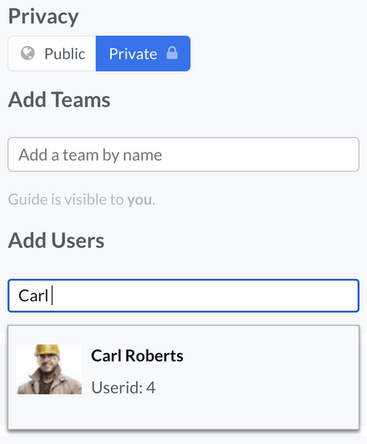
Access Control
Okay, so you've created a guide. Now it's time to control who has access to it. Guide Access Control on a Dozuki site is very flexible and can help your end users find the procedures they need quickly and easily. When you have your guide set to Public, it is viewable to every user on the site once it is published. If a guide is set to Private, it is only viewable by your privileged users (Admins and Authors) unless otherwise specified. To make exceptions to the privacy settings, type in the name of the team or individual in the specified areas. As you type, select from the drop-down menu that appears, and hit save. Once published, those specific users or teams will now have access to that content, no matter their user type.
Edit Permissions
Edit Permissions is an administrator–only feature that keeps track of edits made by site members. Set the permissions threshold from 0 to ∞ for any guide by adjusting the slider on the right side of your screen while editing the guide. Edits made to a guide by a user with a reputation lower than the permission threshold will be sent to the patrol queue for approval.
To learn more about editing permissions, see our page about the Permissions Manager.
Tags
What's the point of making a guide if no one will see it? Tags help your guide to show up in more search results. Simply add pertinent tags one-by-one, and then save them. Anyone may add, delete, or edit tags on a guide at any point.

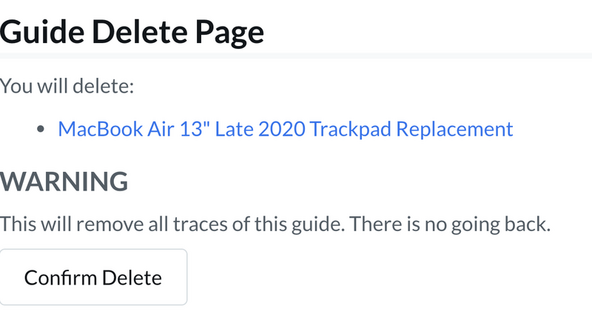
Delete Guide
Deleting a guide is an irreversible leap of faith that can only be made by a guide's creator or an administrator. Once a guide is deleted, it cannot be recovered. The Delete Guide button is located at the bottom-left of the page while editing (adjacent to the Save button).

Before clicking Delete Guide, consider repurposing or improving the guide. Deleting a guide cannot be undone, even by reverting to a previous version in the guide history.
Was this article helpful to you?
Didn't find the answer you were looking for?
Ask a QuestionYour vote has been recorded.
Tell us more. (optional)