Introduction
Nearly six years after the release of the original PlayStation 3, Sony released the third iteration of the third iteration of PlayStation console, the PlayStation 3 Super Slim. It is undeniably slim, but is it really super? Only a teardown of iFixit proportions can tell. Join us as we explore the internal hardware of a redesigned fan favorite.
Dig these killer teardowns? Follow us @iFixit to keep up to date with all kinds of teardown news.
Hey, your old PS3 giving you some YLOD sass? Use iFixit's kit to keep it out of the landfill!
What you need
-
-
Primed and ready to bare all and prove its worth, the PlayStation 3 Super Slim packs a lot of power in a super compact form factor. Notable specs include:
-
HD 1080p, 1080i, 720p, 480p, and 480i output
-
LPCM 7.1ch surround sound, Dolby Digital, Dolby Digital Plus, Dolby TrueHD, DTS, DTS-HD, AAC
-
Cell Broadband Engine™
-
RSX® GPU
-
256MB XDR Main RAM and 256MB GDDR3 VRAM
-
Available with 12 (flash memory), 250, or 500 GB (upgradable!) internal storage
-
-
-
Not that we're complaining, but we had to get our PlayStation 3 Super Slim in a bundle. It seems that after countless adventures, Nathan Drake finally found a treasure worthy of praise.
-
What exactly is included in this bundle? Glad you asked:
-
250 GB PlayStation 3 Super Slim System
-
DualShock 3 Wireless Controller
-
AV Composite Cable (sadly no HDMI cable is included in this bundle)
-
AC Power Cord
-
USB Cable (required for charging the DualShock controller)
-
Uncharted 3: Drake's Deception (Game of the Year Edition) + Dust 514 (Downloadable content included)
-
-
-
We wanted to see how the PS3 Super Slim stacks up to the standard slim model, the console it replaces.
-
Call us silly, but our test gave us the results we were expecting. The Super Slim might have gotten a bigger name, but it shed some serious size.
-
Though the backsides of both consoles look similar, they give us a lot of insight into some of the revisions made for the Super Slim.
-
For starters, the cooling vents are considerably smaller, which most likely means that the fan itself is smaller and has less heat to deal with.
-
Secondly, the port layout is shifted ever-so-slightly, answering a question we get a lot about motherboard compatibility: No, you cannot swap Slim and Super Slim motherboards.
-
-
-
Perhaps the biggest change in the new model—and biggest gripe from consumers—is the switch to a manual top-loading disc drive.
-
The door is thin, cheap-feeling plastic, and means this PS3 now requires overhead clearance to change the disc. No more cramming the PS3 into a short shelf.
-
We suspect that ditching the tray was necessary to cut both costs and size in the Super Slim. It's a design choice that has been met with a lot of criticism, though, reminding us of another recent size-conscious change.
-
In addition to the immediate benefit to Sony's margins, lowering production costs also future-proofs the PS3. When the Playstation 4 is finally released, it's almost a certainty that the PlayStation 3 Super Slim will still be sold alongside the new console, but at a much lower price point.
-
-
-
The bottom section of the Super Slim looks similar to its predecessor, with the exception of a missing Wi-Fi indicator light.
-
Still present on the front of the Super Slim are two USB 2.0 ports, a hard drive indicator light, and a plethora of supported logos—including the typical Blu-ray Disc logo.
-
-
-
The PS3 Super Slim's hard drive bay cover pops right off and reveals a bright blue Phillips screw.
-
After removing said screw, the Hitachi TravelStar Z5K320 2.5" SATA II 3.0Gbps 250 GB 5400 RPM hard drive comes right out.
-
Perhaps the coolest thing about the PlayStation's hard drive is that Sony allows you to upgrade your console with any 2.5" laptop hard drive. No fancy firmware, no wacky enclosures—just you, your console, and as much storage as you can cram in there.
-
-
-
-
Small rubber feet hide three of the outer case's screws and provide the PlayStation 3 Super Slim with some grip.
-
We don't think that these feet are much of a nuisance; they are easy to remove, add function, and clean up the look of the console.
-
Blocking access to the fourth screw, a wild Warranty Void sticker appears! And, it's gone.
-
We think that stickers like this are bogus, and we think you should, as well.
-
-
-
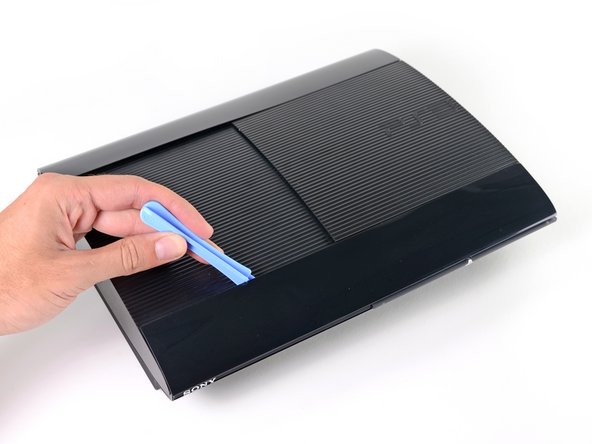
A plastic opening tool makes quick work of the outer bezels.
-
Located underneath the front outer bezel, we find the ever-tempting laser warning sticker.
-
Removing the bezels also provides access to the screws we need to remove to get inside the Super Slim.
-
-
-
After removing the top cover, we continue our exploration by removing the manual top-loading disc tray.
-
Say what you will about the tray-free disc loader in the Super Slim, but it's definitely a repair-friendly design.
-
The laser lens is labeled as KEM-850 PHA 0672 23020A.
-
We read some conflicting reports about the noise level from the PS3 Super Slim's disc drive and were sure to include a look at Sony's noise reduction efforts:
-
We found the drive is mounted on super soft rubber bumpers and surrounded by a noise-reducing plastic tray, which should dampen vibrations.
-
However, this won't do much to muffle sounds coming straight off the drive through the thin, plastic tray door.
-
-
-
The power supply module is easily removed from the rear side of the case.
-
Despite the clean layout of components, the power supply's internals are very difficult to get at, as its internal case is held together by four screws and several tough plastic clips.
-
In a similar fashion to the PS3 Slim, the power supply is designed for inputs ranging from 100V to 240V AC, making it usable across the globe.
-
It seems the overall power consumption has been lowered as well. While the PS3 Slim was rated at 12 V and 18 A DC, the Super Slim is rated at 12 V and 13 A DC.
-
-
-
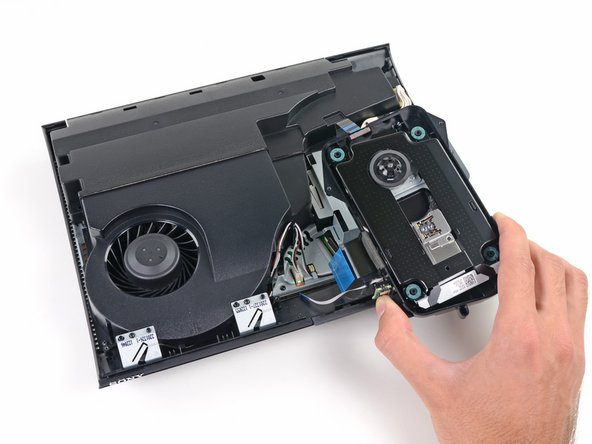
The motherboard/fan assembly is dispatched from the lower case as we continue our quest.
-
We were a bit miffed to find that the entire motherboard assembly must be removed to access the fan or heat sinks, but it does make for a very compact and solid design.
-
On the front of the fan assembly, we find the Wi-Fi and Bluetooth antennas.
-
Engraved on the antennas we find the logo for TE Connectivity. According to TE Connectivity, their "antenna designs have been applied to a wide range of wireless products including…revolutionary gaming consoles."
-
-
-
Turning the motherboard 45 degrees gives us a look at some of the major players behind the PlayStation 3 Super Slim's processing power:
-
Cell Broadband Engine CXD2996BGB
-
Hynix H5RS5223DFA 512 Megabits GDDR3 VRAM (times four chips = 256 MB)
-
Sony CXM4027R MultiAV driver
-
Panasonic MN8647091 HDMI transmitter
-
Elpida X1032BBBG-3C-F 1 Gb (on two chips for 256 MB total) XDR DRAM
-
-
-
Some of the more…Cartesian ICs on the top of the motherboard:
-
Sony RSX CXD530 "Reality Synthesizer"
-
Marvell Avastar 88W8781 SoC WLAN/Bluetooth chip
-
Sony CXD9963GB I/O bridge controller
-
Macronix MX29GL128FLT2I flash storage
-
Sony CXD5132R SATA/PATA Blu-ray drive controller
-
Integrated PCB Wi-Fi antenna
-
-
-
PS3 Super Slim Repairability: 7 out of 10 (10 is easiest to repair)
-
The hard drive is easy to access, repair, and upgrade.
-
The tray-free disc loader is modular, making it easy to replace.
-
Standard tools, except a T8 Security bit.
-
There is a pesky, but mostly harmless "Warranty Void" sticker.
-
Power supply is held behind lots of clips; however, we don't expect many internal repairs to the power supply.
-
The entire motherboard assembly must be removed to access the fan or heat sinks.
-
Sliding disc tray door feels janky, and may break after repeated use.
-


37 Comments
You write:
> The tray-free disc loader is modular, making it easy to replace.
Are you sure? My best guess would be that the drive assembly is matched against the motherboard so you cannot switch the unit. At least that has been the usual Sony DRM policy. The custom "SW3-302 SCEI 1220EM42E" could well be doing the DRM stuff on the motherboard side, but you didn't disassemble the bluray unit, so it's hard to tell..
You write:
> Power supply is held behind lots of clips; however, we don't expect many internal repairs to the power supply.
With two capacitors (on the left of your picture) right next to the heat sink of two diodes I'd expect a fair amount of capacitor replacing coming in about two years from now..
The tray free loader is modular, and there's no DRM on the mechanism as you wrongly state. The control logic with encryption is built into the motherboard on these, so the whole optical deck including laser can be swapped out and replaced.
The bad thing is, typical Sony style is if the BluRay logic actually goes bad the whole mainboard has got to be replaced unless you know someone who's professional at re-balling (not reflowing) and can replace the circuitry and dump the encryption keys.
Never seen the V-Ram on the substrate before - won't that make GPU replacement pretty expensive?
They used this design since the original PS3
This is how the original 90nm GPU looks like after removing the IHS
I thougt the super slim ps3 super cheaper for sony to make. I am not talking about rubbish bluray top loading. Look at the logic board PCB. Full of smd rat $#$*. Compare that with original ps3 slim logic board. Thanks to proadlizer, the PCB is super clean without rat @!#*