Introduction
The allure of Spring is in the air. Feel the weather warming up. The hills covered with blooming flowers. And with Spring comes the reemergence of berries, specifically BlackBerrys. The BlackBerry Z10 is BlackBerry's (the company formerly known as RIM) newest flagship smartphone. Join us as we discover the juicy secrets that dwell inside the BlackBerry Z10.
Follow iFixit on Twitter or "Like" us on Facebook for the latest updates on teardowns!
What you need
-
-
The BlackBerry Z10 is finally here. As BlackBerry's first dual-core smartphone, how does it stack up spec-wise? Let's find out.
-
Tech Specs:
-
4.2" display with a resolution of 1280x768 pixels, (~356 ppi pixel density)
-
Dual band (2.4 GHz / 5 GHz) Wi-Fi 802.11 a/b/g/n and Bluetooth 4.0 Low Energy (LE)
-
8 MP rear-facing camera with autofocus, a 5-element f/2.2 lens (1080p HD Video) + LED flash, and a 2 MP front-facing camera (720p HD Video)
-
1800 mAh removable battery with up to 10 hours of talk time
-
2 GB RAM with 16 GB internal flash memory and support for microSD memory cards (expandable up to 32 GB)
-
-
-
Removing the rear case simply requires prying a few clips around the perimeter of the Z10. Easy peasy.
-
The rear panel contains an integrated NFC antenna, similar to the antenna found in the Samsung Nexus S.
-
-
-
The 3.8 V, 1800 mAh Lithium-ion battery allows for up to 10 hours of talk time on 3G with up to 13 days of standby time.
-
If you're wondering how the BlackBerry Z10 stacks up to its competitors, wonder no more:
-
Nexus 4: 3.8 V, 2100 mAh battery with over 10 hours of talk time.
-
iPhone 5: 3.8 V, 1440 mAh with up to 8 hours of talk time on 3G.
-
-
-
-
Several screws secure the plastic midframe to the outer plastic frame.
-
Ha! Nice try BlackBerry…Fool us once, shame on you; fool us twice, and we'll be forced to use our spudger to remove a small sticker revealing a hidden screw.
-
With the screws out of the way, the plastic midframe just pops off.
-
-
-
This is a surprise. It seems the screws that secured the plastic midframe to the outer case also doubled as fasteners for the motherboard.
-
With the screws already removed, the motherboard is held in place by only a few connectors.
-
Absolutely zero adhesive holding down this motherboard. We'll say that again. Absolutely NO ADHESIVE. Wonderful. It's as free as a bird, now.
-
-
-
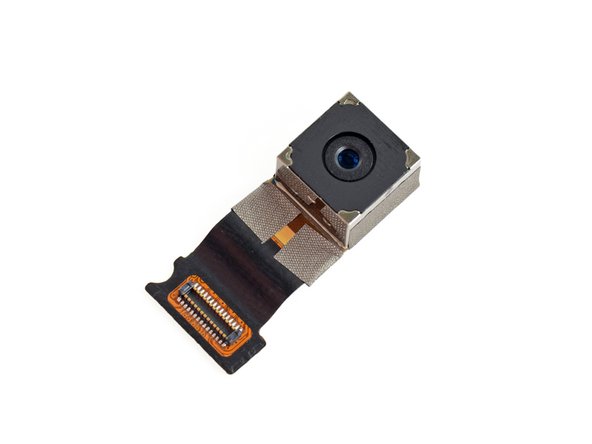
The rear-facing camera is dispatched from the motherboard with ease.
-
The 8 megapixel auto-focus camera has a 5-element f/2.2 lens, with a dedicated ISP (image signal processor) and 64 MB frame buffer.
-
A Backside Illumination sensor increases the amount of light captured, greatly improving low-light performance.
-
-
-
A few of the major ICs on the backside of the motherboard:
-
Samsung KLMAG2GE4A 16 GB MLC NAND Flash + Controller
-
Avago ACPM-7051 Quad-Band GSM/EDGE and Dual-Band UMTS (B1/B5) Power Amplifier
-
Inside Secure SecuRead 972-DC-C6 NFC Solution Module
-
Qualcomm WCD9310 Audio Codec
-
ST Microelectronics LIS3DH 3-axis MEMS Accelerometer
-
STMicroelectronics LSM330DLC 3D Accelerometer & 3D Gyroscope
-
-
-
Front side of the motherboard:
-
Samsung K3PE0E000A XG 2 GB Mobile DDR2 SDRAM + Qualcomm MSM8960 Snapdragon S4 Baseband/Applications Processor
-
Qualcomm PM8921 Power Management IC
-
Qualcomm RTR8600 Multi-band/mode RF transceiver, the same one found in the Samsung Galaxy S III and iPhone 5
-
Texas Instruments WL1273L Wireless Module (802.11a/b/g/n, WLAN, Bluetooth, and FM)
-
TriQuint TQP6M9017 Dual-Band WLAN Module
-
RF Micro Devices RF7252 Linear Power Amplifier Module
-
Avago ACPM-5017 LTE Band XVII Power Amplifier
-
-
-
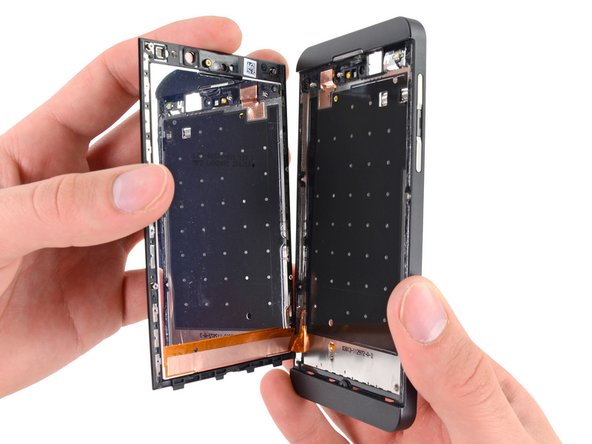
With the motherboard out of the way, we're ready to tackle the display assembly.
-
It's held in place with several smaller-than-usual screws (T2 Torx) and just a few light adhesive strips—no match for our prying experts.
-
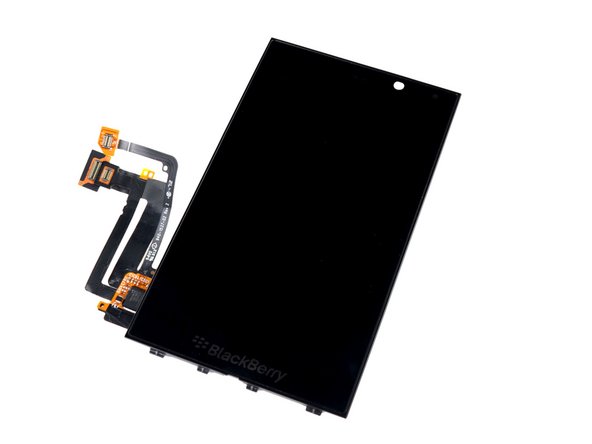
Peeling the display assembly off the outer plastic frame reveals a convenient pocket-mirror on the back of the LCD. Convenient for anyone who cares more about reflections than a functional Z10.
-
-
-
The downside: Shattering the glass means losing all touchscreen capabilities. A drop from ear-height on concrete spells death.
-
The display gets three cables which correspond to, as far as we can judge, the LCD, digitizer, and backlight.
-
The digitizer cable is home to the Synaptics Clearpad 3203 Capacitive Touchscreen Controller to manage all the snazzy Z10 gestures.
-
-
-
While major components come out of the BlackBerry Z10 without much fuss, once you get down to the small case peripherals, things get a little more dicey.
-
The headphone jack, power switch, ambient light sensor, and earpiece speaker housing are built into a single assembly, held in place with some tough adhesive.
-
We set our spudger to work against more adhesive, this time holding the rotary vibrator motor very securely in place.
-
-
-
BlackBerry Z10 Repairability Score: 8 out of 10 (10 is easiest to repair)
-
The battery can be replaced without any tools.
-
Motherboard and display come out with little difficulty and are held in place with little adhesive.
-
Standard screws are used throughout the device.
-
Although the display assembly comes out fairly easily, the LCD is fused to the glass, increasing cost of repair.
-
Smaller components (headphone jack, camera) are modular and can be replaced individually, but have somewhat strong adhesive holding them in place.
-


16 Comments
Does anyone know where to buy replacement parts for this phone?
I found that you can buy almost anything cheaply from China. etradesupply.com, which I got to via e-bay links, seems to have lots of Blackberry parts, and if you can't find a picture of the part you want, they can often find it if you ask. For example, I got a new micro SD card reader for my Classic, though all the pics were of SIM readers till I asked. After that I had several all trying to outdo each other on tiny prices that wouldn't even cover the postage in this country! Many of them come with the necessary tools for the strip down free too.
Incidentally, some of the suppliers listed are flogging off broken phones for spares or repair very cheaply too, so, if it's buttons and the like you want, just buy a broken phone.
Spamlet -
I have found that this requires a T1 and T3 Torx. Not a T2 and T4 as advised above.
I have what looks like a small circle of rubber, maybe thermal paste, between my Snapdragon and the case that isn't pictured in the teardown.
And I think the T1/T3 comment is spot on. I used a T3 to remove all the main screws, but don't have anything small enough to take out the monitor, at the moment.