
iPod Touch 3rd Generation Display Replacement

What you need

  1. iPod Touch 3rd Generation Display Replacement, Front Panel: step 1, image 1 of 1
    • The glass front panel on the third generation Touch has a plastic frame glued both to its outer edge and also under the wide black strips at the top and bottom of the device.

    • The picture at left (front panel already removed) shows the locations of the metal clips (shown in red) that snap on to the plastic frame. In the next few steps, try to pry the front panel up from the gaps between these clips.

    • Also, be mindful of the very thin and delicate touch screen ribbon cable (connector location shown in green) attaching the front panel to the upper left corner of the Touch.

  2. iPod Touch 3rd Generation Display Replacement: step 2, image 1 of 2 iPod Touch 3rd Generation Display Replacement: step 2, image 2 of 2
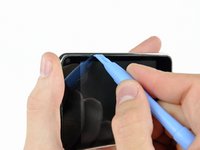
    • Gently insert an iPod opening tool between the glass front panel and its plastic surround near the volume adjust buttons.

    • Rotate the tool away from the Touch to pry up on the glass panel.

    • The key is to work slowly and gently to avoid breaking internal components.

  3. iPod Touch 3rd Generation Display Replacement: step 3, image 1 of 2 iPod Touch 3rd Generation Display Replacement: step 3, image 2 of 2
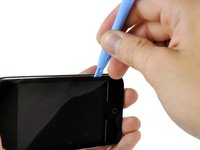
    • Insert the iPod opening tool between the front panel and its plastic surround and pry up at several points along the left edge of the Touch.

    • Do not insert the tool and run it down the edge of the front panel, as it will damage the front panel itself and the rubber strip along the plastic surround. It is best to work at one point, pry up, then remove the tool and reinsert it at the next spot to be pryed up.

  4. iPod Touch 3rd Generation Display Replacement: step 4, image 1 of 2 iPod Touch 3rd Generation Display Replacement: step 4, image 2 of 2
    • Continue prying up the left edge until the top and bottom edges start to lift out of the Touch.

    • Once the top and bottom edges have lifted slightly out of the Touch, use the opening tool to assure the plastic surround is detached from the clips along the inside of the Touch.

  5. iPod Touch 3rd Generation Display Replacement: step 5, image 1 of 1
    • Continue the prying procedure, now focusing on detaching the plastic surround from the internal metal clips.

    • Pry along the top edge of the Touch to further separate the front panel from the rest of the device.

  6. iPod Touch 3rd Generation Display Replacement: step 6, image 1 of 3 iPod Touch 3rd Generation Display Replacement: step 6, image 2 of 3 iPod Touch 3rd Generation Display Replacement: step 6, image 3 of 3
    • Pry up the front panel along the right edge using the method described in previous steps.

    • Eventually work around the entire perimeter of the front panel until it is lifted slightly from the rear panel.

    • Also, ensure that the plastic surround is separated from the clips in the rear panel.

  7. iPod Touch 3rd Generation Display Replacement: step 7, image 1 of 1
    • Lift the front panel out of the rear case minding the cable still attaching it near the upper left corner of the Touch.

  8. iPod Touch 3rd Generation Display Replacement: step 8, image 1 of 1
    • Use the flat end of a spudger (or an opening tool) to very carefully pry the touch screen cable connector up off the upper logic board.

    • The touch screen ribbon cable is extremely fragile! Be very gentle in disconnecting this cable to prevent tearing the ribbon cable.

    • Now that the front panel is out, check it for damage. If the plastic surround is not flush with the front face of the glass panel, gently peel it off and stick it down.

    • Be careful not to scratch the front panel on the underside of the black portions, as the scratches will be visible once the device is reassembled.

    • Be sure to clean both the face of the display and the inner surface of the front panel, as any dust or fingerprints will be trapped inside the Touch once it is fully reassembled.

  9. iPod Touch 3rd Generation Display Replacement, Display: step 9, image 1 of 1
    • Insert a small iPod opening tool with the edge angled up toward the underside of the display between the white plastic backlight and the metal shield beneath it.

    • Pry up along the lower edge of the display enough to grab it with your fingers, being careful to not flex the screen.

  10. iPod Touch 3rd Generation Display Replacement: step 10, image 1 of 1
    • Lift the display up from its lower edge and rotate it toward the top of the Touch.

    • The next few steps require removal of components under where the display normally sits. Be sure to hold the display to avoid putting tension on the delicate display ribbon cable.

    • Remove the seven Phillips screws securing the metal display tray to the rear panel. They may be very tight; watch carefully to make sure you don't strip them.

    • The two darker screws belong in the two holes in the tray nearest the bottom edge of the Touch.

  11. iPod Touch 3rd Generation Display Replacement: step 11, image 1 of 1
    • Lay the display back down into its tray.

    • Remove the final Phillips screw securing the metal tray to the rear panel.

  12. iPod Touch 3rd Generation Display Replacement: step 12, image 1 of 1
    • Lift the display out of the metal tray and rotate it toward the top edge of the Touch.

    • Use an iPod opening tool to lift the metal display tray and rotate it up toward the top edge of the Touch.

  13. iPod Touch 3rd Generation Display Replacement: step 13, image 1 of 1
    • Use the edge of an iPod opening tool to peel the copper tape off the top edge of the display.

    • Leave the copper tape attached to the metal display tray.

  14. iPod Touch 3rd Generation Display Replacement: step 14, image 1 of 1
    • Use the edge of an iPod opening tool to remove the piece of tape covering the display data cable.

  15. iPod Touch 3rd Generation Display Replacement: step 15, image 1 of 1
    • Use an iPod opening tool to pry the display data cable connector up off its socket on the logic board.

  16. iPod Touch 3rd Generation Display Replacement: step 16, image 1 of 1
    • Peel the display data cable off the adhesive securing it to the rear panel.

  17. iPod Touch 3rd Generation Display Replacement: step 17, image 1 of 1
    • Lift the metal display tray slightly (the battery is attached to its underside) and remove the display from the Touch, minding its delicate cable that may get caught.

    • The display ribbon cable is routed under the metal display tray.

Conclusion

To reassemble your device, follow these instructions in reverse order.

72 other people completed this guide.

3 Comments

A few years ago, the screen of my iPod Touch was failing (at that time, I had left it to my son). I asked for a new display and the iPod came back up. Later we bought my son an iPhone, and the iPod left it to my daughter, but again the display failed again. I requested another display, but now only the "white screen of death" is displayed. It is heard that it turns on, but the display goes white and then goes out. I tried to reset it but there was no success. My MacBook recognizes, it can be seen on iTunes. Any suggestion?

[deleted] - Reply

Hi Daniel, I’m guessing that it could be improper installation of the screen or static discharge. It does happen, you want to touch something metallic to discharge the static electricity before handling the screen, and wear gloves too.

Kuromi - Reply

Hii, when will these products be back in stock???

For iPod Touch 3rd Generation…

Thomas Xavier - Reply

Add Comment

View Statistics:

Past 24 Hours: 2

Past 7 Days: 24

Past 30 Days: 118

All Time: 141,514