
iPod Nano 3rd Generation Battery Replacement

What you need

  1. iPod Nano 3rd Generation Battery Replacement, Rear Panel: step 1, image 1 of 1
    • Please be aware that removing the rear panel from the back of the iPod will cause considerable damage to the rear panel. We highly recommend purchasing an additional rear panel to properly reassemble the iPod.

    • Before opening your iPod, ensure that the hold switch is in the locked position.

  2. iPod Nano 3rd Generation Battery Replacement: step 2, image 1 of 1
    • The rear panel is secured to the front case by eight clips permanently attached to the rear panel. These clips lock onto small tabs machined into the front case.

    • To free the tabs, they must be pushed toward the center of the Nano. Note the location of all tabs on the rear panel. When using an iPod opening tool to free the rear panel, be sure to work the tool at the location of these clips.

    • To aid in visualization, the two clips boxed in red are located closest to the headphone jack.

  3. iPod Nano 3rd Generation Battery Replacement: step 3, image 1 of 2 iPod Nano 3rd Generation Battery Replacement: step 3, image 2 of 2
    • Opening the iPod can be challenging. Don't get discouraged if it takes you a few tries before the iPod is opened.

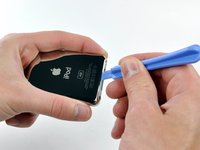
    • Insert the large iPod opening tool into the seam between the front case and rear panel of the iPod, above the dock connector. The tool's edge should point toward the rear panel to prevent any accidental scratching of the anodized aluminum front case.

  4. iPod Nano 3rd Generation Battery Replacement: step 4, image 1 of 1
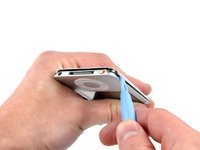
    • Insert a small iPod opening tool into the seam on the headphone jack side of the Nano, with the edge of the tool pointing toward the rear panel.

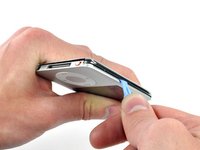
    • Gently enlarge the existing gap by pressing/wiggling the small iPod opening tool into the gap near each of the the two tabs attached to the rear case, pushing the clips toward the center of the Nano until both have been freed.

  5. iPod Nano 3rd Generation Battery Replacement: step 5, image 1 of 2 iPod Nano 3rd Generation Battery Replacement: step 5, image 2 of 2
    • The large iPod opening tool is no longer needed to gain access to the left side of the iPod.

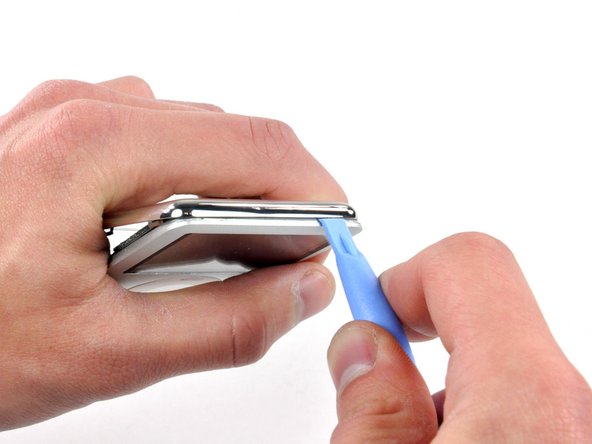
    • Repeat the same procedure listed in the previous step to free the three clips along the hold switch side of the Nano.

  6. iPod Nano 3rd Generation Battery Replacement: step 6, image 1 of 1
    • Insert an iPod opening tool into the gap near the top left corner of the Nano and work to free the three clips along the top edge of the rear panel.

    • After ensuring all tabs are free, separate the two halves of the iPod.

    • The rear panel is now free from the iPod.

  7. iPod Nano 3rd Generation Battery Replacement, Logic Board: step 7, image 1 of 1
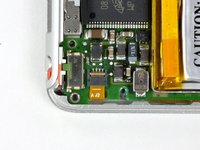
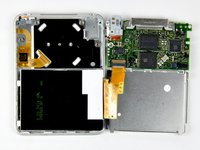
    • With the rear case removed, the back side of your Nano should now look like this.

  8. iPod Nano 3rd Generation Battery Replacement: step 8, image 1 of 1
    • Remove the following six screws:

    • One 1.8 mm Phillips.

    • Three 1.9 mm Phillips.

    • One 2.4 mm Phillips.

    • One 2.6 mm Phillips.

  9. iPod Nano 3rd Generation Battery Replacement: step 9, image 1 of 2 iPod Nano 3rd Generation Battery Replacement: step 9, image 2 of 2
    • Using a spudger, flip up the brown click wheel ribbon cable retaining clip.

    • The clip is hinged at the end nearest the edge of the case.

  10. iPod Nano 3rd Generation Battery Replacement: step 10, image 1 of 1
    • Use the tip of a spudger to slide the click wheel ribbon cable out of its socket.

    • The logic board is still connected to the iPod by the display ribbon cable.

  11. iPod Nano 3rd Generation Battery Replacement: step 11, image 1 of 2 iPod Nano 3rd Generation Battery Replacement: step 11, image 2 of 2
    • The logic board is still connected to the front case by the display ribbon cable, located on the headphone jack side of the logic board.

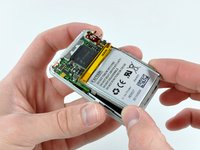
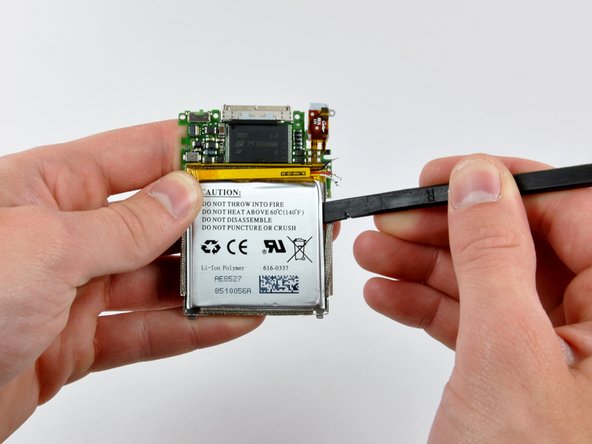
    • Lift the logic board assembly out of the front case from the click wheel connector side (the cable you just disconnected). Rotate the logic board assembly about the display ribbon cable and lay it next to the front case.

  12. iPod Nano 3rd Generation Battery Replacement: step 12, image 1 of 1
    • Use a spudger to flip up the display ribbon cable retaining clip.

    • The retaining clip is hinged about the end nearest the battery.

  13. iPod Nano 3rd Generation Battery Replacement: step 13, image 1 of 1
    • Slide the display ribbon cable out of its socket.

    • The logic board is now completely disconnected from the front case.

  14. iPod Nano 3rd Generation Battery Replacement, Battery: step 14, image 1 of 2 iPod Nano 3rd Generation Battery Replacement, Battery: step 14, image 2 of 2
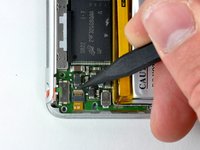
    • Before proceeding, remove the metal EMI finger shown by pulling it away from the adhesive on the logic board.

    • Do not forget to reinstall this during reassembly.

  15. iPod Nano 3rd Generation Battery Replacement: step 15, image 1 of 1
    • Battery replacement on the iPod Nano 3rd Generation requires soldering. Before proceeding, be sure you have all the required tools and a general feel for soldering small electronic components.

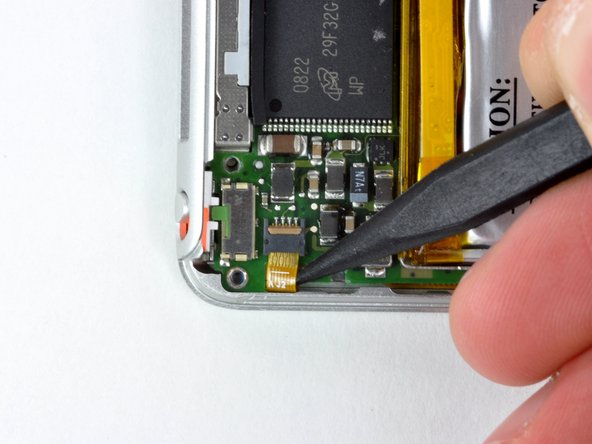
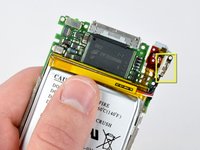
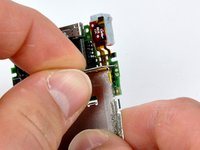
    • Before de-soldering the battery cables, you must remove a small amount of black rubbery adhesive securing them to the logic board.

  16. iPod Nano 3rd Generation Battery Replacement: step 16, image 1 of 1
    • Push the tip of a spudger beneath the rubber adhesive and toward the battery to free it from the surface of the logic board.

    • Start freeing the adhesive from around one of the outer leads, then free it from the two gaps between leads, and finally push the spudger along the back side of the leads to completely remove it from the logic board/battery leads.

    • The battery leads are delicate, so be careful to not tear them while removing the black adhesive.

  17. iPod Nano 3rd Generation Battery Replacement: step 17, image 1 of 1
    • The battery leads, now free of adhesive, should look like this.

  18. iPod Nano 3rd Generation Battery Replacement: step 18, image 1 of 1
    • The next few steps require a soldering iron.

    • The ends of the battery leads are fed through small holes in the logic board and held in place by a small amount of solder.

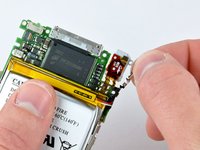
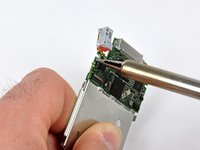
    • Begin by heating the exposed end of the white battery lead with the tip of a soldering iron while simultaneously pulling the lead away from the connection, using tweezers to grasp the lead by the insulation.

    • Due to the delicate nature of electronic components, it is imperative to limit the amount of heat transferred from the soldering iron to the logic board. An easy way to accomplish this is to pull on the battery lead with light continuous tension while the soldering iron heats up the connection. As soon as the solder melts and the lead slides out, immediately lift the solder tip off the connection to avoid damage.

  19. iPod Nano 3rd Generation Battery Replacement: step 19, image 1 of 2 iPod Nano 3rd Generation Battery Replacement: step 19, image 2 of 2
    • De-solder the remaining leads, following the procedure illustrated in the previous step.

  20. iPod Nano 3rd Generation Battery Replacement: step 20, image 1 of 1
    • All leads should now be de-soldered and disconnected from the logic board.

  21. iPod Nano 3rd Generation Battery Replacement: step 21, image 1 of 2 iPod Nano 3rd Generation Battery Replacement: step 21, image 2 of 2
    • Using a spudger, pry the battery up from the adhesive holding it to the battery shield.

    • Start prying at the upper right corner of the battery and work your way around the perimeter until the battery has lifted enough to grab it with your fingers.

    • Remove the battery from the battery shield.

  22. iPod Nano 3rd Generation Battery Replacement, Battery: step 22, image 1 of 2 iPod Nano 3rd Generation Battery Replacement, Battery: step 22, image 2 of 2
    • To aid in soldering the new battery in place, be sure the holes through the solder pads on the logic board are clear of solder. This way, you can insert the new battery leads and solder them in place rather than heating the solder pad while simultaneously inserting the battery lead and applying solder.

    • To open the solder holes, straighten out a staple and push it against the solder blocking the hole while simultaneously heating the same solder pad from the other side of the logic board.

    • Do not overheat the logic board. If the staple does not make it through on the first try, allow the logic board to first cool down, then reheat the pad. Repeat this process until the staple is pushed all the way through the hole.

  23. iPod Nano 3rd Generation Battery Replacement: step 23, image 1 of 1
    • Place the new battery in the metal battery tray, sticking it down to the adhesive.

  24. iPod Nano 3rd Generation Battery Replacement: step 24, image 1 of 3 iPod Nano 3rd Generation Battery Replacement: step 24, image 2 of 3 iPod Nano 3rd Generation Battery Replacement: step 24, image 3 of 3
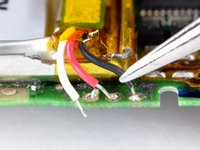
    • Using a pair of tweezers, insert the stripped ends of the battery leads into their respective holes.

    • Insert the black lead into the rightmost hole.

    • Insert the red lead into the center hole.

    • Insert the white lead into the leftmost hole.

    • To keep the leads in place, it may be helpful to first bend the insulated portion of the battery leads into their final shape, then insert the stripped ends into the holes.

  25. iPod Nano 3rd Generation Battery Replacement: step 25, image 1 of 1
    • In this step, you will solder the battery leads to the solder pads on the logic board.

    • Excess amounts of heat transferred to the logic board while soldering may result in permanent electronic component damage. As a rule of thumb, only hold the tip of the soldering iron against the joint just long enough to melt the solder, then quickly remove it.

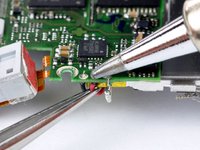
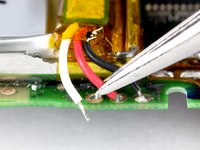
    • Solder the connection by momentarily placing the tip of the soldering iron against the connection, pressing solder into the connection (melting it), and quickly removing both the solder and the tip of the soldering iron from the connection. The solder should flow around the new battery lead, solidly connecting it to the pad on the logic board.

    • Solder the other two battery leads in the same fashion, taking special care not to bridge any of the connections together with solder.

Conclusion

To reassemble your device, follow these instructions in reverse order.

114 other people completed this guide.

18 Comments

I have one suggestion about replacing the back cover after you are all done (If you did not purchase a new replacement cover). I noticed that in the process of removing the back cover, the metal clips get bent up. This causes the cover to be very loose when you replace it (this is the "considerable damage" I presume the article talks about. In order to get a tight fit, you must press down the clips very gently. One of the tack welds came off of mine, and I had to remove one of the metal tabs because it was useless, so be careful. Anyway, keep this in mind and you won't have to buy a new back cover. Thanks for the article, it really helped!

Mag748 - Reply

definitely get the back cover

gdohmeier - Reply

This is NO EASY TASK. Much HARDER than the steps shown here. There is no way in !@#$ the plastic tool will separate the case...but I am sure someone will say there is.

Not I though.

I will be purchasing the back case now since it is obvious to me after receiving the replacement battery in the mail that I am going to butcher this thing up and the clips.

Peace.

scederas - Reply

I totally agree, the plastic tool broke the tangs right away. I had to use a small flat blade jewelers screwdriver to pry around. And yes, I bought a new cover

Bud -

I successfully opened the ipod with a walmart brand set that contained a large and small plastic tool. You gotta work it.

Logan Carbin -

Add Comment

View Statistics:

Past 24 Hours: 74

Past 7 Days: 371

Past 30 Days: 1,584

All Time: 263,829