iPhone 6s Plus Opening Procedure

Prerequisite Only
This guide is only intended to be used as a prerequisite for other guides. It's incomplete by itself.

What you need

  1. iPhone 6s Plus Opening Procedure, Pentalobe Screws: step 1, image 1 of 1
    • Before disassembling your iPhone, discharge the battery below 25%. A charged lithium-ion battery can catch fire and/or explode if accidentally punctured.

    • Power off your iPhone before beginning disassembly.

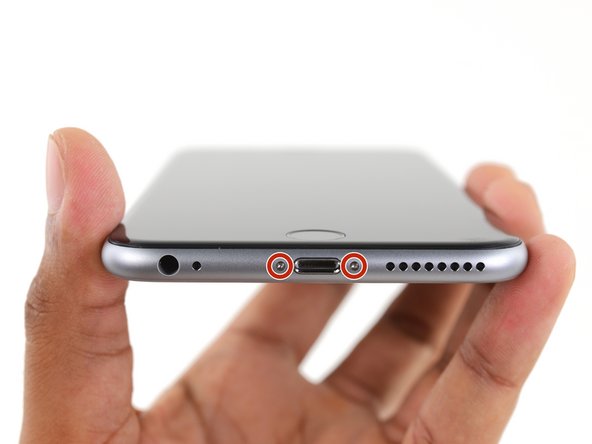
    • Remove the two 3.4 mm Pentalobe screws on either side of the Lightning port.

  2. iPhone 6s Plus Opening Procedure, Opening Procedure: step 2, image 1 of 1
    • Optionally, apply mild heat to the lower edge of the iPhone using an iOpener or hair dryer for about a minute.

    • Heat softens the adhesive securing the display, making it easier to open.

  3. iPhone 6s Plus Opening Procedure: step 3, image 1 of 1
    • Opening the display on the 6s Plus separates a thin strip of adhesive around the perimeter of the display. If you prefer to replace the adhesive, have a set of new adhesive strips ready before you continue. It's possible to complete the repair without replacing the adhesive, and you probably won't notice any difference in functionality.

    • Apply a suction cup to the lower left corner of the display assembly.

  4. iPhone 6s Plus Opening Procedure: step 4, image 1 of 2 iPhone 6s Plus Opening Procedure: step 4, image 2 of 2
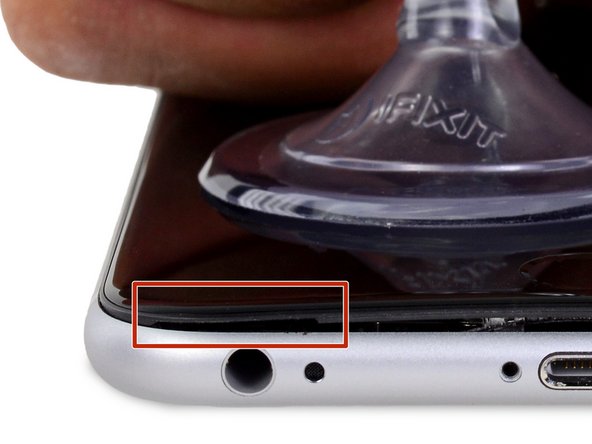
    • Pull up on the suction cup with firm, constant pressure to create a slight gap between the front panel and rear case.

    • Pulling too hard may damage the display assembly. Apply just enough pressure to create a small gap between the display assembly and the rear case.

  5. iPhone 6s Plus Opening Procedure: step 5, image 1 of 3 iPhone 6s Plus Opening Procedure: step 5, image 2 of 3 iPhone 6s Plus Opening Procedure: step 5, image 3 of 3
    • The safest place to pry from is the notch in the front panel above the headphone jack.

    • While still maintaining pressure on the suction cup, insert the flat tip of a spudger into the gap, directly above the headphone jack.

  6. iPhone 6s Plus Opening Procedure: step 6, image 1 of 2 iPhone 6s Plus Opening Procedure: step 6, image 2 of 2
    • Twist the spudger to widen the gap between the front panel and the rear case.

  7. iPhone 6s Plus Opening Procedure: step 7, image 1 of 3 iPhone 6s Plus Opening Procedure: step 7, image 2 of 3 iPhone 6s Plus Opening Procedure: step 7, image 3 of 3
    • While firmly pulling up on the suction cup, slide the edge of the spudger under the bottom left corner of the display.

  8. iPhone 6s Plus Opening Procedure: step 8, image 1 of 2 iPhone 6s Plus Opening Procedure: step 8, image 2 of 2
    • Slide the tip of the spudger up the left side of the phone, between the front panel and the rear case.

  9. iPhone 6s Plus Opening Procedure: step 9, image 1 of 2 iPhone 6s Plus Opening Procedure: step 9, image 2 of 2
    • Insert the flat tip of the spudger under the right edge of the display.

    • Slide the spudger up the right side.

  10. iPhone 6s Plus Opening Procedure: step 10, image 1 of 2 iPhone 6s Plus Opening Procedure: step 10, image 2 of 2
    • Use a plastic opening tool to hold down the rear case while pulling up the suction cup to open the phone.

    • Do not remove the display completely, or you will damage the data cables connecting the display near the top edge of the iPhone.

  11. iPhone 6s Plus Opening Procedure: step 11, image 1 of 2 iPhone 6s Plus Opening Procedure: step 11, image 2 of 2
    • Pull up on the small nub on the suction cup to remove it from the display.

  12. iPhone 6s Plus Opening Procedure: step 12, image 1 of 3 iPhone 6s Plus Opening Procedure: step 12, image 2 of 3 iPhone 6s Plus Opening Procedure: step 12, image 3 of 3
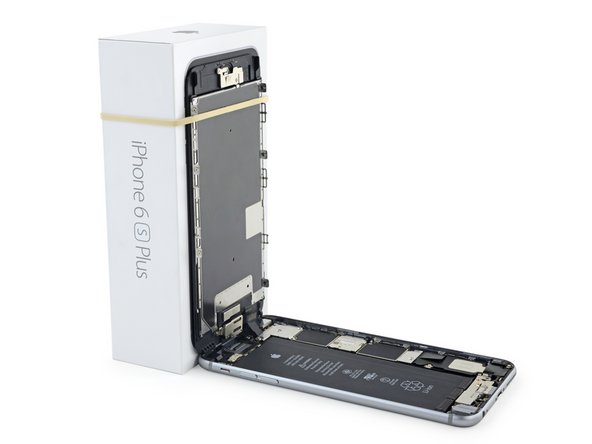
    • Gently grasp the display assembly and lift it up to open the phone, using the clips at the top of the front panel as a hinge.

    • Open the display to about a 90º angle, and lean it against something to keep it propped up while you're working on the phone.

    • Don't open the display more than 90º—it is still connected to the top of the phone by the display, digitizer, and front camera cables which can tear easily.

    • Add a rubber band to keep the display securely in place while you work. This prevents undue strain on the display cables.

    • In a pinch, you can use an unopened canned beverage to support the display.

Dante Mazzanti

Member since: 07/13/15

36,177 Reputation

26 Guides authored

View Statistics:

Past 24 Hours: 2

Past 7 Days: 10

Past 30 Days: 11

All Time: 784