iPhone 4S Battery Replacement

What you need

Video Overview

  1. iPhone 4S Battery Replacement, Rear Panel: step 1, image 1 of 1
    • Before you begin, discharge your iPhone battery below 25%. A charged lithium-ion battery can catch fire and/or explode if accidentally punctured.

    • Power off your iPhone before beginning disassembly.

    • Remove the two 3.6 mm Pentalobe P2 screws next to the dock connector.

    • Be sure the driver is well-seated when removing Pentalobe screws—they are easy to strip.

  2. iPhone 4S Battery Replacement: step 2, image 1 of 2 iPhone 4S Battery Replacement: step 2, image 2 of 2
    • Push the rear panel toward the top edge of the iPhone.

    • The panel will move about 2 mm.

  3. iPhone 4S Battery Replacement: step 3, image 1 of 1
    • Pull the rear panel away from the back of the iPhone, being careful not to damage the plastic clips attached to the rear panel.

    • Remove the rear panel from the iPhone.

  4. iPhone 4S Battery Replacement, Battery: step 4, image 1 of 2 iPhone 4S Battery Replacement, Battery: step 4, image 2 of 2
    • Remove the following screws securing the battery connector to the logic board:

    • One 1.7 mm Phillips screw

    • One 1.5 mm Phillips screw

  5. iPhone 4S Battery Replacement: step 5, image 1 of 3 iPhone 4S Battery Replacement: step 5, image 2 of 3 iPhone 4S Battery Replacement: step 5, image 3 of 3
    • Carefully push the pressure contact away from the battery connector until it slides free from its position.

    • Remove the pressure contact.

  6. iPhone 4S Battery Replacement: step 6, image 1 of 3 iPhone 4S Battery Replacement: step 6, image 2 of 3 iPhone 4S Battery Replacement: step 6, image 3 of 3
    • Use a plastic opening tool to gently pry up the battery connector from its socket on the logic board.

    • Place the tip of the tool between the loudspeaker enclosure and the metal cover of the connector, and lift the bottom edge of the connector first.

    • The battery connector comes off vertically from the logic board. Do not apply force sideways.

    • Be careful not to pry at the battery connector socket itself, or it may detach from the logic board. There are four very small solder points awaiting this mistake!

  7. iPhone 4S Battery Replacement: step 7, image 1 of 2 iPhone 4S Battery Replacement: step 7, image 2 of 2
    • Before you reattach the battery connector during reinstallation, carefully position the pressure contact back in place. It should rest on top of the Philips screw post shown, and the gold contact should point towards the battery connector.

    • Be sure to clean the pressure contact with a degreaser such as windex or isopropyl alcohol. The oils on your fingers have the potential to create wireless interference.

  8. iPhone 4S Battery Replacement: step 8, image 1 of 2 iPhone 4S Battery Replacement: step 8, image 2 of 2
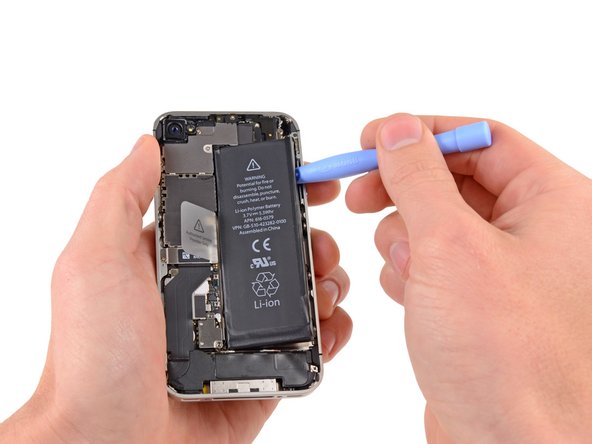
    • Insert the edge of a plastic opening tool between the battery and the outer case near the bottom of the iPhone.

    • Run the plastic opening tool along the right edge of the battery and pry up at several points to completely separate it from the adhesive securing it to the outer case.

  9. iPhone 4S Battery Replacement: step 9, image 1 of 2 iPhone 4S Battery Replacement: step 9, image 2 of 2
    • Use the exposed clear plastic pull tab to peel the battery off the adhesive securing it to the iPhone.

    • Be careful not to pull the plastic pull tab too hard as it can be ripped off very easily.

    • Remove the battery.

    • If your replacement battery came in a plastic sleeve, remove it before installation by pulling it away from the ribbon cable.

    • If your replacement battery came with an uncreased cable, carefully crease the cable into the proper shape before installing the battery into the phone.

    • While installing the replacement battery, temporarily connect the battery connector to the phone to ensure proper alignment. Once the battery is glued in place, disconnect the battery connector.

    • Perform a hard reset after reassembly. This can prevent several issues and simplify troubleshooting.

View Statistics:

Past 24 Hours: 30

Past 7 Days: 244

Past 30 Days: 1,199

All Time: 1,740,877