
iPhone 4 Verizon Home Button Replacement

What you need

  1. iPhone 4 Verizon Home Button Replacement, Rear Panel: step 1, image 1 of 1
    • Before you begin, discharge your iPhone battery below 25%. A charged lithium-ion battery can catch fire and/or explode if accidentally punctured.

    • Power off your iPhone before beginning disassembly.

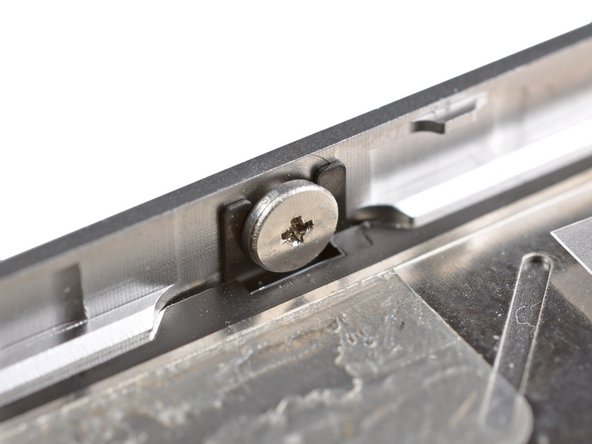
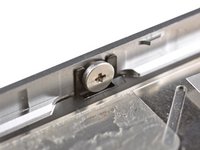
    • Your phone's rear cover may have two #000 Phillips screws or Apple's 5-Point "Pentalobe" screws. Check which screws you have, and ensure you also have the correct screwdriver in order to remove them.

    • Remove the two 3.6 mm Pentalobe or Phillips #000 screws next to the dock connector.

  2. iPhone 4 Verizon Home Button Replacement: step 2, image 1 of 2 iPhone 4 Verizon Home Button Replacement: step 2, image 2 of 2
    • Push the rear panel toward the top edge of the iPhone.

    • The panel will move about 2 mm.

  3. iPhone 4 Verizon Home Button Replacement: step 3, image 1 of 1
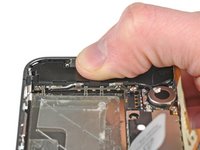
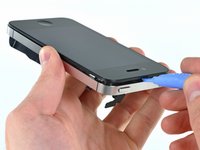
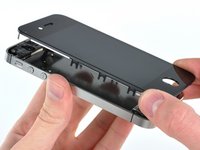
    • Pinch the rear panel with your fingers, and lift it away from the iPhone. Alternatively, use a Small Suction Cup .

    • Be careful not to damage the plastic clips attached to the rear panel.

  4. iPhone 4 Verizon Home Button Replacement, Battery: step 4, image 1 of 1
    • Remove the single 1.5 mm Phillips screw securing the battery connector to the logic board (if present).

  5. iPhone 4 Verizon Home Button Replacement: step 5, image 1 of 1
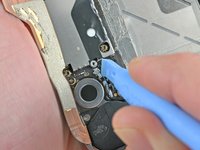
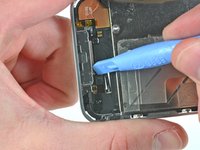
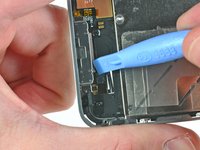
    • Use the edge of a plastic opening tool to gently pry the battery connector up from its socket on the logic board.

    • Be very careful to only pry up on the battery connector and not the socket on the logic board. If you pry up on the logic board socket, you may break it entirely.

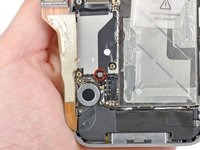
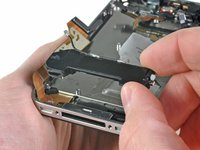
    • Remove the metal clip covering the antenna connector.

  6. iPhone 4 Verizon Home Button Replacement: step 6, image 1 of 2 iPhone 4 Verizon Home Button Replacement: step 6, image 2 of 2
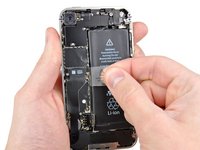
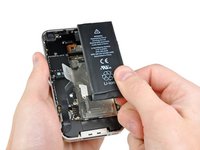
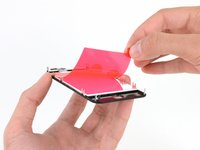
    • Pull up on the exposed clear plastic tab to peel the battery off the adhesive securing it to the iPhone.

    • If the tab breaks before the battery is freed, apply a few drops of high concentration (over 90%) isopropyl alcohol under the edge of the battery. Wait about one minute for the alcohol solution to weaken the adhesive. Carefully slide a spudger under the battery tab to release the adhesive.

    • Prying in other places may cause damage. Don't try to forcefully lever the battery out. If needed, apply a few more drops of alcohol to further weaken the adhesive. Never deform or puncture the battery with your pry tool.

    • If there's any alcohol solution remaining in the phone, carefully wipe it off or allow it to air dry before installing your new battery.

    • Remove the battery.

    • If your replacement battery came in a plastic sleeve, remove it before installation by pulling it away from the the ribbon cable.

    • Before reassembly, clean metal-to-metal contact points with a de-greaser such as windex. The oils from your fingers have the potential to cause wireless interference issues.

    • Perform a hard reset after reassembly. This can prevent several issues and simplify troubleshooting.

  7. iPhone 4 Verizon Home Button Replacement, Dock Connector Cable: step 7, image 1 of 2 iPhone 4 Verizon Home Button Replacement, Dock Connector Cable: step 7, image 2 of 2
    • Remove the two 1.8 mm Phillips screws securing the dock connector cable to the logic board.

    • Remove the thin metal dock connector cable cover.

  8. iPhone 4 Verizon Home Button Replacement: step 8, image 1 of 1
    • Use the edge of a plastic opening tool to pry the dock cable up from its socket on the logic board.

  9. iPhone 4 Verizon Home Button Replacement: step 9, image 1 of 1
    • Peel the dock connector cable off the adhesive securing it to the logic board and the side of the speaker enclosure.

  10. iPhone 4 Verizon Home Button Replacement: step 10, image 1 of 2 iPhone 4 Verizon Home Button Replacement: step 10, image 2 of 2
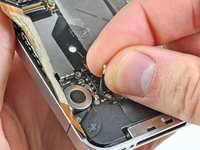
    • Remove the 1.6 mm Phillips screw securing the pressure contact to the logic board near the vibrator.

    • Remove the pressure contact.

  11. iPhone 4 Verizon Home Button Replacement: step 11, image 1 of 2 iPhone 4 Verizon Home Button Replacement: step 11, image 2 of 2
    • Use the edge of a plastic opening tool to pry the cellular antenna cable up from its socket on the logic board.

    • De-route the cellular antenna cable out from under the metal fingers attached to the logic board.

    • When reconnecting the antenna wire be VERY certain that the round connector at the end of the wire is centered on its mating half on the motherboard before applying pressure. Failure to do so will likely destroy both halves of the connector.

  12. iPhone 4 Verizon Home Button Replacement, Rear Camera: step 12, image 1 of 1
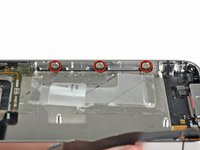
    • Remove the following five screws:

    • Three 1.3 mm Phillips screws

    • One 1.5 mm Phillips screw

    • One 2.4 mm Phillips screw

  13. iPhone 4 Verizon Home Button Replacement: step 13, image 1 of 2 iPhone 4 Verizon Home Button Replacement: step 13, image 2 of 2
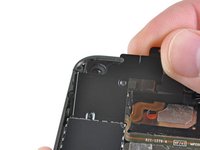
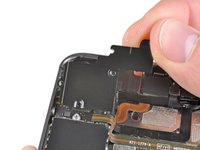
    • Lift the cable cover from its edge nearest the top of the iPhone.

    • Pull the cable cover tabs out of their slots cut into the EMI shield on the logic board and remove it from the iPhone.

  14. iPhone 4 Verizon Home Button Replacement: step 14, image 1 of 2 iPhone 4 Verizon Home Button Replacement: step 14, image 2 of 2
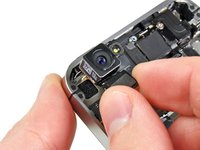
    • Use the edge of a plastic opening tool to pry the rear camera connector up from its socket on the logic board.

    • Be careful not to break any components off the surrounding area on the logic board as you pry upwards.

    • Remove the rear camera from the iPhone.

    • Be careful not to scratch the back of the display assembly after the removal of the rear facing camera.

  15. iPhone 4 Verizon Home Button Replacement, Logic Board: step 15, image 1 of 1
    • Disconnect the five cables near the top of the logic board in the following order:

    • Headphone jack/volume button cable

    • Power button cable

    • Front facing camera cable

    • Digitizer cable

    • Display data cable

    • To disconnect the cables, use the edge of a plastic opening tool to gently lift their connectors up and out of the sockets on the logic board.

    • Be careful not to break any of the small and delicate surface mount components as you disconnect the cables.

  16. iPhone 4 Verizon Home Button Replacement: step 16, image 1 of 1
    • Remove the 1.5 mm Phillips #000 screw near the headphone jack.

  17. iPhone 4 Verizon Home Button Replacement: step 17, image 1 of 1
    • Lift the small grounding clip up off the logic board and remove it from the iPhone.

  18. iPhone 4 Verizon Home Button Replacement: step 18, image 1 of 1
    • Use the edge of a plastic opening tool to disconnect the Wi-Fi antenna cable connector from the logic board.

    • When reconnecting the wifi ribbon connector to the mother board be VERY certain that the round connector at the end of the ribbon cable is centered on its mating half on the motherboard before applying pressure. Failure to do so will likely destroy both halves of the connection.

  19. iPhone 4 Verizon Home Button Replacement: step 19, image 1 of 2 iPhone 4 Verizon Home Button Replacement: step 19, image 2 of 2
    • If present, remove the piece of tape covering a Phillips screw near the power button.

  20. iPhone 4 Verizon Home Button Replacement: step 20, image 1 of 1
    Tool used on this step:
    Standoff Screwdriver for iPhones
    $5.49
    Buy
    • Remove the 2.5 mm Phillips #000 screw securing the logic board near the power button.

    • Remove the 4.8 mm standoff screw near the headphone jack.

    • Standoff screws are best removed using a standoff screwdriver or bit.

    • In a pinch, a small flathead screwdriver will do the job—but use extra caution to ensure it doesn't slip and damage surrounding components.

  21. iPhone 4 Verizon Home Button Replacement: step 21, image 1 of 1
    • Remove the 3.4 mm Phillips screw near the vibrator motor.

    • Remove the two 3.6 mm standoff screws along the side of the logic board nearest the battery opening.

  22. iPhone 4 Verizon Home Button Replacement: step 22, image 1 of 1
    • Carefully lift the logic board from the end closest to the speaker enclosure and slide it away from the top edge of the iPhone.

    • Remove the logic board.

    • Before reassembly, be sure to clean all metal-to-metal contact points on the logic board (not the mating halves of connectors) with a de-greaser such as windex or isopropyl alcohol. The oils on your fingers have the potential to cause grounding issues.

    • There's a small rectangular rubber pad at the top of the logic board that prevents the display cables from chafing against the edge of the board. If it comes loose during your repair, make sure to position it correctly when reinstalling your logic board.

  23. iPhone 4 Verizon Home Button Replacement: step 23, image 1 of 1
    • Be sure not to lose the small grounding finger for the rear facing camera near the power button.

  24. iPhone 4 Verizon Home Button Replacement, Vibrator: step 24, image 1 of 2 iPhone 4 Verizon Home Button Replacement, Vibrator: step 24, image 2 of 2
    • Use the edge of a plastic opening tool to pry the vibrator off the adhesive securing it to the frame of the iPhone.

    • Remove the vibrator.

  25. iPhone 4 Verizon Home Button Replacement, Screen: step 25, image 1 of 1
    • Remove the two 2.4 mm Phillips screws from the sides of the speaker enclosure assembly.

  26. iPhone 4 Verizon Home Button Replacement: step 26, image 1 of 1
    • Remove the small plastic bracket that was installed under the screw closest to the dock connector cable.

  27. iPhone 4 Verizon Home Button Replacement: step 27, image 1 of 2 iPhone 4 Verizon Home Button Replacement: step 27, image 2 of 2
    • Remove the speaker enclosure assembly from the iPhone.

    • Before reinstalling the speaker enclosure assembly's screws, be sure the Wi-Fi grounding fingers are installed below the lip in the iPhone's metal case as seen in the second picture.

    • Before reassembly, be sure to clean all metal-to-metal contact points between the grounding fingers of the Wi-Fi antenna and the case of the iPhone with a de-greaser such as windex or isopropyl alcohol. The oils on your fingers have the potential to cause wireless interference issues.

  28. iPhone 4 Verizon Home Button Replacement: step 28, image 1 of 1
    • Remove the small pieces of black tape covering the display mounting tabs.

  29. iPhone 4 Verizon Home Button Replacement: step 29, image 1 of 1
    • Remove the 1.6 mm Phillips screw securing the display assembly near the power button.

  30. iPhone 4 Verizon Home Button Replacement: step 30, image 1 of 1
    • Remove the 1.6 mm Phillips screw near the headphone jack.

  31. iPhone 4 Verizon Home Button Replacement: step 31, image 1 of 1
    • Remove the 1.6 mm Phillips screw near the lower microphone.

  32. iPhone 4 Verizon Home Button Replacement: step 32, image 1 of 1
    • Remove the 1.6 mm Phillips screw near the dock connector cable.

  33. iPhone 4 Verizon Home Button Replacement: step 33, image 1 of 2 iPhone 4 Verizon Home Button Replacement: step 33, image 2 of 2
    • Loosen the three large-headed Phillips screws along the volume button side of the iPhone about one half turn.

    • It is not necessary to completely remove these screws. When reinstalling the display assembly, be sure the washers are closest to the screw head (as seen in the second picture).

  34. iPhone 4 Verizon Home Button Replacement: step 34, image 1 of 1
    • Loosen the three large-headed Phillips screws along the other side of the iPhone about one half turn.

  35. iPhone 4 Verizon Home Button Replacement: step 35, image 1 of 3 iPhone 4 Verizon Home Button Replacement: step 35, image 2 of 3 iPhone 4 Verizon Home Button Replacement: step 35, image 3 of 3
    • Use the edge of a plastic opening tool to gently pry up the display assembly around its perimeter.

    • Press gently on the home button to push it through the display and make sure it stays behind as the display separates from the iPhone. Otherwise, the home button cable may tear.

    • De-route the digitizer and LCD cables through the steel inner frame.

    • When reinstalling the display, carefully straighten the digitizer and LCD data cables, and feed them through the slot cut in the steel frame. This photo shows the display assembly being installed incorrectly, with a fold in the digitizer cable.

    • When the front panel has been correctly installed, both the LCD and digitizer cables should be immediately next to one another and should be the same length, as shown in the second photo.

    • If the digitizer cable has been installed incorrectly, it will not reach its socket on the logic board. Do not attempt to pull it through by force, or it will tear. Remove the display assembly, straighten the cable, and feed it through to its full length, as shown.

    • During reassembly, do not touch the metallic area at the base of the LCD data cable, as this can cause problems with the LCD. If you do touch it accidentally, clean it gently with an alcohol wipe before continuing.

  36. iPhone 4 Verizon Home Button Replacement: step 36, image 1 of 2 iPhone 4 Verizon Home Button Replacement: step 36, image 2 of 2
    • Remove the display assembly from the iPhone.

    • Be sure to separate the home button from the front panel. If the home button sticks to the front panel you may tear the home button cable.

    • When replacing the display assembly, note the following:

    • You may have to reuse the earpiece grille and the clear plastic ring around the front facing camera from the old/damaged assembly. This will depend on where you buy the replacement part.

    • Your replacement display may come with colored plastic film on the back of the LCD. If so, use the pull tab near the home button to peel the plastic film from the LCD before installing the new display in your iPhone.

    • After reassembly, note the following:

    • Clean the touchscreen surface with an alcohol wipe prior to turning the iPhone back on. The alcohol helps dissipate any lingering static electricity, which can cause problems with the display.

    • After reassembly, connect the iPhone to an AC power source before turning it on for the first time. Once the iPhone has booted up successfully, you can disconnect the AC power.

  37. iPhone 4 Verizon Home Button Replacement, Home Button: step 37, image 1 of 2 iPhone 4 Verizon Home Button Replacement, Home Button: step 37, image 2 of 2
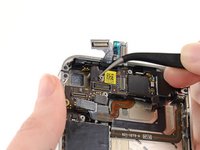
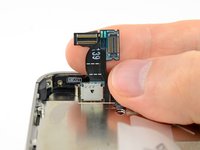
    • Use a clean fingernail or the edge of a plastic opening tool to flip up the retaining flap on the home button ribbon cable.
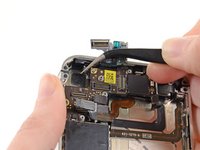
    • Be sure you are prying up on the hinged flap, not the socket itself.

  38. iPhone 4 Verizon Home Button Replacement: step 38, image 1 of 1
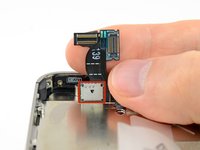
    • Use a pair of tweezers to pull the home button cable out of its socket.

  39. iPhone 4 Verizon Home Button Replacement: step 39, image 1 of 1
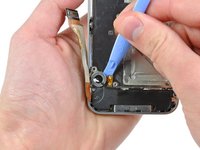
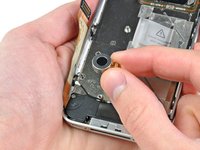
    • Carefully de-route the home button cable through its slot in the outer case and remove it from the iPhone.

Conclusion

To reassemble your device, follow these instructions in reverse order.

129 other people completed this guide.

3 Comments

How can a company that prides itself on simplicity and elegance make something so needlessly unserviceable? I don't mind the small screws, even if I wonder how many of them really need to be there... but the fragile cables, little black spacers, the pentalobe screws and the glue - oh the inhumanity of the glue! The only thing that makes me happy is, now that Tim Cook's decided that they're going to service these things in-store, the thought of Apple employees sending an earful of expletives up the management chain.

jwkc2 - Reply

Small and fragile = lite weight. And all of those spacers and glue is to keep everything in place and prevent those small and fragile parts from breaking as you use the phone. If you want a tiny, lite phone there are compromises. And Apple's mantra has never been serviceability. It's about getting you to upgrade to the new cool thing every 1-2 years, way before the phone would normally need servicing. And the Apple store really only services new batteries and screens. For pretty much everything else they just give you a new phone.

J V -

is there a way to remove the button without replacing the cable?

Crystal Haugh - Reply

Add Comment

View Statistics:

Past 24 Hours: 3

Past 7 Days: 12

Past 30 Days: 26

All Time: 55,189