Free Shipping on Domestic Orders $75+

iPhone 17 Pro Screen Installation

Prerequisite Only
This is a prerequisite-only guide! This guide is part of another procedure and isn’t meant to be used alone.

What you need

    1. iPhone 17 Pro Screen Installation, Clean the frame: step 1, image 1 of 3 iPhone 17 Pro Screen Installation, Clean the frame: step 1, image 2 of 3 iPhone 17 Pro Screen Installation, Clean the frame: step 1, image 3 of 3
      Tool used on this step:
      Tweezers
      $4.99
      Buy
      • Work around the fragile grounding clips as you clean the frame. If you bend one out of place, gently bend it back with your fingers or tweezers.

      • Use tweezers or your fingers to remove large pieces of adhesive from the frame perimeter.

      • Use a spudger to scrape the adhesive residue off the frame.

      • If the adhesive feels stubborn, apply some heat using a hair dryer or heat gun and try again.

      Ask FixBot

      Add Comment

    2. iPhone 17 Pro Screen Installation: step 2, image 1 of 1
      • Use a lint-free cloth or a coffee filter to wipe in one direction along the perimeter of the frame to clean the adhesive residue.

      • If the residue feels sticky, apply a few drops of isopropyl alcohol to the cloth and wipe again.

      • Take your time doing this. A clean frame allows replacement adhesive to lay evenly, ensuring a better bond.

      Ask FixBot

      Add Comment

    3. iPhone 17 Pro Screen Installation, Clean the screen: step 3, image 1 of 1
      Tool used on this step:
      Microfiber Cleaning Cloths
      $3.99
      Buy
      • If you're reusing your screen, apply a few drops of highly-concentrated isopropyl alcohol (over 90%) to a microfiber or lint-free cloth and wipe around the perimeter to prepare the surface for new adhesive.

      Ask FixBot

      Add Comment

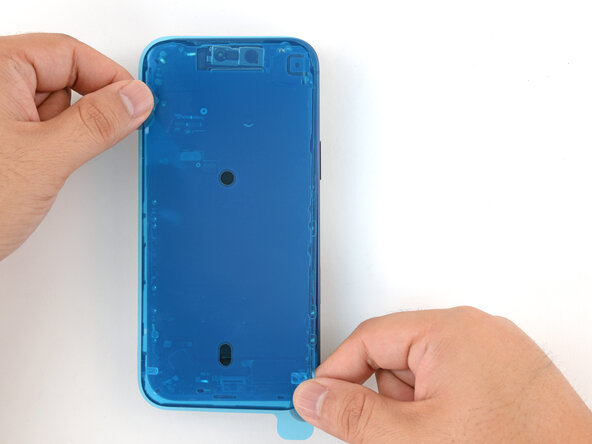
    4. iPhone 17 Pro Screen Installation, Orient the replacement adhesive: step 4, image 1 of 2 iPhone 17 Pro Screen Installation, Orient the replacement adhesive: step 4, image 2 of 2
      • Without peeling any liners, lay the adhesive sheet over the frame to determine its proper orientation.

      • Use features such as the camera cutout and notches along the top and bottom edges to visualize how the adhesive will lay in the frame.

      Ask FixBot

      Add Comment

    5. iPhone 17 Pro Screen Installation, Apply the replacement adhesive: step 5, image 1 of 1
      • Grab the tab in the corner of the adhesive sheet and peel the liner to expose a third of the adhesive.

      • The exposed adhesive is very sticky. Don't let it touch anything until you're ready to apply it to the frame.

      • If your adhesive has multiple liners, peel the liner that exposes the side that sticks to the frame.

      Ask FixBot

      Add Comment

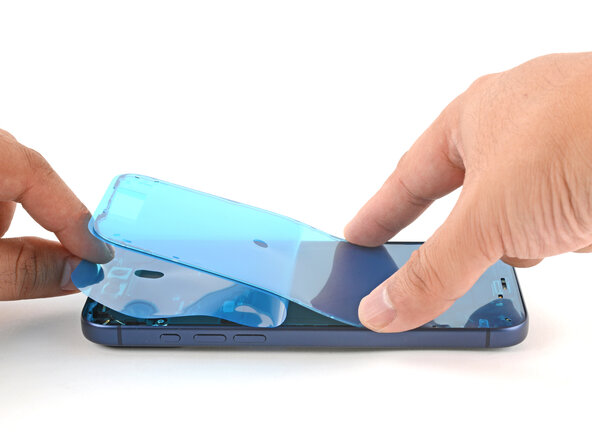
    6. iPhone 17 Pro Screen Installation: step 6, image 1 of 2 iPhone 17 Pro Screen Installation: step 6, image 2 of 2
      • Once the adhesive is pressed into place, you can't reposition it—you'll have to remove it and start over with new adhesive.

      • Carefully align the exposed edge of the adhesive strip with the corresponding edge of the iPhone's frame.

      • When it's correctly aligned, gently press the exposed adhesive strip onto the frame.

      Ask FixBot

      Add Comment

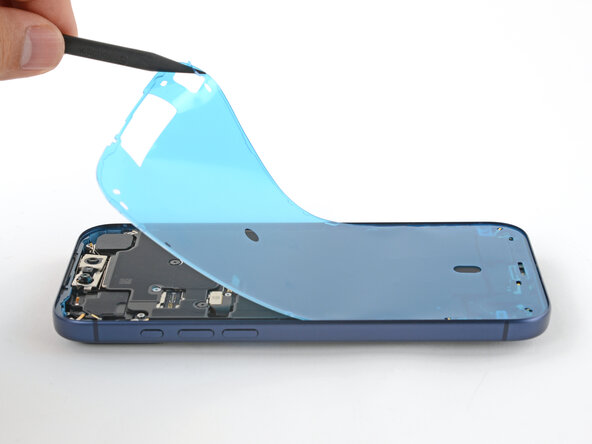
    7. iPhone 17 Pro Screen Installation: step 7, image 1 of 3 iPhone 17 Pro Screen Installation: step 7, image 2 of 3 iPhone 17 Pro Screen Installation: step 7, image 3 of 3
      • Continue peeling away the liner from the adhesive, gently pressing the adhesive into place.

      • If you've correctly aligned the adhesive, the edges will fall perfectly into place.

      • If your adhesive is slightly misaligned, gently pull the long edges into alignment with the frame.

      • If the adhesive begins to crease or wrinkle, remove it and start over with fresh adhesive.

      • If you don't have another set of adhesive strips handy, it's okay to temporarily put your iPhone back together and use it normally without any adhesive. Just keep in mind that your iPhone's water resistance will be compromised until you replace the adhesive.

      Ask FixBot

      Add Comment

    8. iPhone 17 Pro Screen Installation: step 8, image 1 of 2 iPhone 17 Pro Screen Installation: step 8, image 2 of 2
      • Use a spudger to press the adhesive around the entire perimeter of your iPhone.

      • Work around the fragile grounding clips. If you bend one out of place, gently bend it back with your fingers or tweezers.

      • Don't press too hard, or you'll stretch and deform the adhesive.

      Ask FixBot

      Add Comment

    9. iPhone 17 Pro Screen Installation: step 9, image 1 of 3 iPhone 17 Pro Screen Installation: step 9, image 2 of 3 iPhone 17 Pro Screen Installation: step 9, image 3 of 3
      • Use the pull tab to peel off the large front liner from the adhesive. The pull tab is often in a corner of the liner.

      • At this point, you'll still have liners covering the perimeter. Don't remove these liners yet—they prevent the adhesive from accidentally sticking while you reassemble your iPhone.

      Ask FixBot

      Add Comment

    10. iPhone 17 Pro Screen Installation, Connect the screen: step 10, image 1 of 1
      • Set the iPhone screen next to the frame such that the screen cables can comfortably reach the logic board.

      Ask FixBot

      Add Comment

    11. iPhone 17 Pro Screen Installation: step 11, image 1 of 3 iPhone 17 Pro Screen Installation: step 11, image 2 of 3 iPhone 17 Pro Screen Installation: step 11, image 3 of 3
      • Use your finger or the flat end of a spudger to press and connect the two screen connectors onto the logic board.

      • Don't try to force the connector into place. If you're having trouble, reposition it and try again.

      Ask FixBot

      Add Comment

    12. iPhone 17 Pro Screen Installation, Connect the battery: step 12, image 1 of 2 iPhone 17 Pro Screen Installation, Connect the battery: step 12, image 2 of 2
      • Use your finger or the flat end of a spudger to press and connect the battery connector onto the logic board.

      Ask FixBot

      Add Comment

    13. iPhone 17 Pro Screen Installation, Test your repair: step 13, image 1 of 1
      • This is a good point to test your repair before sealing up your iPhone. Power on your iPhone and make sure it works as expected. Power it back down and continue reassembly.

      • If your iPhone doesn't turn on, connect it to a power source and try again.

      Ask FixBot

      Add Comment

    14. iPhone 17 Pro Screen Installation, Install the battery connector cover: step 14, image 1 of 2 iPhone 17 Pro Screen Installation, Install the battery connector cover: step 14, image 2 of 2
      • Tuck the top edge of the battery connector cover under the cutout lip.

      • Make sure both tabs are tucked under the lip.

      • Align the cover by its screw hole and lay it in place.

      Ask FixBot

      Add Comment

    15. iPhone 17 Pro Screen Installation: step 15, image 1 of 1
      • Use a JIS 00 screwdriver to install the 1.2 mm‑long screw to secure the battery connector cover.

      Ask FixBot

      Add Comment

    16. iPhone 17 Pro Screen Installation, Install the screen connector cover: step 16, image 1 of 3 iPhone 17 Pro Screen Installation, Install the screen connector cover: step 16, image 2 of 3 iPhone 17 Pro Screen Installation, Install the screen connector cover: step 16, image 3 of 3
      • Tuck the left edge of the screen connector cover under the cutout lip.

      • Align the cover by its screw hole and lay it in place.

      Ask FixBot

      Add Comment

    17. iPhone 17 Pro Screen Installation: step 17, image 1 of 1
      • Use a JIS 00 screwdriver to install the 1.2 mm‑long screw to secure the screen connector cover.

      Ask FixBot

      Add Comment

    18. iPhone 17 Pro Screen Installation, Remove the final adhesive liners: step 18, image 1 of 3 iPhone 17 Pro Screen Installation, Remove the final adhesive liners: step 18, image 2 of 3 iPhone 17 Pro Screen Installation, Remove the final adhesive liners: step 18, image 3 of 3
      • With one hand hold the screen steady.

      • Use your fingers or a spudger to peel away all perimeter liners, exposing the adhesive.

      • Make sure nothing touches the exposed adhesive.

      • Check the internals for any stray liners and remove them. There should be no liners remaining.

      Ask FixBot

      Add Comment

    19. iPhone 17 Pro Screen Installation, Install the screen: step 19, image 1 of 3 iPhone 17 Pro Screen Installation, Install the screen: step 19, image 2 of 3 iPhone 17 Pro Screen Installation, Install the screen: step 19, image 3 of 3
      • Lower the screen onto the frame, beginning with the top edge.

      • If you feel resistance, a perimeter clip may have bent out of place and is being crushed by the frame. Look at the point of resistance and gently straighten any bent clips.

      • Make sure the screen edge isn't pinching any cables.

      • Press along the edges of the iPhone until the screen sits flush against the frame.

      Ask FixBot

      Add Comment

    20. iPhone 17 Pro Screen Installation: step 20, image 1 of 2 iPhone 17 Pro Screen Installation: step 20, image 2 of 2
      • Firmly squeeze around the entire perimeter of the iPhone.

      Ask FixBot

      Add Comment

    21. iPhone 17 Pro Screen Installation, Apply heat to the perimeter: step 21, image 1 of 1
      • Use a hair dryer or a heat gun to heat the screen perimeter until it's slightly too hot to touch.

      • The heat softens the adhesive and helps create a better bond.

      Ask FixBot

      Add Comment

Conclusion

To reassemble your device, follow these instructions in reverse order.

Cancel: I did not complete this guide.

Arthur Shi

Member since: 01/03/18

350,754 Reputation

938 Guides authored

0 Guide Comments

Add Comment

View Statistics:

Past 24 Hours: 1

Past 7 Days: 1

Past 30 Days: 10

All Time: 114