Introduction
Use this guide to replace the RAM.
What you need
-
-
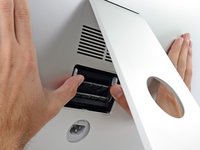
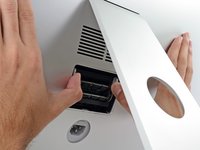
While holding the display steady, use the flat end of a spudger to press in on the RAM door release button, located just above the power port.
 Ask FixBot
-
-
-
-
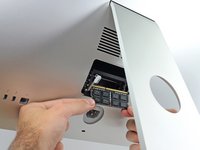
Use your thumbs or index fingers to unlock the tray by pushing the tabs outward, away from the RAM.
-
Pull the tabs out and down, swinging the RAM tray down to a near-horizontal position.
-
-
-
Remove a stick of RAM by grabbing it with two hands and pulling straight out of the RAM tray.
-
To install a new module, insert the module into the desired slot in the tray and press it firmly in place. Push the tray back up until it locks in place.
-
Re-insert the RAM access door back into its place.
-


To reassemble your device, follow these instructions in reverse order.
Take your e-waste to an R2 or e-Stewards certified recycler.
Repair didn’t go as planned? Try some basic troubleshooting, or ask our Answers community for help.
Cancel: I did not complete this guide.
72 other people completed this guide.

14 Guide Comments
I just purchased RAM and this guide was very accurate. Thank you.
Hi guys! I have to slot full with the basic amount of RAM (2 x 4 GB), can I install 2 x 8 GB in the other two slots available? I want to upgrade to 24 GB of RAM, but I don't know if there are any problem putting together 4 GB modules with 8 GB ones. I remember an old story about possible issues... Thanks for your replies! :-)
You should be fine with pairs of equal capacity. 2 X 4 GB and 2 X 8 GB
Usually best to install in pairs of similar sizes
P
I just upgraded mine from 16GB to 32GB. The only problem with this guide is that it says the difficulty is moderate. What could be easier? It took me less than five minutes, and most of that was unplugging/replugging stuff before and after the actual RAM upgrade.
I used a screwdriver to push on the little button that opens the door, as I didn't have a spudger handy.