Introduction
Hier wird gezeigt, wie du deine Festplatte austauschen oder aufrüsten kannst.
What you need
-
-
Beginne an der linken Seite des Displays, auf der Seite der Ein-/Aus-Taste, und schiebe das iMac Opening Tool zwischen Das Glaspanel und das Rückgehäuse.
-
Arbeite vorsichtig! Das Glas bricht leicht, wenn es zu stark belastet wird. Erwärme die Kanten mit einem Haartrockner und löse das Klebeband ab, wenn die Raumtemperaturen niedrig sind.
-
-
Tool used on this step:Plastic Cards$2.99
-
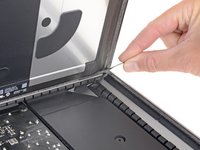
Beginne an der oberen rechten Ecke des iMacs und schiebe eine Kunststoffkarte zwischen Display und Rahmen.
-
-
-
-
Entferne folgende Torx T10 Schrauben, welche die Festplattenhalterung am Rückgehäuse befestigen:
-
Zwei 21 mm Schrauben an der linksseitigen Festplattenhalterung
-
Eine 9 mm Schraube
-
Eine 27 mm Schraube
-
-
-
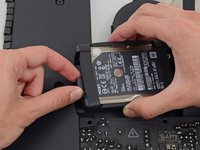
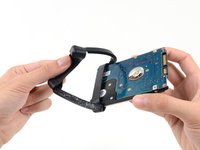
Hebe die Festplatte am Rand in der Nähe des Lüfters hoch und ziehe sie etwas aus ihrer Vertiefung heraus.
-
-
-
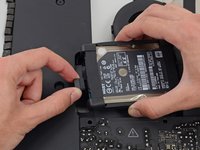
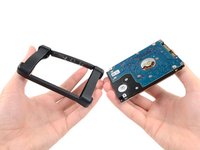
Löse die flexible Festplattenhülle von der oberen linken Ecke der Festplatte ab.
-


Um deinen iMac wieder zusammenzubauen, folge diesen Schritten in umgekehrter Reihenfolge und benutze unsere Klebeanleitung, um das Displayglas wieder anzukleben.
Cancel: I did not complete this guide.
360 other people completed this guide.
Special thanks to these translators:
100%

These translators are helping us fix the world! Want to contribute?
Start translating ›


43 Guide Comments
I used the iMac Opening Tool just as shown in this guide to separate the tape. DISASTER! The screen cracked! I used the tool slowly and carefully and despite this, the screen cracked. I should have simply used a guitar pick. That said, while I was inside my iMac replacing the Harddisk with a SSD, which was pretty easy to do, I decided to also see if I could replaced the 8GB RAM with 16GB RAM WITHOUT removing the logic board, as shown in other instructions on this site. I found that by simply removing the fan assembly, this makes enough room to reach behind the logic board and unclip the 2 memory modules. I installed 2 8GB modules (1600MHz DDR3L SO-DIMM PC12800 204 Pin) without much trouble. I used a plastic stick to reach behind the logic board and unclip the existing memory modules, then carefully inserted the new ones and clipped them into place. This is much easier than removing the power supply and logic board and all of the associated connectors and screws.
I had to replace the HD as it failed after less than two years. It was a good opportunity to increase the RAM from 8 to 16 GB. So I ordered the RAM chips from Kingston and a 256 GB SSD from Angelbird.
The repair went smoothly: to anyone trying this, please carefully follow the iFixit step-by-step guide. I recommend reading at least twice the whole procedure *before* beginning. Check all the photos. During the operation itself, I had the guide open before my eyes on my iPad and followed it step by step. The opening tool is a bit fragile, the wheel got damaged after the operation, but I guess it was designed to be used only once. After all, the adhesive strips can also be used only once!
For those replacing the hard-disk with an SSD: I highly recommend the Angelbird model "SSD wrk for Mac" (http://www.angelbird.com/en/prod/ssd-wrk...), for several dollars more you spare yourself the need to use additional software to enable TRIM or persuade the fans of your Mac that the HD's temperature is Ok.
Thanks for the tip on the Angelbird, working smoothly so far!
Elling -
Hi! Thanks for the tip! Do you know if can I put an SSD on an imac 21.5 in late 2012 ?