Introduction
Folge den Schritten in dieser Anleitung, um die Festplatte im iMac Intel 21,5" EMC 2889 aufzurüsten oder zu ersetzen. Beachte, dass wenn man die Festplatte austauscht, zuerst alle Inhalte der alten Festplatte auf die Ersatzfestplatte kopiert werden müssen, bevor man das Upgrade durchführt, um alle Dateien sowie das Betriebssystem zu behalten.
What you need
-
-
Wenn du die iFixit-Reparaturhilfe aus Karton verwendest, dann baue sie zuerst mit Hilfe dieser Anleitung zusammen.
-
Bevor du beginnst an deinem iMac zu arbeiten: Ziehe den Netzstecker, drücke und halte den Ausschaltknopf für mindestens zehn Sekunden. Dadurch werden die Kondensatoren im Netzteil entladen.
-
-
-
Beginne in der oberen rechten Ecke und zwänge eine Kunststoffkarte zwischen Display und Rahmen.
-
-
-
-
Halte das Display mit einer Hand fest und löse mit der anderen Hand das Kabel der Stromversorgung des Displays.
-
-
-
Entferne folgende Torx T10 Schrauben welche die Festplattenhalterungen am iMac befestigen:
-
Zwei 21 mm Schrauben
-
Eine 9 mm Schraube
-
Eine 27 mm Schraube
-
-
-
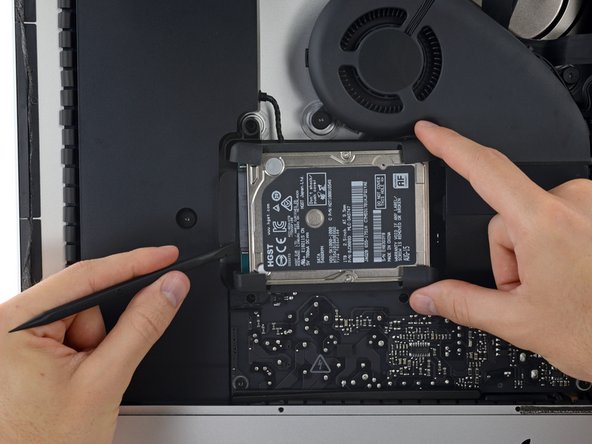
Hebe die Festplatte an der Kante nahe des Logic Boards an und ziehe sie etwas aus ihrer Vertiefung heraus.
-
-
-
Löse die Gummidämpfer von einer Seite der Festplatte ab.
-
Wiederhole dies auf der anderen Seite.
-


Um dein Gerät wieder zusammenzusetzen, folge den Anweisungen in umgekehrter Reihenfolge und verwende unsere Anleitung für Klebestreifen, um den Bildschirm wieder zu befestigen.
Um dein Gerät wieder zusammenzusetzen, folge den Anweisungen in umgekehrter Reihenfolge und verwende unsere Anleitung für Klebestreifen, um den Bildschirm wieder zu befestigen.
Cancel: I did not complete this guide.
73 other people completed this guide.
Special thanks to these translators:
100%


These translators are helping us fix the world! Want to contribute?
Start translating ›


10 Comments
Well done and thank you for this very precise description to access the hard drive. After that, reconnecting the hard drive or SSD is difficult because the very short SATA connector wires do not allow it to be presented well in the axis of the drive connector and it is impossible to hold it firmly with your fingers. Space is very small.
Thank you SO MUCH for this guide. I bought my iMac used from someone who was upgrading to a newer SSD model, and once I got it home and reset, I was understood all too well why he upgraded. So I ordered the kit here and followed these directions. With my iPad propped up next to the iMac on my table, I was able to follow it right through. As others have commented, the drive cable is very short, but I held back the rubber bumpers until I got it connected, and then everything else went smoothly. Now my iMac is like a new machine (minus the newer Thunderbolt ports and other newer amenities). Thanks again!
I was just looking at the dismal trade in options for all my old apple products, and just assumed Id be buying a new computer every 2-3 yrs at retail whenever apple decided mine was out of date, but after stumbling on this site i love the mission, and am actually excited to try some of these articles on my old products and maybe learn a few things. Thank you for all this work its awesome and appreciated.
I’ve the same question Thurston made. I’m planning to upgrade to a SSD but I’m worried about thermal sensor and the kernel_task issue some that some people mention. Is there a solution? This should be a concern?