Removing the display on the Late 2012 iMac requires cutting adhesive with a specialized iMac opening tool. After you've completed your repair, you'll need to follow our Adhesive Strip Guide to scrape off the old adhesive and replace it with new double-stick adhesive strips.
With the hinge free to move, the iMac will be unbalanced and hard to work on. Repairs can be completed as shown, but are faster and easier with an iMac service wedge.
Before beginning any work on your iMac: Unplug the computer and press and hold the power button for ten seconds to discharge the power supply's capacitors.
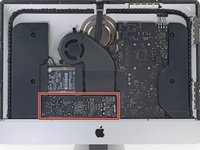
Be very careful not to touch the capacitor leads or any exposed solder joints on the back of the power supply. Only handle the board by the edges.
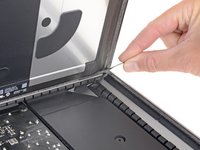
Starting on the left of the display, near the power button, insert the iMac Opening Tool into the gap between the glass panel and the rear enclosure.
The hub on the iMac Opening Tool will keep you from pushing the wheel in too far. If using a different tool, insert no more than 3/8" into the display. Otherwise, you risk severing antenna cables and causing serious damage.
Be gentle! The glass may crack if pried too much. Use a hairdryer to heat the edges and loosen the tape if the room temperatures are low.
You may want to run the tool back and forth through what you've already cut a few times, to ensure you get as much of the adhesive separated as possible.
While the opening tool cut most of the adhesive, the display will still be slightly adhered to the case. A plastic card will be necessary to free up the last of this adhesive.
Set the iMac face-up on a table.
Starting from the top right corner of the iMac, wedge a plastic card between the display and frame.
Be careful not to insert the plastic card more than 3/8", or you may damage internal components.
While holding the display up with one hand, use the other hand to unplug the display power cable. Make sure that you pull the cable out from the plastic tab, and not by pulling on the color wires.
Lift the display up enough to have easy access to the connector, but not so much that you stretch the cables and stress their connections (about 8").
At this point there is still a strip of adhesive along the bottom of the display, that will hold the display to the frame like a hinge. You can loosen this adhesive by working the display up and down a few times.
I got to the point where I fit in the display back on before I pulled the covers off of the adhesive strips. I turned the computer on and the display worked perfectly. Everything worked! The camera was aligned and everything! It must’ve been beginners luck.
I turn the computer off, unplugged the display, pulled the covers off the adhesive strips, plugged the display back in and sealed the display down. When I turn the computer on again I had a blank screen. It wasn’t just blank, it never came back on. The iMac did, but the display didn’t. I tried the old display. Same thing. After some research I found that I had burned up a device on my logic board.
So, I am left with only my iPhone and don’t know how to upload a picture in comments or I would show you exactly which one it is.