
bObsweep Robotic Vacuum Cleaner UV lamp Replacement

What you need

Video Overview

  1. bObsweep Robotic Vacuum Cleaner UV lamp Replacement, bObsweep's cover: step 1, image 1 of 3 bObsweep Robotic Vacuum Cleaner UV lamp Replacement, bObsweep's cover: step 1, image 2 of 3 bObsweep Robotic Vacuum Cleaner UV lamp Replacement, bObsweep's cover: step 1, image 3 of 3
    • Flip Bob over and remove the 7 screws around which hold the cover together.

    • Remove the main brush. Unscrew the holder, and lift the brush out. Reminder: Keep this screw separate from the others so you can use it later to reinstall.

    • Depending on your model, there may be only 6 screws installed on bObsweep.

  2. bObsweep Robotic Vacuum Cleaner UV lamp Replacement: step 2, image 1 of 3 bObsweep Robotic Vacuum Cleaner UV lamp Replacement: step 2, image 2 of 3 bObsweep Robotic Vacuum Cleaner UV lamp Replacement: step 2, image 3 of 3
    • There are two screw holes inside the brush compartment: one in the centre, one on the left end. Remove both and keep aside for reassembly.

    • There are five more screws around bObsweep's edges. Two are installed at the top and bottom, and one on the right end of the main brush.

  3. bObsweep Robotic Vacuum Cleaner UV lamp Replacement: step 3, image 1 of 2 bObsweep Robotic Vacuum Cleaner UV lamp Replacement: step 3, image 2 of 2
    • Flip bOb back over so you can see the screen. Lift the cover up to reveal bObsweep’s main board.

    • Detach the power inlet from the cover. Grip and slide it out.

  4. bObsweep Robotic Vacuum Cleaner UV lamp Replacement: step 4, image 1 of 2 bObsweep Robotic Vacuum Cleaner UV lamp Replacement: step 4, image 2 of 2
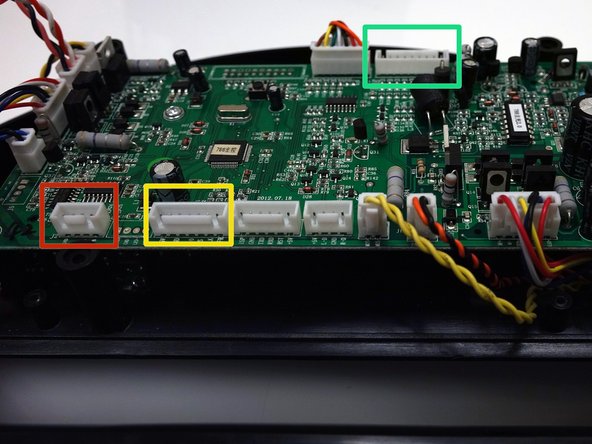
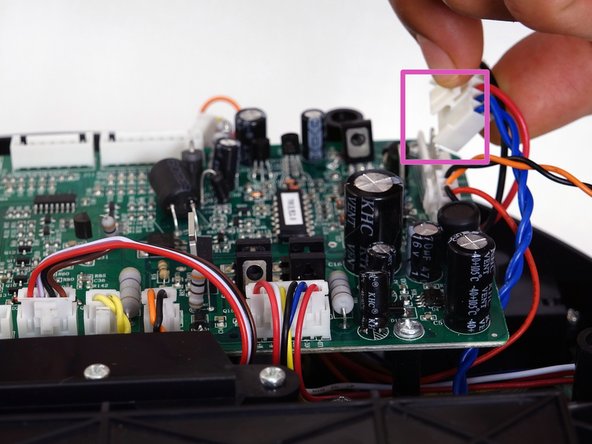
    • Remove three circuit plugs from the motherboard. Pinch the small white tab on the side of each circuit plug and pull straight up to release each from the motherboard.

    • 1. On the bottom left corner: a small connector with red, black and white wires.

    • 2. One thick white wire that attaches on the right side of the previous connector.

    • 3. On the top edge of bOb’s motherboard: a wide multicoloured connector.

    • Place the cover aside and begin your repair.

  5. bObsweep Robotic Vacuum Cleaner UV lamp Replacement, Main Board: step 5, image 1 of 2 bObsweep Robotic Vacuum Cleaner UV lamp Replacement, Main Board: step 5, image 2 of 2
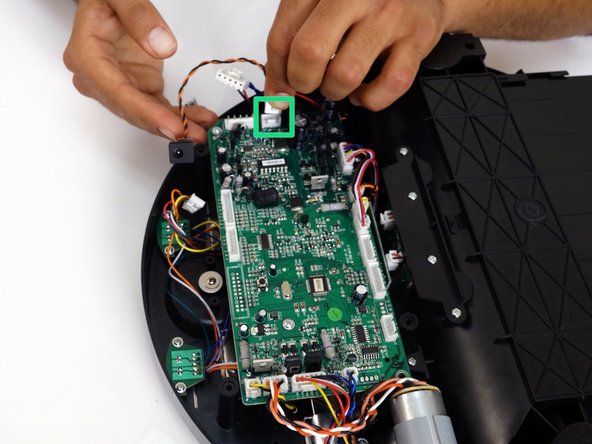
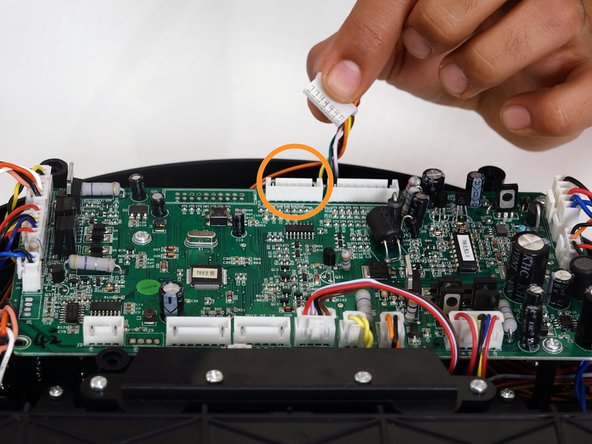
    • After opening bObsweep, you will see the main board in the center. To remove it, you will need to unplug 11 more circuit plugs and uninstall 3 screws.

    • There is one in the centre of the motherboard, near the multicoloured plug for Bob’s left wheel.

    • The second is close to the top right corner.

    • The third is near the bottom right edge.

    • Keep all three screws. They will be needed later while installing the replacement main board.

  6. bObsweep Robotic Vacuum Cleaner UV lamp Replacement: step 6, image 1 of 3 bObsweep Robotic Vacuum Cleaner UV lamp Replacement: step 6, image 2 of 3 bObsweep Robotic Vacuum Cleaner UV lamp Replacement: step 6, image 3 of 3
    • Detach all of the motherboard's circuit plugs. Keep note of where each plug attaches for installation of the new one.

    • Lift the main board up and replace it with a new functional one. Make sure the replacement main board lies flat on top of the screw posts inside bObsweep.

    • Re-install the 3 screws you removed in the previous step.

    • All the circuit plugs you removed in the first step must be reconnected in the correct spaces.

  7. bObsweep Robotic Vacuum Cleaner UV lamp Replacement: step 7, image 1 of 2 bObsweep Robotic Vacuum Cleaner UV lamp Replacement: step 7, image 2 of 2
    • The order along the motherboard’s left edge from the top down is:

    • A small yellow and black circuit plug.

    • The main brush motor's circuit plug which has two pairs of twisted wires, one red and white, the other pink and black.

    • A wider, multicoloured circuit plug which is attached to bObsweep’s left wheel.

    • Finally, a small circuit plug with black and blue twisted wires.

    • When all have been connected to bObsweep, begin putting the cover back together before vacuuming again.

  8. bObsweep Robotic Vacuum Cleaner UV lamp Replacement: step 8, image 1 of 2 bObsweep Robotic Vacuum Cleaner UV lamp Replacement: step 8, image 2 of 2
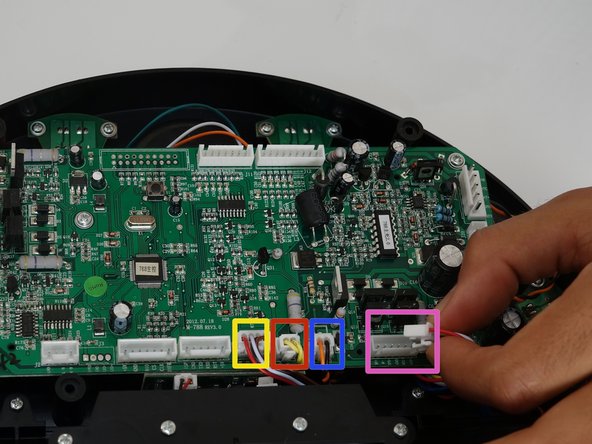
    • The order from left to right along the bottom ledge should be reconnected as follows:

    • A circuit plug with multicolored wires and a wide base which connects to Bob's right wheel.

    • A small black and orange wired circuit plug

    • A small yellow wired plug.

    • A small circuit plug with red, black, white, and brown wires.

    • There will be 3 empty spaces left on this row. Two will be filled when you put the cover back on.

  9. bObsweep Robotic Vacuum Cleaner UV lamp Replacement: step 9, image 1 of 3 bObsweep Robotic Vacuum Cleaner UV lamp Replacement: step 9, image 2 of 3 bObsweep Robotic Vacuum Cleaner UV lamp Replacement: step 9, image 3 of 3
    • At the top of the motherboard’s right edge is a wide, red, black, and blue circuit plug.

    • Beneath that is a smaller plug for Bob’s power inlet with orange and black wires.

    • Plug each one into the motherboard in the suitable slot.

  10. bObsweep Robotic Vacuum Cleaner UV lamp Replacement: step 10, image 1 of 2 bObsweep Robotic Vacuum Cleaner UV lamp Replacement: step 10, image 2 of 2
    • There are two wide, multicoloured circuit plugs that attach to the top edge of the motherboard. One was removed to detach bObsweep’s cover, so the space will stay empty for now.

    • The other plugs in on the right side of the open space.

  11. bObsweep Robotic Vacuum Cleaner UV lamp Replacement, UV lamp: step 11, image 1 of 3 bObsweep Robotic Vacuum Cleaner UV lamp Replacement, UV lamp: step 11, image 2 of 3 bObsweep Robotic Vacuum Cleaner UV lamp Replacement, UV lamp: step 11, image 3 of 3
    • There are two screws which hold the UV lamp in place. Uninstall them, and lift the lamp up.

    • Then, slide the UV lamp’s small circuit board up and it will come out of its holder inside bObsweep.

    • If any pieces come apart, put them back in the correct order. Ensure the clear plastic sits so the rougher side will be on the outside of bOb.

  12. bObsweep Robotic Vacuum Cleaner UV lamp Replacement: step 12, image 1 of 3 bObsweep Robotic Vacuum Cleaner UV lamp Replacement: step 12, image 2 of 3 bObsweep Robotic Vacuum Cleaner UV lamp Replacement: step 12, image 3 of 3
    • Place your new lamp in the open space and install the two screws you removed previously.

    • The circuit board will slide straight down into the holder.

  13. bObsweep Robotic Vacuum Cleaner UV lamp Replacement: step 13, image 1 of 1
Conclusion

To reassemble your device, refer to the closing bobsweep standard or pethair guide

Tatiana

Member since: 06/28/14

737 Reputation

17 Guides authored

0 Comments

Add Comment

View Statistics:

Past 24 Hours: 1

Past 7 Days: 1

Past 30 Days: 3

All Time: 215