
Closing bObsweep's cover after repair

What you need

  1. Closing bObsweep's cover after repair, bObsweep's cover: step 1, image 1 of 3 Closing bObsweep's cover after repair, bObsweep's cover: step 1, image 2 of 3 Closing bObsweep's cover after repair, bObsweep's cover: step 1, image 3 of 3
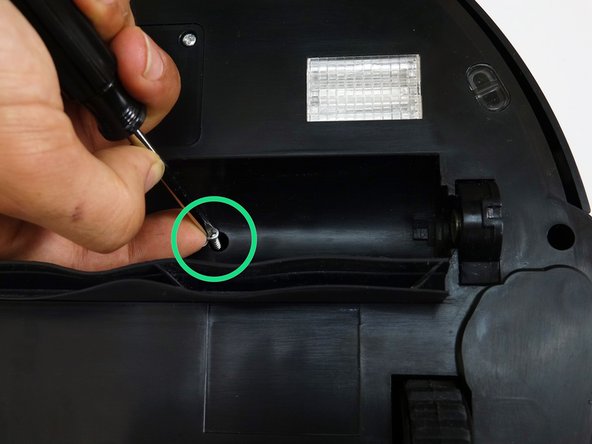
    • Flip Bob over and remove the 7 screws around which hold the cover together.

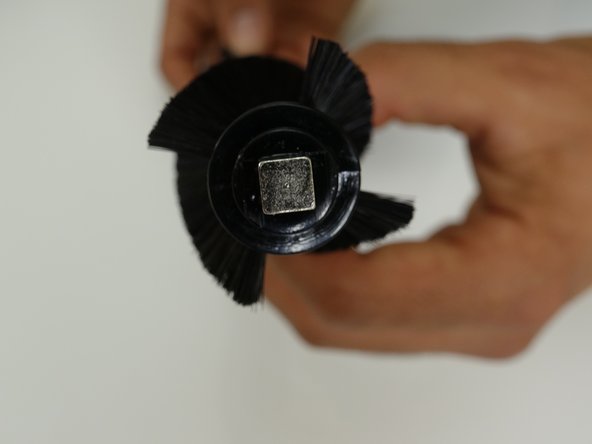
    • Remove the main brush. Unscrew the holder, and lift the brush out. Reminder: Keep this screw separate from the others so you can use it later to reinstall.

    • Depending on your model, there may be only 6 screws installed on bObsweep.

  2. Closing bObsweep's cover after repair: step 2, image 1 of 3 Closing bObsweep's cover after repair: step 2, image 2 of 3 Closing bObsweep's cover after repair: step 2, image 3 of 3
    • There are two screw holes inside the brush compartment: one in the centre, one on the left end. Remove both and keep aside for reassembly.

    • There are five more screws around bObsweep's edges. Two are installed at the top and bottom, and one on the right end of the main brush.

  3. Closing bObsweep's cover after repair: step 3, image 1 of 2 Closing bObsweep's cover after repair: step 3, image 2 of 2
    • Flip bOb back over so you can see the screen. Lift the cover up to reveal bObsweep’s main board.

    • Detach the power inlet from the cover. Grip and slide it out.

  4. Closing bObsweep's cover after repair: step 4, image 1 of 2 Closing bObsweep's cover after repair: step 4, image 2 of 2
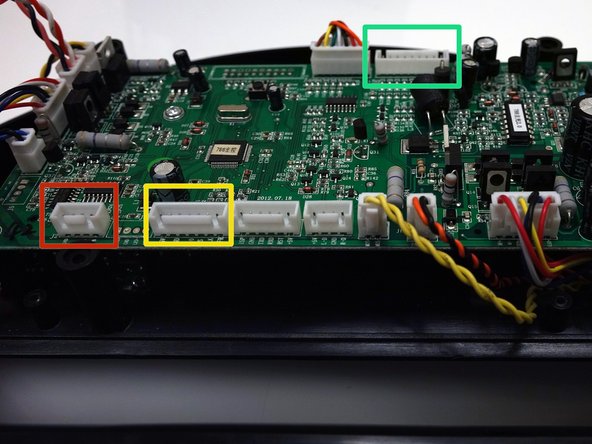
    • Remove three circuit plugs from the motherboard. Pinch the small white tab on the side of each circuit plug and pull straight up to release each from the motherboard.

    • 1. On the bottom left corner: a small connector with red, black and white wires.

    • 2. One thick white wire that attaches on the right side of the previous connector.

    • 3. On the top edge of bOb’s motherboard: a wide multicoloured connector.

    • Place the cover aside and begin your repair.

  5. Closing bObsweep's cover after repair, Closing bObsweep's cover after repair: step 5, image 1 of 2 Closing bObsweep's cover after repair, Closing bObsweep's cover after repair: step 5, image 2 of 2
    • Attach the widest circuit plug with multicoloured wires, on the top right edge of the motherboard.

    • Attach the smallest circuit plug in the lower left corner of the motherboard.

    • Attach the all white circuit plug to the bottom of the motherboard, in the centre of the row.

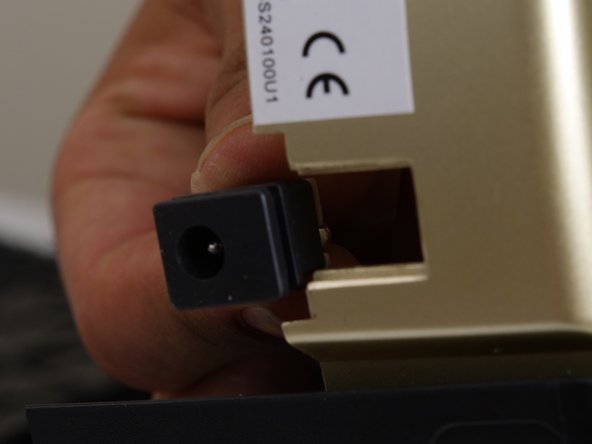
    • Slide the power inlet back into the space on bObsweep’s cover.

    • Put bObsweep's top back on, and align the edges precisely.

  6. Closing bObsweep's cover after repair: step 6, image 1 of 3 Closing bObsweep's cover after repair: step 6, image 2 of 3 Closing bObsweep's cover after repair: step 6, image 3 of 3
    • Use a phillips head screwdriver to reinstall the six or seven screws you removed at the start of the repair, so the cover is sealed together.

    • There are 5 along the edges of bObsweep's underside.

    • Plus one or two more in the screw holes inside the brush compartment.

    • Depending on your bObsweep model, there may be only one screw in the brush compartment.

  7. Closing bObsweep's cover after repair: step 7, image 1 of 3 Closing bObsweep's cover after repair: step 7, image 2 of 3 Closing bObsweep's cover after repair: step 7, image 3 of 3
    • Remember to reinstall the main brush before setting bObsweep to clean again.

    • Attach the end piece first.

    • Put the square end in the square space inside bObsweep, then lower the brush in place.

    • Install the screw securely.

Conclusion

Follow these steps after completing any internal repairs on your bObsweep.

One other person completed this guide.

Tatiana

Member since: 06/28/14

737 Reputation

17 Guides authored

One Comment

Good job. I had to backtrack once or twice, but had bOb apart and back together quite easily and he seems to be working again (No NR 04 message).

A couple of suggestions. On reassemble, unless I missed it, you missed telling people to reattach the power jack cord in the slot on the side of the unit.

Also, I found 1 screw in the well under the brush. There was a second screw hole, but it was empty

Finally, a helpful tip. When you loosen the 6/7 recessed screws on the bottom, if you put a small piece of tape over the holes, the screws won't fall out or get lost.

And for the manufacturer, While most of the screws are common, a couple are not. The more screws that are common, the cheaper to make the unit and if repair or deep cleaning is required, the owner doesn't have to remember which length screw goes where.

Thanks

writermd - Reply

Add Comment

View Statistics:

Past 24 Hours: 1

Past 7 Days: 1

Past 30 Days: 4

All Time: 261