Introduction
This tutorial explains how to completely disassemble a Xiaomi Redmi Go smartphone to replace the screen, battery and/or any other part (vibrator, speaker, earpiece, volume on/off buttons, motherboard, charger module, etc.).
Replacing the battery is quite simple, on the other hand replacing the screen is a fairly complex operation because all the components are mounted on the frame that carries the screen. This therefore requires dismantling all the components to transfer them to the new chassis which carries the new screen.
What you need
-
-
An opening pick or strong fingernail to open the phone creating a gap between the case and the screen
-
A small Phillips screwdriver
-
A plastic spudger to disconnect the cables without damaging them
-
A box cutter or X-Acto knife to take off the vibrator and the cable that carries the Power/Volume buttons
-
Contact glue (liquid neoprene) to glue the vibrator, the cable that carries the Power/Volume buttons, the charger cable and the battery
-
-
-
You must remove both the SIM and SD card holders before unclipping the case
-
-
-
To unclip the rear case, you must insert a fingernail or an opening pick between the screen glass and the case at the level of the card holders located on the left, to create a gap in which you will slide a pick.
-
Once you have an opening, insert an opening pick and leave it in place, then continue to go around the case by sliding a thumbnail or pick between the case and the screen
-
With the screen facing you, continue unclipping, preferably turning counter-clockwise to go around the bottom of the screen, then the right of the screen without damaging the push buttons, to finish from the top of the screen
-
-
-
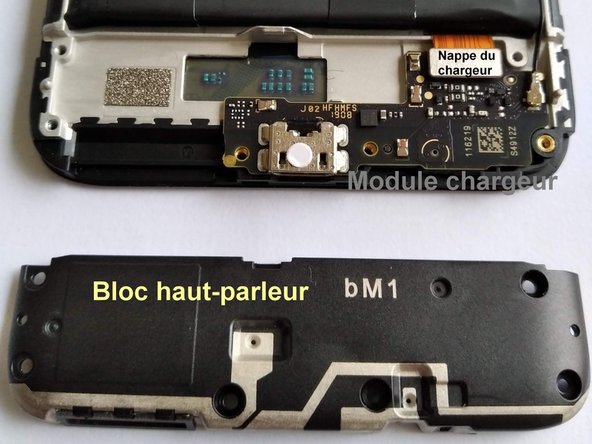
Remove the 6 screws from the loudspeaker located at the bottom of the phone.
-
Carefully peel off the loudspeaker assembly
-
-
-
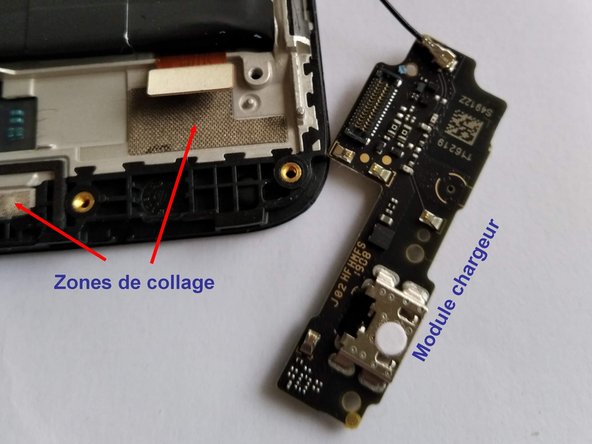
Disconnect the charger module cable located at the bottom right of the battery
-
Carefully peel off the charger module starting from the left
-
-
-
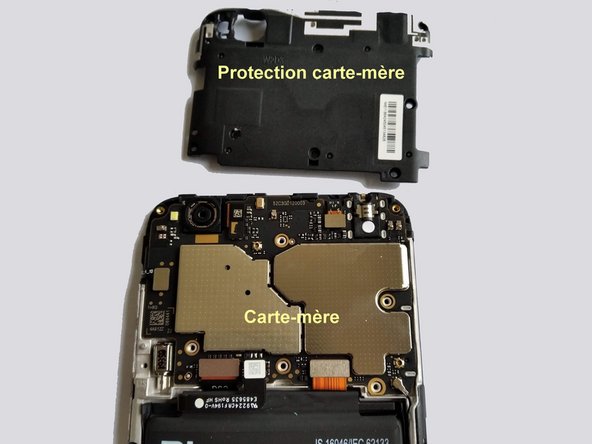
Remove the 8 mounting screws from the motherboard cover. One of them, located at the bottom left, is hidden by an opening indicator (small adhesive circle with the "MI" logo).
-
Carefully unclip the plastic cover, taking care not to twist it too much. Lever it up with a small screwdriver on one of the corners of the screen
-
-
-
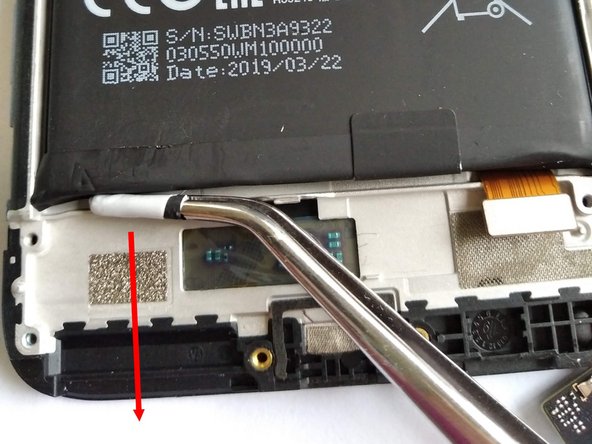
Peel off the 2 adhesive tabs located at the bottom of the battery
-
One at a time, pull these tabs horizontally, wrapping them around pliers or a screwdriver as you go. They will stretch to a length of around 20 to 30 cm
-
Disconnect the battery cable. The connector is located at the bottom of the motherboard between the screen connector and the charger module connector
-
Remove the battery
-
-
-
-
Disconnect the charger module cable. The connector is located at the bottom right of the motherboard
-
Carefully peel off the charger cable located on the right of the frame if it is not included with the new screen
-
Keep the flex cable away from dust so as not to degrade its adhesive
-
-
-
Carefully disconnect the following:
-
The touch connector located at the top right of the motherboard
-
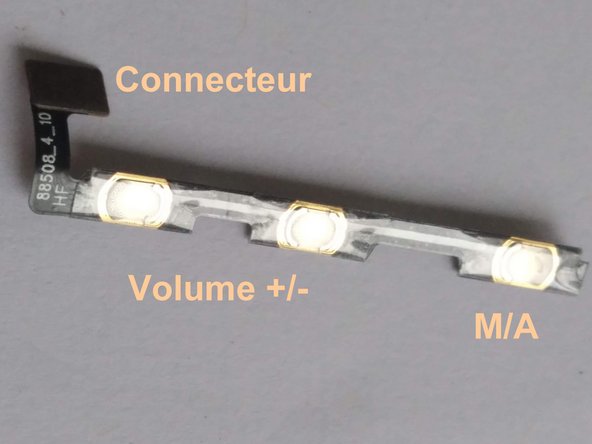
The volume/power cable connector, located on the left
-
The screen cable connector, located at the bottom left
-
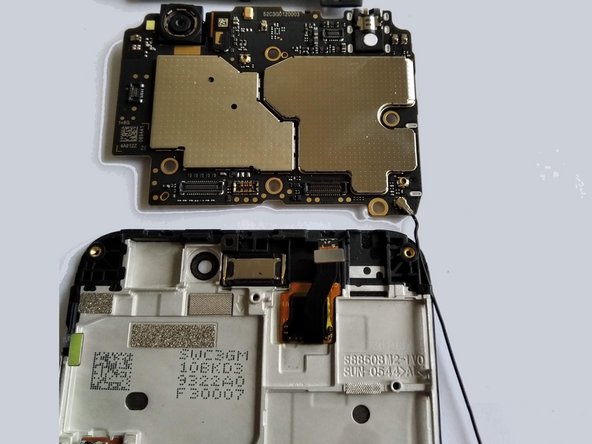
Remove the motherboard by lifting it from the bottom
-
-
-
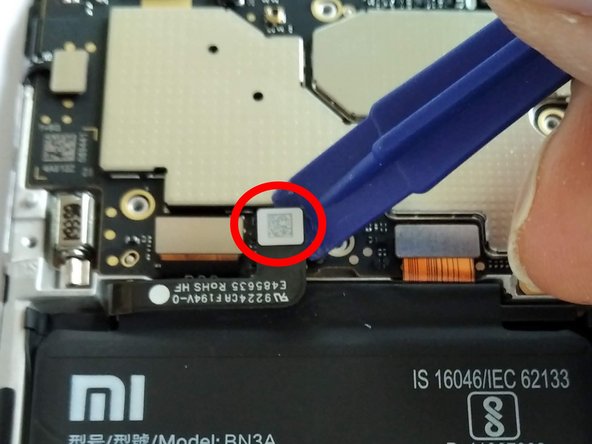
With a sharp blade, slice the adhesive under the vibrator's printed circuit to carefully remove it
-
Carefully remove the remaining glue under the vibrator with a sharp blade
-
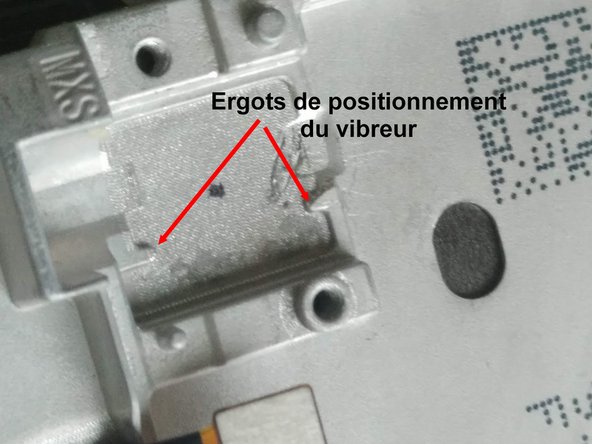
Glue the vibrator back onto the new screen frame, taking care to position it correctly between the two small lugs on the metal frame
-
Put a dot of glue on the vibrator motor
-
Press the motor into place so that the glue spreads over the motor and the frame
-
Immediately remove the motor and wait a few minutes for the glue to dry a little
-
When the glue is no longer liquid, but it still sticks slightly to the finger, position the motor into position and press. The bond will be solid after a few hours
-
-
-
With a very small flat screwdriver remove the earpiece speaker located at the top of the phone
-
Place it directly on the new screen so as not to get the orientation wrong
-
-
-
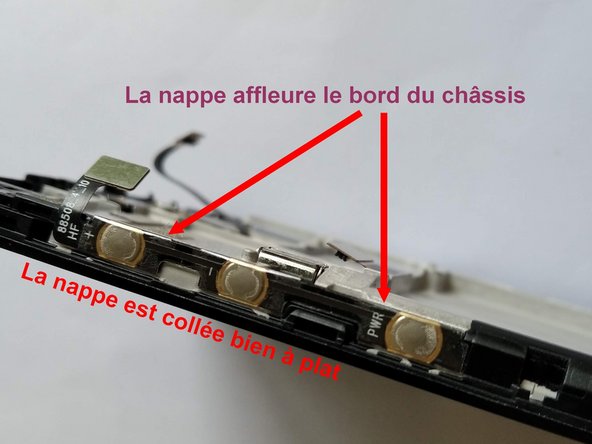
Carefully use a flat spudger or a sharp blade between the frame of the screen and the cable which supports the power and volume buttons, located on the left of the telephone to slice the adhesive and remove this cable
-
Carefully remove the glue on the back of the flex cable with a fingernail or a plastic spudger
-
Place the cable on the new chassis and check that it is positioned flat on the edge of the frame just flush with the metal edge of the chassis
-
Glue the flex cable with a thin line of neoprene glue (see step 9 for gluing instructions)
-
-
-
Carefully fold the touch screen flex connector located at the top left upwards
-
Place the motherboard on the new screen, taking care to position the headphone jack and the front camera in their respective slots. Be sure the rubber seal for the rear camera is in place.
-
Temporarily secure the motherboard in the chassis with one of the 8 screws of the midframe cover
-
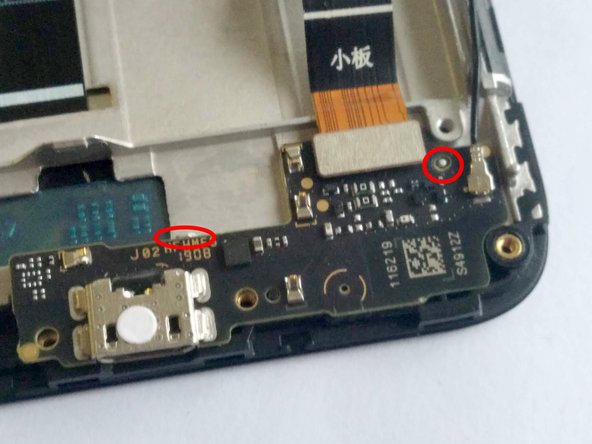
Plug in the touch screen connector, located at the top right of the motherboard
-
Plug in the power and volume button cable, located to the left of the motherboard
-
Plug in the screen cable, located at the bottom left of the motherboard.
-
-
-
On the new screen, remove the two blue stickers that protect the adhesive used to secure the charger module and the micro USB connector
-
Replace the charger module by positioning it correctly in relation to the two small metal lugs located on the chassis (a small cylindrical point located at the top right and a small protrusion located just above and to the right of the micro USB connector)
-
-
-
Plug the charger flex cable into the motherboard
-
Plug the other end into the charger module
-
On the frame of the screen, in the path of the charger cable, place a thin line of neoprene glue
-
Apply the flex cable to the frame to distribute the glue on the flex cable and in the path of the flex cable
-
Wait a few minutes and stick the cable onto the chassis starting from the center and flattening the cable going up and down towards the two connectors
-
Form the cable near the connectors without forcing it too much so as not to damage it
-
Check that the black coax antenna cable that connects the charger module to the motherboard is correctly positioned in its channel
-
-
-
Place 2 dots of contact adhesive (neoprene) on the chassis at the base of the battery, where the tabs are.
-
Position the battery in its location in order to distribute the glue on the battery and on the chassis then immediately remove the battery
-
As with gluing the vibrator, wait a few minutes before gluing the battery
-
Reconnect the battery flex cable to the motherboard
-
-
-
Position the loudspeaker module and install its 6 screws
-
Double-check on the right that the black coax antenna cable that connects the charger module and the motherboard is correctly positioned in its groove
-
-
-
Before completing the complete reassembly, check the proper functioning of the phone
-
Turn on the phone and check that the vibrator is functioning
-
Take a photo with and without flash then a selfie to check the front and rear cameras as well as the flash
-
Make a call to check the microphone and earpiece speaker
-
During the call, hold your hand close to the screen to check that it turns off. This indicates that the proximity sensor is working properly.
-
Check the loudspeaker by playing music or switching to speakerphone mode during a call
-
Check that the touchscreen works correctly with a drawing application or a test application
-
Bravo, you have been meticulous, everything works perfectly!
-
-
-
Check that the rubber surround around the rear camera is in place
-
Remove the screw previously placed temporarily to hold the motherboard in place
-
Reposition and reclip the protective cover of the motherboard and install its 8 screws
-
-
-
Reclip the case starting at the bottom and working upwards symmetrically on the left and right sides
-


The operation is accessible to any patient and meticulous person who will carefully follow the instructions of this tutorial.
The operation is accessible to any patient and meticulous person who will carefully follow the instructions of this tutorial.
Special thanks to these translators:
100%

These translators are helping us fix the world! Want to contribute?
Start translating ›
