
ASUS Q405U RAM Replacement

Jeremiah Baselice and 3 other contributors
Last updated on Jul 7, 2025
Views: 1.9K
View statistics:
- Past 24 Hours:
- 1
- Past 7 Days:
- 14
- Past 30 Days:
- 84
- All Time:
- 1,885
Comments: 1
1 comment on steps.
Completed: 0 1
No one has marked this guide "completed." Will you be the first?
1 person has marked this guide "completed." It's you — great job!
Favorites: 0 1
No one has favorited (and subscribed to) this guide. Will you be the first?
1 person has favorited (and subscribed to) this guide — and that's you!
Action Shots
Be an action hero! This guide needs images that better demonstrate how to perform specific actions.
Needs Better Images
Better photos will improve this guide. Help out by taking, editing, or uploading new ones!
Needs More Images
A few more images would make this guide's procedures crystal clear.
Introduction
Go to step 1 ↓If you are experiencing performance issues with your ASUS Q405U such as intermittent crashing, lagging, or difficulty turning the computer on, or planning to run applications that require large amounts of memory, use this guide to replace your RAM.
The Random Access Memory (RAM) is high-speed temporary storage that your computer uses to store currently active applications and data, allowing for fast access by the CPU. If you do not have the proper amount of RAM memory or if your RAM is broken, you will have problems with the computer's speed and ability to open applications.
Before using this guide, make sure that your new RAM is compatible with both the motherboard and the operating system. You can do this by looking at the motherboard and the operating system manuals.
Once you have the proper RAM, shut down the computer and unplug it. Since the RAM is such a sensitive component, it is also important to make sure that you ground yourself to discharge any static electricity by touching an unpainted metal surface on your computer case or wearing an anti-static wrist strap. A static shock to the RAM can damage the component before you even get to replace it.
What you need
Tools


-
-
-
Using the Phillips #1 screwdriver, remove eleven (11) 1.5 mm screws from the back cover.
 Ask FixBot
-
-
-
Pull the back cover off of your laptop. Use a spudger to help pry it off of the device.
-
-
-
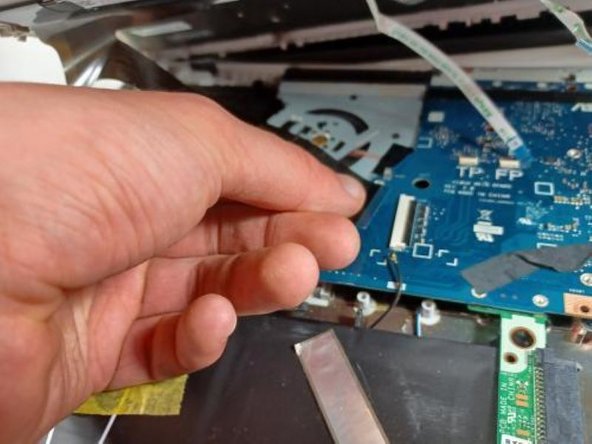
Disconnect the 4 wires attached from the keyboard side of laptop to the screen side of laptop by pulling them out of their sockets on one end (as shown in picture).
-
-
-
OPTIONAL: Additional pictures to demonstrate moving keyboard out of the way without detaching connections.
-
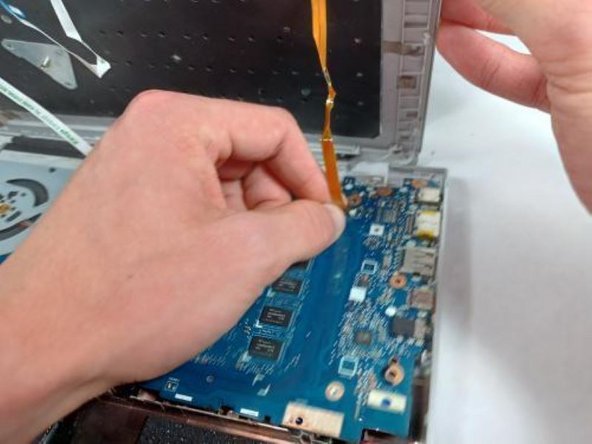
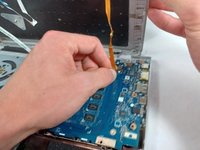
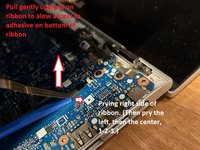
Lift the ribbon cable with gentle pressure, pry the ribbon away from the motherboard on the right side, then the left, then the center, prying away only a little triangle of tape at a time, applying gentle upward pressure to the tape while you loosen and pry.
-
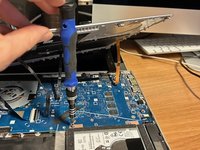
Once you have enough slack in the three ribbons that hold the keyboard down too tightly, lift the front of the keyboard and twist counterclockwise to produce enough room to reach the screws securing the hard drive with your screwdriver.
-
-
-
-
-
-
Pull the metal arms out a couple of millimeters to release the RAM stick.
-
Slide the RAM stick from the socket on the motherboard.
-
-





To reassemble your device, follow these instructions in reverse order. Take your e-waste to an R2 or e-Stewards certified recycler.

Team

UMass Dartmouth, Team 2-8, Sinclaire Fall 2021 Member of UMass Dartmouth, Team 2-8, Sinclaire Fall 2021
UMASSD-SINCLAIRE-F21S2G8
4 Members
60 Guides authored
