Introduction
Over time, components such as the bumpers can wear down, become unresponsive, or break. If the bumpers in your The Xbox One Elite Wireless Controller Series 2 (Model 1797) have stopped working, follow this guide to replace the bumper assembly.
This guide will walk you through the process of disassembling the controller to access and replace the bumper assembly. Whether your bumpers feel loose, fail to register inputs, or have completely stopped working, this step-by-step guide will help restore full functionality.
Follow Steps 1–6 to remove the bumper assembly. If you are replacing the switches, proceed with the remaining steps to remove them from underneath the assembly.
Caution: Replacing the bumper switches requires a soldering iron. Follow this guide for soldering and desoldering instructions. Be careful, as soldering irons become extremely hot and can cause burns, and always work in a well-ventilated area to avoid inhaling fumes.
Before starting, make sure your controller is powered off, disconnected, and the battery is removed. This repair requires moderate difficulty and involves careful handling of internal components, so take your time and follow each step closely to avoid damage.
What you need
-
-
-
Press and hold the Xbox button located at the top center of the controller for several seconds until the power menu appears on screen.
-
Continue holding the button until you feel a vibration or see the shutdown options displayed on your connected device.
-
Use the joystick or directional pad to navigate to the “Turn off controller” option in the power menu.
-
Select “Turn off controller” and wait until the Xbox button light completely turns off before starting the repair process.
 Ask FixBot
-
-
-
Insert a plastic opening tool between the front faceplate and the controller shell near the top edge of the controller, close to the Xbox button.
-
Gently pry upward to begin releasing the plastic clips that secure the front faceplate to the controller body.
-
Slowly work your way around the outer edge of the controller, releasing each clip one at a time to avoid placing too much stress on the plastic.
-
Carefully continue separating the faceplate from the controller until all clips and adhesive sections have been fully detached.
-
-
-
Use a TR8 Torx security screwdriver to remove the eight screws from the midframe.
-
Peel back or puncture the sticker carefully to access the hidden screw underneath without damaging the surrounding plastic.
-
-
-
Remove the thumbsticks, D-pad, and rear paddles from the controller before continuing with the disassembly process.
-
Grip each thumbstick firmly and rotate it counterclockwise until it disconnects from the controller.
-
Carefully lift the D-pad away from the front of the controller and set it aside in a safe location.
-
-
-
-
Open the controller slowly using a motion similar to opening a book rather than pulling the two halves straight apart.
-
-
-
Remove the plastic bracket that connects both bumper buttons into a single assembly piece.
-
Carefully lift the bumper assembly upward from the controller housing to begin releasing it from the retaining clips.
-
Avoid bending the bumper assembly excessively during removal, as the thin plastic clips can break easily under pressure.
-
-
-
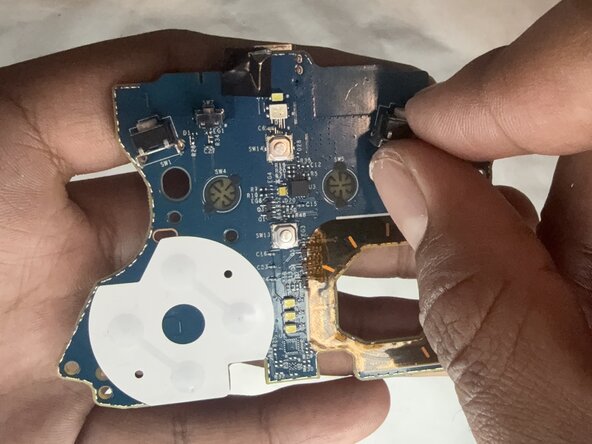
Inspect the bumper mechanism and internal switch components for signs of wear, dirt buildup, damage, or misalignment.
-
Carefully press the internal bumper switch by hand to test whether the button responds properly when activated.
-
Check for inconsistent clicking, sticking, delayed response, or a lack of tactile feedback while pressing the switch.
-
If dirt or debris is visible around the switch area, use a dust blower, and gently clean the affected area using a cotton swab lightly dampened with isopropyl alcohol or contact cleaner.
-
Press the switch repeatedly during cleaning to help loosen debris and improve button responsiveness.
-
-
-
If the tactile switch is damaged or no longer responding properly, it may need to be removed and replaced.
-
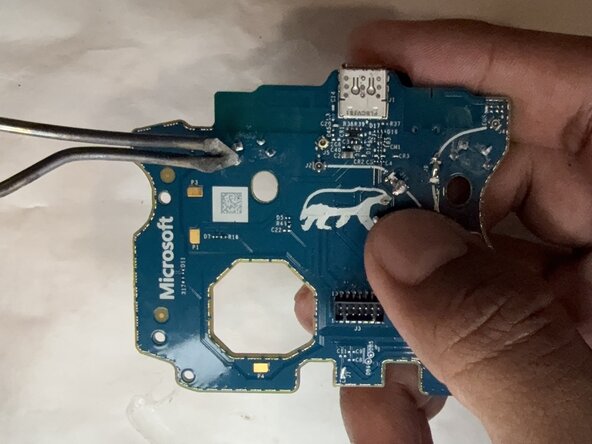
Heat a soldering iron and place the desoldering wick over the solder joints connected to the switch pins on the circuit board.
-
Carefully apply the soldering iron to the desoldering wick to absorb and remove the existing solder from each switch pin.
-
Continue removing solder until the tactile switch is no longer firmly attached to the circuit board.
-
Use tweezers or small pliers to gently lift the faulty switch away from the board once all solder connections have been released.
-
Allow the board to cool briefly before installing a replacement switch or continuing with additional repairs.
-
-
-
Position the replacement bumper assembly at the top of the controller in the same orientation as the original component.
-
Carefully align both the left bumper (LB) and right bumper (RB) over their corresponding internal switches before pressing the assembly into place.
-
Gently lower the bumper assembly onto the retaining clips and apply light pressure until the clips begin to secure the component in place.
-
Check that the bumper assembly rests naturally and evenly across both internal switches without gaps or uneven spacing.
-
Press both bumper buttons several times to test their responsiveness and confirm that each button clicks properly.
-
Verify that both bumpers return smoothly to their original position after being pressed. If either bumper feels uneven, loose, or stuck, carefully remove the assembly and realign it before continuing with reassembly.
-
-
-
Slowly press the two halves of the controller together until the shell closes evenly without large gaps or resistance.
-
Reinstall all eight security Torx screws around the controller housing, including the hidden screw located beneath the sticker inside the battery compartment.
-
Tighten each screw evenly to secure the shell without overtightening or damaging the plastic threads.
-
Align the front faceplate with the controller shell and gently press around the edges until all retaining clips snap back into place.
-
Reattach the thumbsticks, D-pad, and rear paddles to their original positions on the controller.
-
Test the left bumper (LB) and right bumper (RB) several times to confirm that both buttons click properly and return smoothly after being pressed.
-
Power on the controller and verify that all buttons, triggers, and bumper functions operate correctly before completing the repair.
-
-






To reassemble your device, follow these instructions in reverse order. Take your e-waste to an R2 or e-Stewards certified recycler.

Team

CSU Los Angeles, Team 7-18, Grodsky Spring 2026 Member of CSU Los Angeles, Team 7-18, Grodsky Spring 2026
CSULA-GRODSKY-S26S7G18
1 Member
12 Guides authored
