Xbox One ワイヤレスコントローラの下部基板の交換

What you need

  1. Xbox One ワイヤレスコントローラの下部基板の交換, バッテリーパック: step 1, image 1 of 1
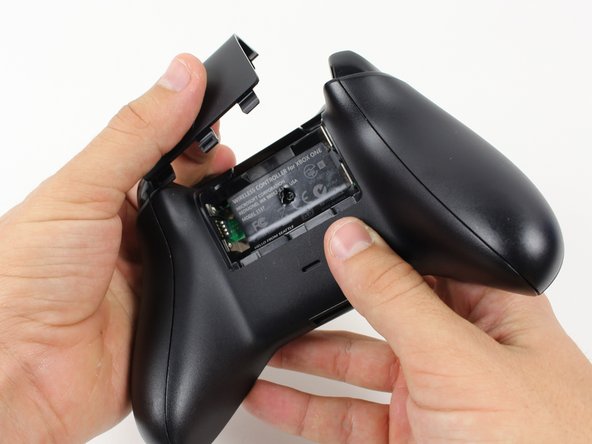
    • バッテリーパックのカバーを外します。

    • バッテリーを取り外します。

  2. Xbox One ワイヤレスコントローラの下部基板の交換, ハンドルをスライドします: step 2, image 1 of 2 Xbox One ワイヤレスコントローラの下部基板の交換, ハンドルをスライドします: step 2, image 2 of 2
    • ナイロン製スパッジャーを使ってこの作業を行ってください。ここではメタルスパッジャーを使用しています。

    • サイドハンドルを外すため、コントローラーをしっかりと握ります。スパッジャーをフロントとハンドルプレートの間にできた隙間に差し込みます。

    • スパッジャーを前後に動かしながら、フロントプレートからサイドプレートを外します。サイドプレートの隙間全体にスパッジャーを動かして作業を進めてください。

  3. Xbox One ワイヤレスコントローラの下部基板の交換, ネジ: step 3, image 1 of 2 Xbox One ワイヤレスコントローラの下部基板の交換, ネジ: step 3, image 2 of 2
    • ラベルの裏のコントローラ中央部分にネジが一本隠れています。

    • ドライバーを使って、ラベルの中央部分の穴に向けて直接押し込んで穴を開けます。

    • もしラベルに穴を開けたくない場合はラベルを剥がしてください。

    • TR8いじり止めトルクスドライバーを使って、コントローラ裏側にある長さ10mmのネジを5本外します。

  4. Xbox One ワイヤレスコントローラの下部基板の交換, バックプレート: step 4, image 1 of 1
    • バックプレートを取り外します。

  5. Xbox One ワイヤレスコントローラの下部基板の交換, フェイスプレート: step 5, image 1 of 1
    • フェイスプレートを取り外します。

  6. Xbox One ワイヤレスコントローラの下部基板の交換, 上部基板: step 6, image 1 of 2 Xbox One ワイヤレスコントローラの下部基板の交換, 上部基板: step 6, image 2 of 2
    • 予め振動用モーターをソケットから外しておいてください。

    • ハンダを除去し、モーターと基板をつないでいる赤と黒の導線を外します。

    • ハンダを除去し、上部基板につながっている黒とグレーの導線を外します。

    • モーターを外します。

    • はんだごてを使用する際は、周りの部品を損傷させないよう、また火傷しないように気をつけてください。

    • はんだごての使用方法は、こちらをご覧ください。

  7. Xbox One ワイヤレスコントローラの下部基板の交換: step 7, image 1 of 1
    • モーターの台座付近にある2本の7mm T6ネジを外します。

  8. Xbox One ワイヤレスコントローラの下部基板の交換: step 8, image 1 of 1
    • 基板の中央付近をしっかりと握ります。

    • 基板を軽く前後に揺すりながら持ち上げて取り外します。

    • 基板を外す際にある程度の力が必要です。

  9. Xbox One ワイヤレスコントローラの下部基板の交換, トリガーランブルモータ: step 9, image 1 of 1
    • コントローラ前部のワイヤーを留めている黄色のテープを剥がします。

  10. Xbox One ワイヤレスコントローラの下部基板の交換: step 10, image 1 of 3 Xbox One ワイヤレスコントローラの下部基板の交換: step 10, image 2 of 3 Xbox One ワイヤレスコントローラの下部基板の交換: step 10, image 3 of 3
    • トリガーの下側にある2つの7mm T6六角ネジを緩めます。

  11. Xbox One ワイヤレスコントローラの下部基板の交換: step 11, image 1 of 1
    • トリガーのカバーを取り外します。

  12. Xbox One ワイヤレスコントローラの下部基板の交換: step 12, image 1 of 1
    • マザーボードから半田付けされたワイヤを取り外します。

    • ソケットからランブルモータを取り出して、接続されたワイヤを引っ張ります。

  13. Xbox One ワイヤレスコントローラの下部基板の交換, 下部基板: step 13, image 1 of 2 Xbox One ワイヤレスコントローラの下部基板の交換, 下部基板: step 13, image 2 of 2
    • マザーボードに留められた6本のT6トルクスネジを外します。

  14. Xbox One ワイヤレスコントローラの下部基板の交換: step 14, image 1 of 2 Xbox One ワイヤレスコントローラの下部基板の交換: step 14, image 2 of 2
    • 樹脂製のツメを外し、上部バンパーを外します。ツメは表裏どちらにもあります。

    • ナイロン樹脂製のスパッジャの使用を推奨します。基板付近で金属のスパッジャを使用すると、デバイスを損傷する可能性があります。

  15. Xbox One ワイヤレスコントローラの下部基板の交換: step 15, image 1 of 2 Xbox One ワイヤレスコントローラの下部基板の交換: step 15, image 2 of 2
    • ホームボタン周りのカバーを持ち上げて外します。

    • スパッジャを使用して反対側から叩き出します。

    • ナイロン樹脂製のスパッジャの使用を推奨します。基板付近で金属のスパッジャを使用すると、デバイスを損傷する可能性があります。

    • この作業にはかなりの力を要します。

  16. Xbox One ワイヤレスコントローラの下部基板の交換: step 16, image 1 of 1
    • 下部基板を取り外します。

Conclusion

再度組み立てる際は、これらの手順を逆の順番に従って作業を進めてください。

28 other people completed this guide.

Special thanks to these translators:

en jp

100%

These translators are helping us fix the world! Want to contribute?
Start translating ›

Liam Gow

Member since: 01/22/15

5,285 Reputation

3 Guides authored

Team

Cal Poly, Team 20-15, Maness Winter 2015 Member of Cal Poly, Team 20-15, Maness Winter 2015

CPSU-MANESS-W15S20G15

5 Members

50 Guides authored

11 Comments

Is de-soldering optional?

John Gonzalez - Reply

Considering the placement of wires attached by solder on both sides of the top board, it would be quite difficult to reach anything beneath it otherwise. I suppose it depends on what you're trying to achieve.

In any case, you might as well try to move it without desoldering if desoldering is going to be an issue. Make sure not to pull hard, though.

Liam Gow -

I have a question... Will the motherboard you can get at the store here work it the newer controllers with built in headphone jack?

ETHREAL1 - Reply

I would expect not, I'm afraid. The motherboards will probably have different circuitry, even if the shapes are the same, which they may not be.

Liam Gow -

The position/mounting of the LB and RB buttons on the motherboard piece between the day-one/sans-jack and the newer 3.5mm jack (non-Slim) boards are completely different.

The older revision motherboard has the mountings inverted (pointing downwards to the south end-headset attachment port- of the controller) compared to the newer ones.

The newer ones have the circuit with the bumper buttons mounted pointing to the north end toward the bumpers on the top of the controller.
icho - Reply

Add Comment

View Statistics:

Past 24 Hours: 11

Past 7 Days: 74

Past 30 Days: 294

All Time: 58,630