Free Shipping on Domestic Orders $75+

PowerBook G4 Aluminum 17" 1.67 GHz (High-Res) Upper Case Replacement

Views: 5K

View statistics:

Past 24 Hours:
3
Past 7 Days:
22
Past 30 Days:
104
All Time:
4,985
Comments: 6

6 comments on steps.

Completed: 0

No one has marked this guide "completed." Will you be the first?

Favorites: 0

No one has favorited (and subscribed to) this guide. Will you be the first?

Time Required: No estimate
Difficulty: Moderate
PowerBook G4 Aluminum 17" 1.67 GHz (High-Res) Upper Case Replacement

Introduction

Go to step 1 ↓

Remove your upper case to access the internals of your PowerBook.

What you need

Parts

Tools

    1. PowerBook G4 Aluminum 17" 1.67 GHz (High-Res) Upper Case Replacement, Battery: step 1, image 1 of 2 PowerBook G4 Aluminum 17" 1.67 GHz (High-Res) Upper Case Replacement, Battery: step 1, image 2 of 2
      • Use your thumbs to push the two battery retaining tabs away from the battery.

      • The battery should pop up enough to rotate it toward yourself and lift it out of the lower case.

      Ask FixBot

      Add Comment

    1. PowerBook G4 Aluminum 17" 1.67 GHz (High-Res) Upper Case Replacement, Memory Door: step 2, image 1 of 1
      • Remove the three 2.3 mm Phillips screws securing the memory cover to the lower case.

      Ask FixBot

      Add Comment

    2. PowerBook G4 Aluminum 17" 1.67 GHz (High-Res) Upper Case Replacement: step 3, image 1 of 2 PowerBook G4 Aluminum 17" 1.67 GHz (High-Res) Upper Case Replacement: step 3, image 2 of 2
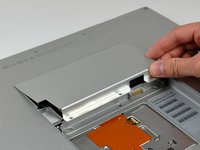
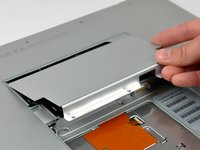
      • Lift the memory cover slightly and pull it toward yourself to remove it from the lower case.

      Ask FixBot

      Add Comment

    1. PowerBook G4 Aluminum 17" 1.67 GHz (High-Res) Upper Case Replacement, Upper Case: step 4, image 1 of 1
      • Remove the following ten screws:

      • Two 14.7 mm shouldered Phillips.

      • Three 12.3 mm Phillips.

      • One 3.8 mm T8 Torx.

      • One 6.8 mm T8 Torx.

      • Three 1.3 mm Phillips.

      Ask FixBot

      Add Comment

    2. PowerBook G4 Aluminum 17" 1.67 GHz (High-Res) Upper Case Replacement: step 5, image 1 of 2 PowerBook G4 Aluminum 17" 1.67 GHz (High-Res) Upper Case Replacement: step 5, image 2 of 2
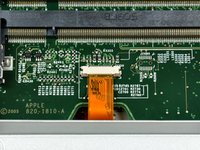
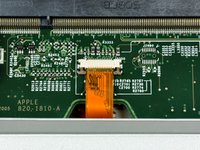
      • The ZIF cable is located underneath the bottom RAM slot. If your PowerBook has both RAM slots occupied, make sure to remove the RAM chip.

      • Use your fingernails to separate the ZIF cable lock away from its socket. (Move the two brown bits down 1mm)

      • The ZIF cable lock will move about a millimeter away from the socket before it stops (see picture 2). Do not try to remove the ZIF cable lock.

      Ask FixBot

      Add Comment

    3. PowerBook G4 Aluminum 17" 1.67 GHz (High-Res) Upper Case Replacement: step 6, image 1 of 1
      • Use the tip of a spudger to slide the trackpad ribbon cable out of its socket.

      Ask FixBot

      Add Comment

    4. PowerBook G4 Aluminum 17" 1.67 GHz (High-Res) Upper Case Replacement: step 7, image 1 of 1
      • Remove the four 3.4 mm Phillips screws from the PC card side of the PowerBook.

      • When replacing these screws, you must reinstall each screw in the correct order. Begin by installing the screw closest to the display hinge, and go out from there.

      Ask FixBot

      Add Comment

    5. PowerBook G4 Aluminum 17" 1.67 GHz (High-Res) Upper Case Replacement: step 8, image 1 of 1
      • Remove the four 3.4 mm Phillips screws from the DVI connector side of the PowerBook.

      • When replacing these screws, you must reinstall each screw in the correct order. Begin by installing the screw closest to the display hinge, and go out from there.

      • During reassembly, make sure to reinstall the two screws on the right into their appropriate locations, and not the DVI port anchor holes.

      Ask FixBot

      Add Comment

    6. PowerBook G4 Aluminum 17" 1.67 GHz (High-Res) Upper Case Replacement: step 9, image 1 of 2 PowerBook G4 Aluminum 17" 1.67 GHz (High-Res) Upper Case Replacement: step 9, image 2 of 2
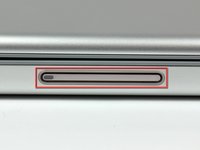
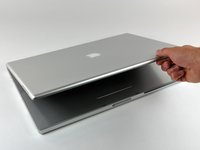
      • Depress the display latch release button and open your display.

      Ask FixBot

      Add Comment

    7. PowerBook G4 Aluminum 17" 1.67 GHz (High-Res) Upper Case Replacement: step 10, image 1 of 2 PowerBook G4 Aluminum 17" 1.67 GHz (High-Res) Upper Case Replacement: step 10, image 2 of 2
      • Starting near the display, lift the upper case straight up off the lower case, minding any cables that may get caught.

      Ask FixBot

      Add Comment

Conclusion

To reassemble your device, follow these instructions in reverse order.

Cancel: I did not complete this guide.

Attached Documents

0 Guide Comments

Add Comment

View Statistics:

Past 24 Hours: 3

Past 7 Days: 22

Past 30 Days: 104

All Time: 4,985