
Toniebox Battery Replacement

What you need

  1. Toniebox Battery Replacement, Toniebox Opening Procedure: step 1, image 1 of 2 Toniebox Battery Replacement, Toniebox Opening Procedure: step 1, image 2 of 2
    • Put the Toniebox on a flat surface (e.g. a desk or a workbench).

    • Apply some pressure and turn the Toniebox counterclockwise to unlock the two clips beneath the bottom plate.

    • You will hear a "klick" when the two clips unlock.

  2. Toniebox Battery Replacement: step 2, image 1 of 1
    • Remove the bottom plate.

  3. Toniebox Battery Replacement: step 3, image 1 of 1
    • Remove the Phillips #1 screw on the bottom of the Toniebox.

  4. Toniebox Battery Replacement: step 4, image 1 of 1
    • Lift the inner part out of the foam housing.

  5. Toniebox Battery Replacement, Battery: step 5, image 1 of 2 Toniebox Battery Replacement, Battery: step 5, image 2 of 2
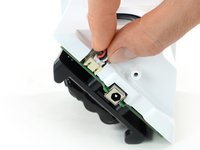
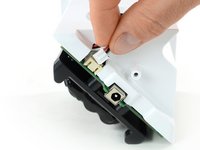
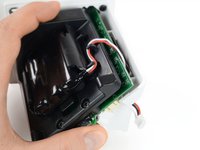
    • Unplug the battery connector from the main board by gently pulling the cables.

    • When reconnecting the new battery make sure to properly orient the connector.

  6. Toniebox Battery Replacement: step 6, image 1 of 3 Toniebox Battery Replacement: step 6, image 2 of 3 Toniebox Battery Replacement: step 6, image 3 of 3
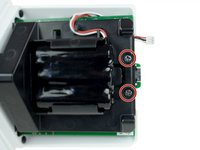
    • Losen the two screws next to the battery. Don't remove them.

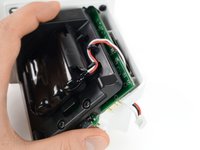
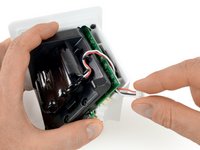
    • Lift the main board a bit to widen the gap between the white plastic housing.

    • This gap will help you in the next step.

  7. Toniebox Battery Replacement: step 7, image 1 of 2 Toniebox Battery Replacement: step 7, image 2 of 2
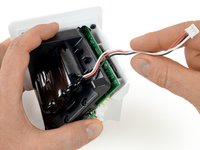
    • Feed the battery cable from behind the main board and out of its plastic guide hooks.

    • When installing the new battery you don't have to feed the cable behind the main board. Depending on their length aligning them along the black plastic will suffice.

  8. Toniebox Battery Replacement: step 8, image 1 of 3 Toniebox Battery Replacement: step 8, image 2 of 3 Toniebox Battery Replacement: step 8, image 3 of 3
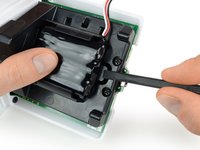
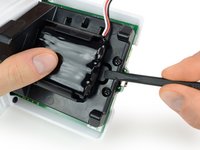
    • Use a spudger or finger to push down the plastic latch that keeps the battery in place.

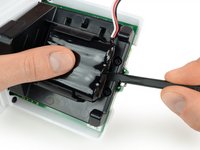
    • Push the battery out of its frame.

  9. Toniebox Battery Replacement: step 9, image 1 of 1
    • Remove the battery.

Conclusion

To reassemble your device, follow these instructions in reverse order.

Take your e-waste to an R2 or e-Stewards certified recycler.

42 other people completed this guide.

Special thanks to these translators:

de en

100%

Tobias Isakeit is helping us fix the world! Want to contribute?
Start translating ›

Tobias Isakeit

Member since: 03/31/14

117,781 Reputation

188 Guides authored

Team

14 Comments

Hallo,

habe den Akku (30€ über eBay

Kerem - Reply

Hi kann mir einer sagen ob der Akku denn man im ifixit Shop kaufen kann ein ni-mh Akku ist?

Alexander - Reply

Jep, es handelt sich um einen NiMH Akku (ist auf dem Produktbild zu sehen). Wie der originale, und sogar mit etwas mehr Ladung ;)

Tobias Isakeit -

Und ist es besser einen mit mehr Ladung zu nehmen oder sollte man es so wie im Original nutzen? Was ist in dem Original Akku der Tonie Box? 1800mAh?

yvi14 - Reply

Der originale hat 2000 mAh, der in unserem Store hat 2200 mAh. Hält einfach ein wenig länger ;)

Tobias Isakeit -

Add Comment

View Statistics:

Past 24 Hours: 70

Past 7 Days: 351

Past 30 Days: 1,743

All Time: 90,196