Free Shipping on Domestic Orders $75+

Steam Machine (2026) SSD Replacement

What you need

    1. Steam Machine (2026) SSD Replacement, Before you begin: step 1, image 1 of 3 Steam Machine (2026) SSD Replacement, Before you begin: step 1, image 2 of 3 Steam Machine (2026) SSD Replacement, Before you begin: step 1, image 3 of 3
      • Before you begin this repair:

      • Power down your Steam Machine and disconnect the power cable.

      • Unplug any remaining cables or accessories from all ports.

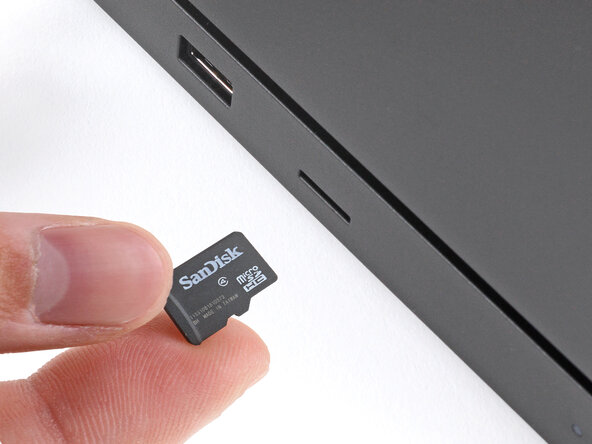
      • If you have a microSD card installed, remove it. Otherwise, it may break during this procedure.

      Ask FixBot

      Add Comment

    1. Steam Machine (2026) SSD Replacement, Reposition the Steam Machine: step 2, image 1 of 1
      • Reposition the Steam Machine so the bottom is facing up.

      Ask FixBot

      Add Comment

    2. Steam Machine (2026) SSD Replacement, Remove the feet: step 3, image 1 of 3 Steam Machine (2026) SSD Replacement, Remove the feet: step 3, image 2 of 3 Steam Machine (2026) SSD Replacement, Remove the feet: step 3, image 3 of 3
      • Use a T8 Torx screwdriver to remove the four rubber feet.

      Ask FixBot

      Add Comment

    1. Steam Machine (2026) SSD Replacement, Reposition the Steam Machine: step 4, image 1 of 1
      • Reposition the Steam Machine so the back panel is facing up.

      Ask FixBot

      Add Comment

    2. Steam Machine (2026) SSD Replacement, Loosen the back panel screws: step 5, image 1 of 2 Steam Machine (2026) SSD Replacement, Loosen the back panel screws: step 5, image 2 of 2
      • Use a T8 Torx screwdriver to fully loosen the two captive screws securing the back panel.

      Ask FixBot

      Add Comment

    3. Steam Machine (2026) SSD Replacement, Remove the back panel: step 6, image 1 of 3 Steam Machine (2026) SSD Replacement, Remove the back panel: step 6, image 2 of 3 Steam Machine (2026) SSD Replacement, Remove the back panel: step 6, image 3 of 3
      • The back panel is secured by two hinge clips near the bottom corners and two locking clips on the sides.

      • Lift the top edge of the panel (near the screws) until the two locking clips release.

      • If you're having trouble getting an initial grip on the panel, use a spudger to lift it enough to grab with your fingers.

      • Slide the panel towards the top edge and lift to remove it.

      Ask FixBot

      Add Comment

    4. Steam Machine (2026) SSD Replacement, Remove the inner assembly screws: step 7, image 1 of 2 Steam Machine (2026) SSD Replacement, Remove the inner assembly screws: step 7, image 2 of 2
      • Use a T8 Torx screwdriver to remove the two 7.3 mm‑long screws securing the inner assembly.

      Ask FixBot

      Add Comment

    5. Steam Machine (2026) SSD Replacement, Remove the inner assembly: step 8, image 1 of 3 Steam Machine (2026) SSD Replacement, Remove the inner assembly: step 8, image 2 of 3 Steam Machine (2026) SSD Replacement, Remove the inner assembly: step 8, image 3 of 3
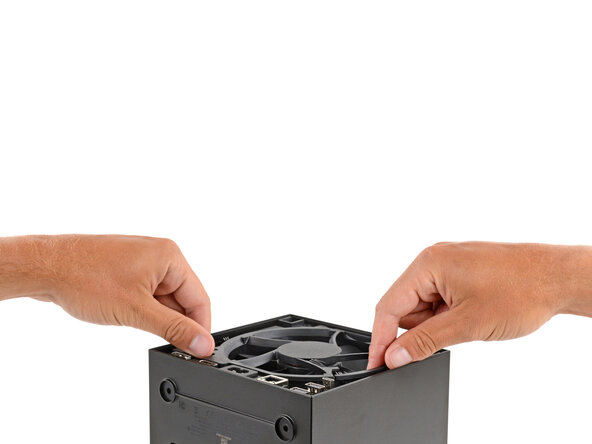
      • After removal, don't lay the inner assembly down on the microSD and USB ports. These ports are fragile and shouldn't have the weight of the assembly resting on them.

      • Grip the inner assembly under the fan and lift it straight up and out of the shell.

      • Set the inner assembly down so the SSD is on top.

      Ask FixBot

      Add Comment

    1. Steam Machine (2026) SSD Replacement, Remove the SSD screw: step 9, image 1 of 2 Steam Machine (2026) SSD Replacement, Remove the SSD screw: step 9, image 2 of 2
      • Use a T8 Torx screwdriver to remove the 5.1 mm‑long screw securing the SSD.

      • With the screw removed, the SSD will pop up at a shallow angle.

      Ask FixBot

      Add Comment

    2. Steam Machine (2026) SSD Replacement, Remove the SSD: step 10, image 1 of 2 Steam Machine (2026) SSD Replacement, Remove the SSD: step 10, image 2 of 2
      • Don't pull up on the SSD at a sharp angle, or you may damage the SSD and its socket.

      • Pull the SSD out of its socket at the angle it popped up at to remove it.

      Ask FixBot

      Add Comment

    3. Steam Machine (2026) SSD Replacement, If changing SSD length: step 11, image 1 of 2 Steam Machine (2026) SSD Replacement, If changing SSD length: step 11, image 2 of 2
      • The standoff screw can be moved to accommodate two different SSD form factors: 2280 or 2230.

      • Use a 5.0 mm nut driver to remove the standoff screw and install it in the desired position:

      • 2280

      • 2230

      Ask FixBot

      Add Comment

Conclusion

To reassemble your device, follow these instructions in reverse order.

Follow Valve's SteamOS installation instructions to install, re-image, or repair SteamOS on your Steam Machine. Follow Valve's Steam Deck recovery instructions to reset or recover SteamOS on your device. For installing Windows, official resources can be found here.

Take your e-waste to an R2 or e-Stewards certified recycler.

Repair didn’t go as planned? Try some basic troubleshooting, or ask our Answers community for help.

Cancel: I did not complete this guide.

Spencer Day

Member since: 09/14/22

205,151 Reputation

1,266 Guides authored

0 Guide Comments

Add Comment

View Statistics:

Past 24 Hours: 153

Past 7 Days: 257

Past 30 Days: 265

All Time: 273