Free Shipping on Domestic Orders $75+

Sony Walkman D-EJ360 Laser Module Replacement

What you need

    1. Sony Walkman D-EJ360 Laser Module Replacement, Lid: step 1, image 1 of 1
      • Open the lid on the Walkman by pressing the open button on the device.

      Ask FixBot

      Add Comment

    2. Sony Walkman D-EJ360 Laser Module Replacement: step 2, image 1 of 3 Sony Walkman D-EJ360 Laser Module Replacement: step 2, image 2 of 3 Sony Walkman D-EJ360 Laser Module Replacement: step 2, image 3 of 3
      • Grip the thin end of each spring using a pair of tweezers, slide it out of the lid notch, then press down on the main coil to release and remove it.

      Ask FixBot

      Add Comment

    3. Sony Walkman D-EJ360 Laser Module Replacement: step 3, image 1 of 3 Sony Walkman D-EJ360 Laser Module Replacement: step 3, image 2 of 3 Sony Walkman D-EJ360 Laser Module Replacement: step 3, image 3 of 3
      • Insert the metal spudger in the crevice between the blue lid and the white body of the Walkman.

      • There is a notch where the lid is held under to stay in place. With the spudger, push the blue lid portion down and out.

      • This may require some harder force. You will hear a popping sound when you successfully push the lid out under the notch.

      • Repeat the same tactic on the other side. The other side should become easier to pop off.

      • Remove the lid.

      Ask FixBot

      Add Comment

    1. Sony Walkman D-EJ360 Laser Module Replacement, Laser Module: step 4, image 1 of 2 Sony Walkman D-EJ360 Laser Module Replacement, Laser Module: step 4, image 2 of 2
      • Remove the eight 6.1 mm screws using a Phillips #00 screwdriver.

      • Open the battery cover to reveal the last screw.

      • Remove the ninth 6.1 mm screw using a Phillips #00 screwdriver.

      Ask FixBot

      Add Comment

    2. Sony Walkman D-EJ360 Laser Module Replacement: step 5, image 1 of 2 Sony Walkman D-EJ360 Laser Module Replacement: step 5, image 2 of 2
      • Insert a Jimmy into the seam between the upper and lower cases and pry apart.

      • Avoid initially prying near buttons, or the laser assembly.

      • Pry until the there is an audible click. The halves should visibly separate roughly 1/4 in.

      • Work around the seam in a circular path, separating the halves completely.

      • The motherboard and turn table module are only held in by gravity in the blue shell. Do not tip the device while separating the shells.

      Ask FixBot

      Add Comment

    3. Sony Walkman D-EJ360 Laser Module Replacement: step 6, image 1 of 2 Sony Walkman D-EJ360 Laser Module Replacement: step 6, image 2 of 2
      • Using tweezers, gently lift the the locking flap on the laser module ribbon connector.

      • Gently remove the ribbon cable from the connector.

      Ask FixBot

      Add Comment

    4. Sony Walkman D-EJ360 Laser Module Replacement: step 7, image 1 of 3 Sony Walkman D-EJ360 Laser Module Replacement: step 7, image 2 of 3 Sony Walkman D-EJ360 Laser Module Replacement: step 7, image 3 of 3
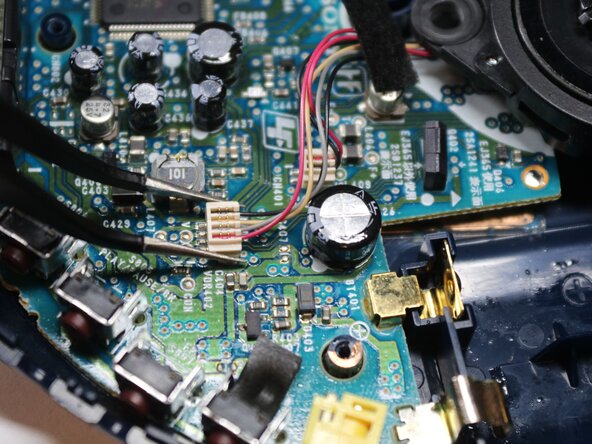
      • Using tweezers, squeeze the upper half of the four wire connector, and lift straight up to remove the connector.

      • The connector may make a tactile click when disengaged.

      • Repeat the step for the two wire connector.

      Ask FixBot

      Add Comment

    5. Sony Walkman D-EJ360 Laser Module Replacement: step 8, image 1 of 2 Sony Walkman D-EJ360 Laser Module Replacement: step 8, image 2 of 2
      • Ensure the ribbon cable, two, and four wire cables are all removed and not tangled with the motherboard.

      • Gently lift the laser module and place aside.

      Ask FixBot

      Add Comment

Conclusion

To reassemble your device, follow these instructions in reverse order.

Cancel: I did not complete this guide.

Kristen Gismondi

Member since: 11/12/14

108,400 Reputation

271 Guides authored

0 Guide Comments

Add Comment

View Statistics:

Past 24 Hours: 3

Past 7 Days: 11

Past 30 Days: 58

All Time: 305