Free Shipping on Domestic Orders $75+

Sony Reader Touch Edition PRS-600 SD and Pro Duo Memory Card Holders Replacement

What you need

    1. Sony Reader Touch Edition PRS-600 SD and Pro Duo Memory Card Holders Replacement, Back Panel: step 1, image 1 of 1
      • Using the Phillips head screwdriver PH000, remove the two 1.4 mm screws that are located on the backside of the device.

      Ask FixBot

      Add Comment

    2. Sony Reader Touch Edition PRS-600 SD and Pro Duo Memory Card Holders Replacement: step 2, image 1 of 1
      • Slide the back cover off by pushing it to the left, away from the side that held the screws.

      • Remove the cover.

      Ask FixBot

      Add Comment

    3. Sony Reader Touch Edition PRS-600 SD and Pro Duo Memory Card Holders Replacement: step 3, image 1 of 1
      • This is what the device should look like once the back cover panel has been removed.

      Ask FixBot

      Add Comment

    1. Sony Reader Touch Edition PRS-600 SD and Pro Duo Memory Card Holders Replacement, Battery: step 4, image 1 of 1
      • Once the back cover has been removed locate the battery in the bottom right corner of the device.

      • Using the pointed end of the spudger, push out the white plug that is connected to the battery from its beige base.

      Ask FixBot

      Add Comment

    2. Sony Reader Touch Edition PRS-600 SD and Pro Duo Memory Card Holders Replacement: step 5, image 1 of 1
      • Use the flat end of the spudger to pry the battery out of its holder. There may be glue holding it in place.

      Ask FixBot

      Add Comment

    1. Sony Reader Touch Edition PRS-600 SD and Pro Duo Memory Card Holders Replacement, Inner Casing: step 6, image 1 of 1
      • Using a screwdriver remove the four 1.4 mm screws that are holding the black plastic casing in place.

      Ask FixBot

      Add Comment

    2. Sony Reader Touch Edition PRS-600 SD and Pro Duo Memory Card Holders Replacement: step 7, image 1 of 1
      • Pry open the black casing to access the screw that is holding down the battery holder.

      • Remove the one 1.4 mm screw that is holding down the battery holder located under black casing.

      • Lift the black inner casing and the battery holder out of the device.

      • The battery holder and the black inner casing are connected by a thin strip of copper. There may be glue holding the black inner casing in place.

      Ask FixBot

      Add Comment

    1. Sony Reader Touch Edition PRS-600 SD and Pro Duo Memory Card Holders Replacement, Power Button: step 8, image 1 of 1
      • Remove the stylus from the device.

      Ask FixBot

      Add Comment

    2. Sony Reader Touch Edition PRS-600 SD and Pro Duo Memory Card Holders Replacement: step 9, image 1 of 3 Sony Reader Touch Edition PRS-600 SD and Pro Duo Memory Card Holders Replacement: step 9, image 2 of 3 Sony Reader Touch Edition PRS-600 SD and Pro Duo Memory Card Holders Replacement: step 9, image 3 of 3
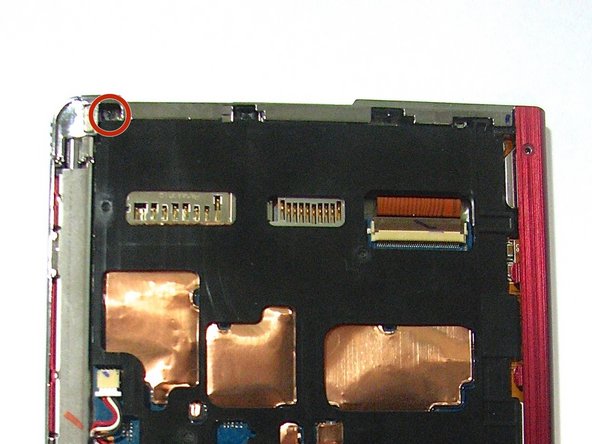
      • Using the Phillips screwdriver remove the 1.4 mm screw from the top panel.

      • Using the same screwdriver, remove the 1.4 mm screw from the back of the device.

      • Pry apart off the top panel of the device.

      Ask FixBot

      Add Comment

    1. Sony Reader Touch Edition PRS-600 SD and Pro Duo Memory Card Holders Replacement, SD and Pro Duo Memory Cards Holder: step 10, image 1 of 1
      • Using a Phillips head screwdriver, remove the three 1.4 mm screws located on the memory card holder.

      Ask FixBot

      Add Comment

    2. Sony Reader Touch Edition PRS-600 SD and Pro Duo Memory Card Holders Replacement: step 11, image 1 of 1
      • Using the flat end of the spudger, pry open the brown flap that connects the cardholder to the motherboard.

      Ask FixBot

      Add Comment

    3. Sony Reader Touch Edition PRS-600 SD and Pro Duo Memory Card Holders Replacement: step 12, image 1 of 2 Sony Reader Touch Edition PRS-600 SD and Pro Duo Memory Card Holders Replacement: step 12, image 2 of 2
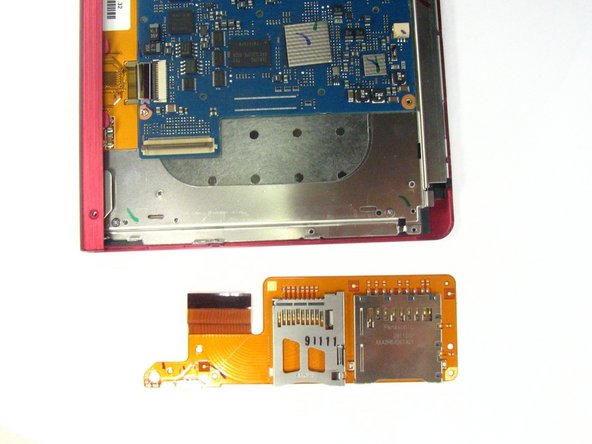
      • Pull the orange strip out of the opened brown flap.

      • Remove the memory card holder.

      Ask FixBot

      Add Comment

Conclusion

To reassemble your device, follow these instructions in reverse order.

Cancel: I did not complete this guide.

Zachary Jeffers

Member since: 10/13/14

412 Reputation

4 Guides authored

Team

Clemson, Team 1-4, Benson Fall 2014 Member of Clemson, Team 1-4, Benson Fall 2014

CLEM-BENSON-F14S1G4

4 Members

132 Guides authored

0 Guide Comments

Add Comment

View Statistics:

Past 24 Hours: 2

Past 7 Days: 21

Past 30 Days: 59

All Time: 860