
Samsung Galaxy Tab S2 9.7 AT&T Battery Replacement

What you need

  1. Samsung Galaxy Tab S2 9.7 AT&T Battery Replacement, Screen: step 1, image 1 of 2 Samsung Galaxy Tab S2 9.7 AT&T Battery Replacement, Screen: step 1, image 2 of 2
    • Apply the heat gun around the edges of the tablet to melt the adhesive glue.

    • Do not allow the gun to remain still for more than two seconds, so that you do not melt the plastic around the screen.

    • If you do not have access to a heat gun, you may also use an iOpener or a hair dryer. Refer to the iOpener guide for extra help.

  2. Samsung Galaxy Tab S2 9.7 AT&T Battery Replacement: step 2, image 1 of 2 Samsung Galaxy Tab S2 9.7 AT&T Battery Replacement: step 2, image 2 of 2
    • Apply the suction to the bottom or top right corner.

    • Use the plastic opening tool at several points around the screen while the suction is being applied to pop the screen out.

  3. Samsung Galaxy Tab S2 9.7 AT&T Battery Replacement: step 3, image 1 of 1
    • Once the screen is detached, open the tablet like a book.

    • Gently open the tablet, and do not pull the pieces apart since you can risk damaging the orange ribbon cable.

  4. Samsung Galaxy Tab S2 9.7 AT&T Battery Replacement: step 4, image 1 of 1
    • Using the precision tweezers, remove the silver tape that is holding the orange ribbon cable connecting the two pieces.

  5. Samsung Galaxy Tab S2 9.7 AT&T Battery Replacement: step 5, image 1 of 1
    • Using the precision tweezers, remove the small press-fit connector from the body of the tablet.

  6. Samsung Galaxy Tab S2 9.7 AT&T Battery Replacement, Screws: step 6, image 1 of 2 Samsung Galaxy Tab S2 9.7 AT&T Battery Replacement, Screws: step 6, image 2 of 2
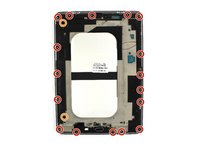
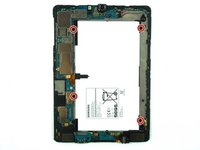
    • Using the Philips #000 screwdriver, remove the seventeen 2.74 mm screws around the edges.

    • Remove the two 2.74 mm black screws in the middle of the tablet with the Philips #000 screwdriver.

    • Put the screws on a magnetic project mat or in a container so that you do not lose them.

  7. Samsung Galaxy Tab S2 9.7 AT&T Battery Replacement: step 7, image 1 of 3 Samsung Galaxy Tab S2 9.7 AT&T Battery Replacement: step 7, image 2 of 3 Samsung Galaxy Tab S2 9.7 AT&T Battery Replacement: step 7, image 3 of 3
    • Take the plastic opening tool around the tablet to remove the motherboard from the device.

  8. Samsung Galaxy Tab S2 9.7 AT&T Battery Replacement, Battery: step 8, image 1 of 2 Samsung Galaxy Tab S2 9.7 AT&T Battery Replacement, Battery: step 8, image 2 of 2
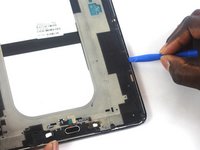
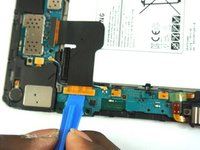
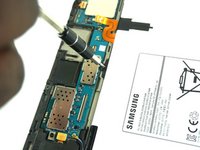
    • At the bottom left of the battery, use the plastic opening tool to detach the lower press-fit connector of the black ribbon cable.

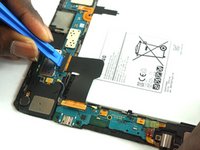
    • Using the plastic opening tool, detach the press-fit connector on the left side of the black ribbon cable.

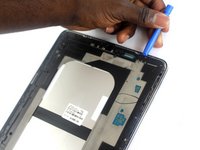
    • Lift up the black ribbon cable to remove it.

  9. Samsung Galaxy Tab S2 9.7 AT&T Battery Replacement: step 9, image 1 of 1
    • Using the plastic opening tool, detach the orange ribbon cable connecting the battery to the motherboard.

  10. Samsung Galaxy Tab S2 9.7 AT&T Battery Replacement: step 10, image 1 of 2 Samsung Galaxy Tab S2 9.7 AT&T Battery Replacement: step 10, image 2 of 2
    • Using the Phillips #000 Screwdriver, remove the four 2.74mm black screws around the edge of the battery.

  11. Samsung Galaxy Tab S2 9.7 AT&T Battery Replacement: step 11, image 1 of 1
    • The battery is now fully detached from the motherboard.

    • Lift up the battery to remove it from the motherboard.

Conclusion

To reassemble your device, follow these instructions in reverse order.

3 other people completed this guide.

Joy Harris

Member since: 02/15/17

814 Reputation

7 Guides authored

Team

USF Tampa, Team S3-G4, Sullivan Spring 2017 Member of USF Tampa, Team S3-G4, Sullivan Spring 2017

USFT-SULLIVAN-S17S3G4

3 Members

14 Guides authored

4 Comments

impossible de décoller l’écran de la tablette

vatin1998 - Reply

Le tuto est parfaitement clair et précis. Un grand Merci.

Néanmoins il faut reconnaître que cette opération n’est pas simple du tout et qu’elle n’est pas sans risque, même en étant très méticuleux.

Pour ouvrir la coque, il faut obligatoirement un minimum de matériel adapté et malgré cela, c’est une galère !

Christian Muller - Reply

Pour info sur la Galaxy tab s2 votre tuto est faux. Merci j'ai cassé le haut de mon écran. Grace à un autre site jai pu voir qu'il faut enlever le capot arrière pour accéder à la batterie

Sébastien Colonges - Reply

Bonjour, pourquoi passer par la face avant très fragile alors que le démontage de la face arrière est beaucoup plus aisée et donne accès à la batterie comme à l'étape 8. A revoir ou à expliquer.

JPG93500 - Reply

Add Comment

View Statistics:

Past 24 Hours: 2

Past 7 Days: 14

Past 30 Days: 90

All Time: 20,721