
Samsung Galaxy Tab 4 7.0 Screen Replacement

What you need

  1. Samsung Galaxy Tab 4 7.0 Screen Replacement, Back Panel: step 1, image 1 of 2 Samsung Galaxy Tab 4 7.0 Screen Replacement, Back Panel: step 1, image 2 of 2
    • Starting at any corner, insert the pry tool between the chrome screen frame and black phone housing.

    • Slide the pry tool around the tablet while applying force to pry the screen away from the phone housing.

  2. Samsung Galaxy Tab 4 7.0 Screen Replacement: step 2, image 1 of 1
    • Carefully separate the rear housing from the front panel assembly.

  3. Samsung Galaxy Tab 4 7.0 Screen Replacement, Motherboard: step 3, image 1 of 3 Samsung Galaxy Tab 4 7.0 Screen Replacement, Motherboard: step 3, image 2 of 3 Samsung Galaxy Tab 4 7.0 Screen Replacement, Motherboard: step 3, image 3 of 3
    • Using the bent tweezers, carefully pull the flat cables away from the connectors.

    • Do not bend the flat cables at the tips as they may become permanently deformed.

  4. Samsung Galaxy Tab 4 7.0 Screen Replacement: step 4, image 1 of 3 Samsung Galaxy Tab 4 7.0 Screen Replacement: step 4, image 2 of 3 Samsung Galaxy Tab 4 7.0 Screen Replacement: step 4, image 3 of 3
    • Using the plastic opening tool, gently pry the chip connections away from the motherboard.

  5. Samsung Galaxy Tab 4 7.0 Screen Replacement: step 5, image 1 of 2 Samsung Galaxy Tab 4 7.0 Screen Replacement: step 5, image 2 of 2
    • Use the Phillips 000 screwdriver to remove the remaining five 1.2 mm screws.

  6. Samsung Galaxy Tab 4 7.0 Screen Replacement: step 6, image 1 of 2 Samsung Galaxy Tab 4 7.0 Screen Replacement: step 6, image 2 of 2
    • Use extreme care while removing the motherboard to avoid damaging the component.

    • Remove the motherboard by rotating it away from the rest of the phone as shown in the first photo.

  7. Samsung Galaxy Tab 4 7.0 Screen Replacement, Battery: step 7, image 1 of 3 Samsung Galaxy Tab 4 7.0 Screen Replacement, Battery: step 7, image 2 of 3 Samsung Galaxy Tab 4 7.0 Screen Replacement, Battery: step 7, image 3 of 3
    • You do not need to remove the motherboard in order to remove the battery as the photos may indicate.

    • Work the spudger underneath the battery as shown and pry the battery away from the phone case.

    • The battery is attached to the case with adhesive, so a bit of force is required during removal.

  8. Samsung Galaxy Tab 4 7.0 Screen Replacement, Screen: step 8, image 1 of 2 Samsung Galaxy Tab 4 7.0 Screen Replacement, Screen: step 8, image 2 of 2
    • Evenly heat the surface of the screen using your heating tool to loosen the adhesive that is holding the screen to the phone case.

    • If using the heating pad, you may have to reheat it once or twice during this process.

    • If you're using a heat gun, avoid heating one spot for more than a few seconds.

  9. Samsung Galaxy Tab 4 7.0 Screen Replacement: step 9, image 1 of 3 Samsung Galaxy Tab 4 7.0 Screen Replacement: step 9, image 2 of 3 Samsung Galaxy Tab 4 7.0 Screen Replacement: step 9, image 3 of 3
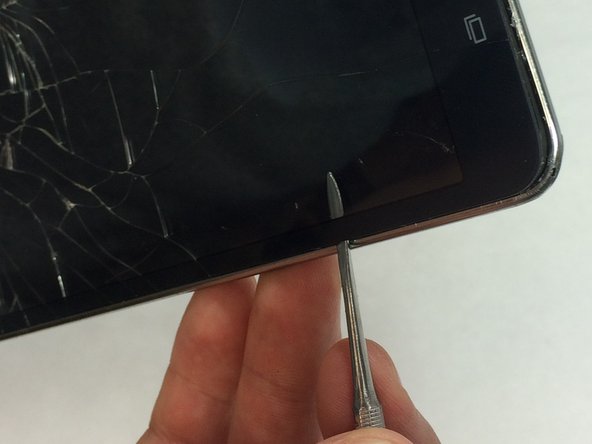
    • Carefully insert the spudger between the glass and the chrome outer frame of the tablet.

    • Now, slowly pry your way around the screen to loosen the glass from the frame.

  10. Samsung Galaxy Tab 4 7.0 Screen Replacement: step 10, image 1 of 3 Samsung Galaxy Tab 4 7.0 Screen Replacement: step 10, image 2 of 3 Samsung Galaxy Tab 4 7.0 Screen Replacement: step 10, image 3 of 3
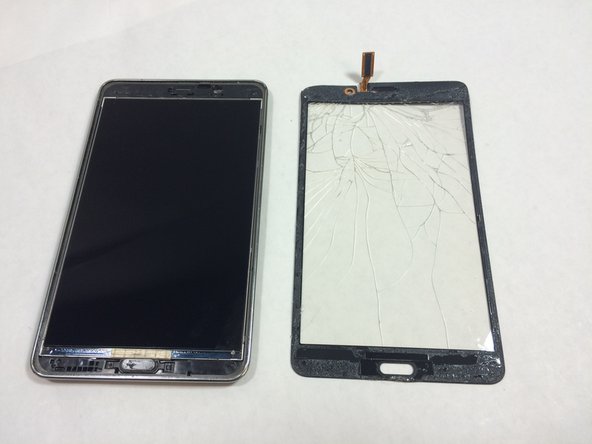
    • After you’ve removed the glass from the screen, feed the chip connection through the phone casing.

    • The screen may need a little more force to separate from the upper edge of the tablet.

Aubrey Goodwin

Member since: 08/31/15

2,700 Reputation

3 Guides authored

Team

USF Tampa, Team 1-3, Remmell Fall 2015 Member of USF Tampa, Team 1-3, Remmell Fall 2015

USFT-REMMELL-F15S1G3

4 Members

12 Guides authored

View Statistics:

Past 24 Hours: 1

Past 7 Days: 5

Past 30 Days: 35

All Time: 46,174