
Samsung NX300 and NX300M Back Panel Assembly Replacement

Andres Perez and 11 other contributors
Last updated on May 7, 2024
Views: 6.2K
View statistics:
- Past 24 Hours:
- 4
- Past 7 Days:
- 27
- Past 30 Days:
- 124
- All Time:
- 6,169
Comments: 8
6 comments on steps, 2 guide comments.
Go to guide commentsCompleted: 11 12
11 people have marked this guide "completed." Will you be next?
12 people have marked this guide "completed." Including you — great job!
Favorites: 0 1
No one has favorited (and subscribed to) this guide. Will you be the first?
1 person has favorited (and subscribed to) this guide — and that's you!
Introduction
Go to step 1 ↓This guide will show you how to remove the back panel assembly, which houses the main control buttons and the LED display, allowing to replace its individual parts or access the internal parts of part of the camera.
What you need
Tools


-
-
-
Using a Phillips #00 precision screwdriver, remove the seven 4mm screws (5 on the bottom of the device and 1 on each of the two sides) holding the back panel to the camera.
 Ask FixBot
-
-
-
Using a Phillips #00 precision screwdriver, remove the last 4 mm screw located inside the input ports' compartment.
-
-
-
-
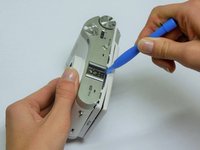
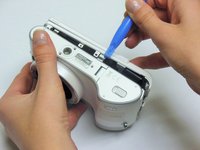
Place a plastic opening tool into the gap between the back panel and camera body, from both the top and the bottom of camera. Carefully pry open the camera and separate the back panel.
-
-
Tool used on this step:Tweezers$4.99
-
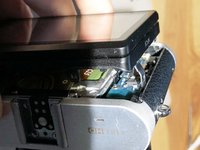
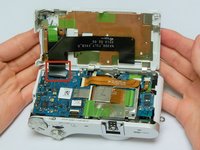
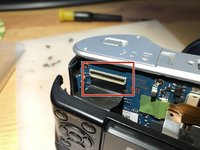
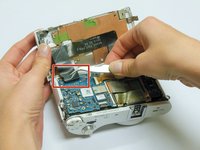
Using tweezers or your fingers, pull the display's black ribbon from the motherboard. This frees the back panel altogether.
-
-




To reassemble your device, follow these instructions in reverse order.
Cancel: I did not complete this guide.
11 other people completed this guide.

Team

USF Tampa, Team 9-6, Blackwell Winter 2015 Member of USF Tampa, Team 9-6, Blackwell Winter 2015
USFT-BLACKWELL-W15S9G6
4 Members
60 Guides authored
2 Guide Comments
I had to replace the back panel when my amoled screen started going bad. Thanks for a great tutorial!
Hello, can anybody tell me if the display of SAMSUNG NX 300 M match to a SAMSUNG NX 300 ? I need to replace the display of NX 300 and i dont find any pieces but i found an NX 300 M
