Introduction
The Samsung Galaxy Camera has many wonderful features for its time like a 21x zoom and 1080p resolution. However, none of these features matter if the device can not be used. The screen is necessary to operate the Samsung Galaxy Camera since taking photos and recording videos are all done by interacting with the screen. Repairing the broken screen is vital to being able to properly utilize the device.
Some reasons the screen may need replacement are due to cracks or due to a malfunctioning display. This guide will help in the case that the screen itself is the issue. If the device was damaged through external force or exposure, there is the possibility of issues being caused by internal damage, such as a faulty motherboard. That guide can be found here. Use the troubleshooting page to review possible issues and identify what repair seems most applicable.
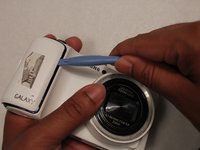
This guide has a moderate difficulty because it requires a decent amount of disassembly and handling of internal parts. Beyond that, there is not any specialist knowledge required. Be mindful when performing any prying to avoid accidentally damaging the device. Make sure to disconnect the device from any power sources before starting.
What you need


To reassemble your device, follow these instructions in reverse order. Take your e-waste to an R2 or e-Stewards certified recycler.
Cancel: I did not complete this guide.
7 other people completed this guide.
Team

USF Tampa, Team 1-3, Sullivan Winter 2015 Member of USF Tampa, Team 1-3, Sullivan Winter 2015
USFT-SULLIVAN-W15S1G3
3 Members
4 Guides authored