Free Shipping on Domestic Orders $75+

Rug Doctor Handle Replacement

Prerequisite Only
This is a prerequisite-only guide! This guide is part of another procedure and isn’t meant to be used alone.

What you need

    1. Rug Doctor Handle Replacement, Handle: step 1, image 1 of 1
      • Before you begin disassembly, make sure that the Rug Doctor is not plugged in and that all reservoirs are empty of liquids.

      • Unclip the clear hose from the back of the Rug Doctor.

      Ask FixBot

      Add Comment

    2. Rug Doctor Handle Replacement: step 2, image 1 of 2 Rug Doctor Handle Replacement: step 2, image 2 of 2
      • Use a 7/16" (11 mm OK) wrench to hold the handle axle while you use a 7/16" socket to remove the cap nut securing the axle end.

      Ask FixBot

      Add Comment

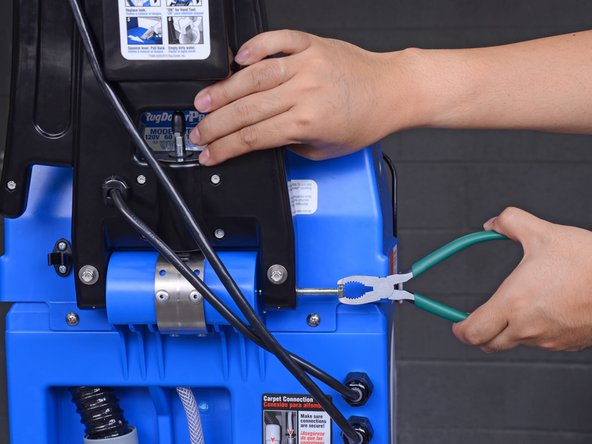
    3. Rug Doctor Handle Replacement: step 3, image 1 of 2 Rug Doctor Handle Replacement: step 3, image 2 of 2
      • Support the handle with one hand. It will be loose after this step.

      • Use fingers or pliers to pull out the handle axle.

      • If the axle feels hard to pull out, squeeze the handle release lever to release pressure on the axle.

      Ask FixBot

      Add Comment

    4. Rug Doctor Handle Replacement: step 4, image 1 of 1
      • Detach the handle from the Rug Doctor and set it down.

      • If you need more cable slack, you can set the Rug Doctor on its side.

      Ask FixBot

      Add Comment

Conclusion

To reassemble your device, follow these instructions in reverse order.

Cancel: I did not complete this guide.

Arthur Shi

Member since: 01/03/18

350,889 Reputation

938 Guides authored

Team

iFixit Member of iFixit

Staff

122 Members

72,401 Guides authored

0 Guide Comments

Add Comment

View Statistics:

Past 24 Hours: 4

Past 7 Days: 6

Past 30 Days: 16

All Time: 213