Introduction
If you need to replace the battery from your Dell XPS 13 9380, this guide is for you!
What you need
-
-
Use a Torx T5 driver to unscrew the eight screws securing the back panel.
-
Use a spudger to pry up and loosen the back panel.
-
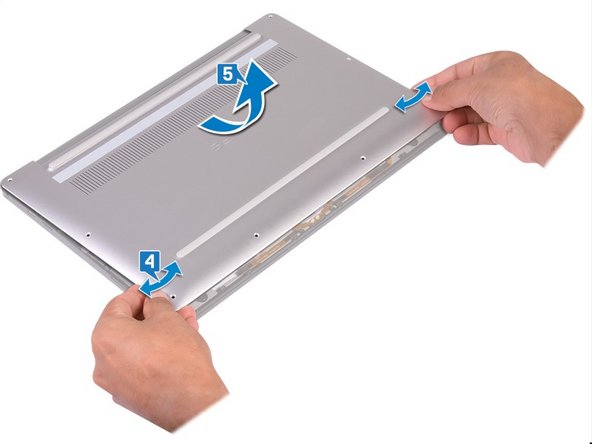
Lift the back panel up slightly from the non-hinged edge.
-
Pull the back panel away from the hinged edge, wiggling it back and forth to loosen the clips.
-
When the back panel clips are free, remove the back panel.
-
-
-
-
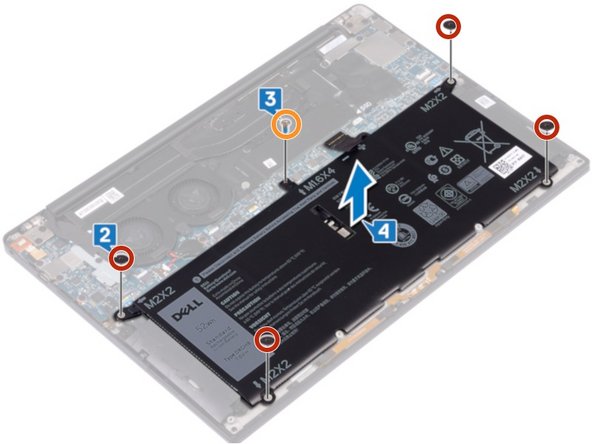
Disconnect the cable from the battery by pulling the connector towards the battery.
-
Remove the four screws (M2 x 2) securing the battery.
-
Remove the screw (M1.6 x 4) securing the battery.
-
Remove the battery from its recess.
-


To reassemble your device, follow the instructions in reverse order.
Cancel: I did not complete this guide.
19 other people completed this guide.
Special thanks to these translators:
100%


These translators are helping us fix the world! Want to contribute?
Start translating ›

Team

4 Guide Comments
The backpanel is a bit tricky to remove, but it can be managed.
The "Essential Electronics Toolkit" is very useful! I recommend to order it with the battery.
I am confused because according to dell.com the battery for the XPS 13 9380 is the G7GV0, not the G8VCF (DXGH8) which you are selling here:
https://www.dell.com/en-uk/shop/dell-4-c...
vs.
The hole for the M1.6x4 screw is too large, allowing the head to go through the hole and not hold the battery. I sawed off the tab from the old battery to use as a washer.
Thank you for this suggestion! I noticed this problem as well, and I took your advice and cut the tab off the old battery for a washer. Worked great.