Introduction
This is truly a quick and dirty guide to the repair of the wiring. This Bose headset is pretty straight forward. Of course, I will clean it up and make it a bit more presentable.
What you need
-
-
Here is the Bose Tricore OE headset. Slightly worn, it does not produce any sound to the right side driver
-
Remove the ear pads by simply applying a bit of force between the ear pads and the housing. The ear pad will simply snap off
-
This shows the snaps that attach the ear pad to the case.
-
-
-
With the ear pad removed, the Phillips screws that hold the drive to the case, are now visible.
-
Remove the two screws on top
-
There are two more under the padding on the bottom. Remove those as well.
-
-
-
All four screws are the same length, 6mm. No need to separate them.
-
With the screws removed, the driver (speaker) can now simply removed by just folding it over.
-
There is a small PCB to which the driver (speaker) mounts. Check the solder connections of the driver (speaker) to the board, as well as the components on this board. It consist of a few caps, resistors, and a coil.
-
-
-
Since both driver (speaker) wiring will be checked, remove the left ear pad as well.
-
Same screw configuration. Two screws on top,
-
two screws under the bottom pad,
-
-
-
-
The Phillips screws are identical and do not need to be separated
-
Remove the driver from the case by simply flipping it to the side.
-
Same PCB on both sides. Check the solder connections from the driver (speaker) to the PCB.
-
-
-
Here is the PCB of the right side driver (speaker)
-
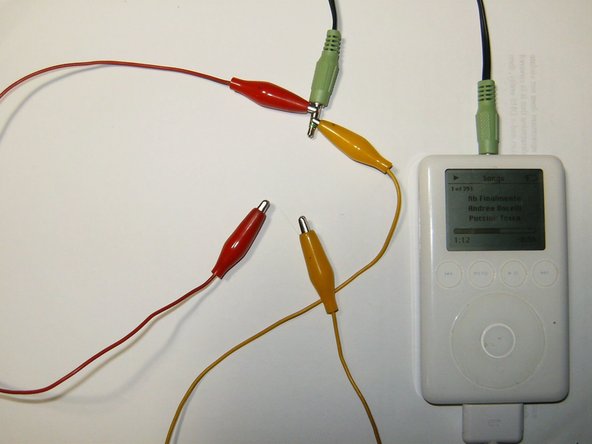
Simple setup to test the driver (speaker) Two leads with alligator clips, connect those to an 3.5mm audio jack extension.
-
Use those leads and touch the connector of the driver (speaker) on the PCB. There will be sound if the driver (speaker) is working.
-
-
-
Time to disassemble the left side. Remove the ear pad
-
Remove the two screws on top
-
then the two on the bottom.
-
-
-
Remove the driver (speaker) from the case
-
Make note off how the audio jack cable is fastened.
-
Remove the audio jack cable from the case. It is simply a rubber plug that is pressed into the case.
-
-
-
Check the driver (speaker) the same way as on the left side.
-
On this headset, both drivers worked while being tested, but not when the audio was connected to the audio jack. The jack needed to be replaced.
-
Desolder the audio jack cable by using a soldering wick. Apply flux to the wick prior to unsoldering.
-
Remove the old audio jack cable.
-
-
-
Here is the rubber boot that holds the audio jack cable in place.
-
Insert the replacement cable as shown through the boot. Solder the new cable to the PCB.
-
Reassemble the headphones after double checking the solder job. This one also received new ear pads (readily available at online auction sites) and works perfectly.
-


Team
