
PlayStation 5 Faceplates Replacement

What you need

  1. PlayStation 5 Faceplates Replacement, Remove the stand screw: step 1, image 1 of 1
    • If your PlayStation 5 is in its vertical orientation, flip it upside down so the stand is facing up.

    • If your PlayStation 5 is in its horizontal orientation, skip to Step 6.

    • Work on a flat surface to prevent your PlayStation from falling over.

    • Use a coin or a flathead screwdriver to remove the 26.5 mm-long stand screw.

  2. PlayStation 5 Faceplates Replacement, Remove the vertical stand: step 2, image 1 of 2 PlayStation 5 Faceplates Replacement, Remove the vertical stand: step 2, image 2 of 2
    • Lift straight up to remove the stand.

  3. PlayStation 5 Faceplates Replacement, Store the stand screw: step 3, image 1 of 2 PlayStation 5 Faceplates Replacement, Store the stand screw: step 3, image 2 of 2
    • Insert the screw into the cubby on the bottom of the stand.

  4. PlayStation 5 Faceplates Replacement, Cap the screw hole: step 4, image 1 of 3 PlayStation 5 Faceplates Replacement, Cap the screw hole: step 4, image 2 of 3 PlayStation 5 Faceplates Replacement, Cap the screw hole: step 4, image 3 of 3
    • Use a pair of tweezers or your fingernail to remove the cap from the cubby.

    • Use your finger to press the cap into the screw hole.

  5. PlayStation 5 Faceplates Replacement, Close the cubby: step 5, image 1 of 3 PlayStation 5 Faceplates Replacement, Close the cubby: step 5, image 2 of 3 PlayStation 5 Faceplates Replacement, Close the cubby: step 5, image 3 of 3
    • Twist the stand counterclockwise to close the cubby.

  6. PlayStation 5 Faceplates Replacement, Remove the horizontal stand: step 6, image 1 of 2 PlayStation 5 Faceplates Replacement, Remove the horizontal stand: step 6, image 2 of 2
    • If your PlayStation 5 is in its horizontal orientation, rest it on its face with the charging port facing up.

    • Lift the stand straight up to remove it.

  7. PlayStation 5 Faceplates Replacement, Remove the left faceplate: step 7, image 1 of 3 PlayStation 5 Faceplates Replacement, Remove the left faceplate: step 7, image 2 of 3 PlayStation 5 Faceplates Replacement, Remove the left faceplate: step 7, image 3 of 3
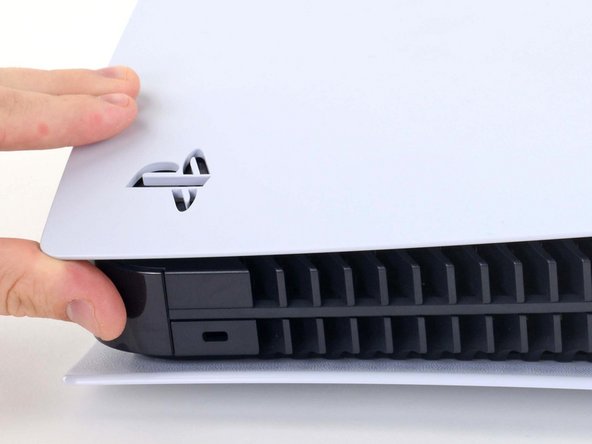
    • Lift up the corner of the faceplate with the PlayStation logo to unclip it from the case.

  8. PlayStation 5 Faceplates Replacement: step 8, image 1 of 2 PlayStation 5 Faceplates Replacement: step 8, image 2 of 2
    • While lifting up the corner, slide the faceplate towards the bottom of the device.

    • Remove the left faceplate.

  9. PlayStation 5 Faceplates Replacement, Remove the right faceplate: step 9, image 1 of 3 PlayStation 5 Faceplates Replacement, Remove the right faceplate: step 9, image 2 of 3 PlayStation 5 Faceplates Replacement, Remove the right faceplate: step 9, image 3 of 3
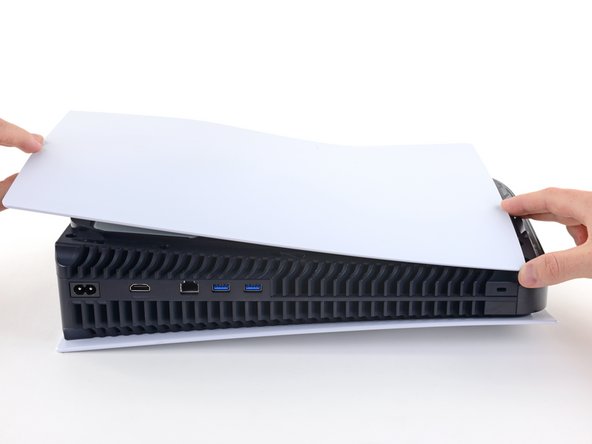
    • Flip the device over so that the USB and ethernet ports are on the left side from your perspective.

    • Lift up the corner of the faceplate to unclip it from the case.

  10. PlayStation 5 Faceplates Replacement: step 10, image 1 of 2 PlayStation 5 Faceplates Replacement: step 10, image 2 of 2
    • While lifting up the corner, slide the faceplate towards the bottom of the device.

    • Remove the right faceplate.

Conclusion

To reassemble your device, follow these instructions in reverse order.

Take your e-waste to an R2 or e-Stewards certified recycler.
Repair didn’t go as planned? Try some basic troubleshooting, or ask our PlayStation 5 Answers community for help.

14 other people completed this guide.

Clay Kim

Member since: 02/16/21

9,701 Reputation

21 Guides authored

One Comment

Hello, thanks for the updates

hadi rp - Reply

Add Comment

View Statistics:

Past 24 Hours: 23

Past 7 Days: 142

Past 30 Days: 630

All Time: 13,976