Introduction
No, Mario, go over there! Touchscreen not responding correctly? You might need a new one.
What you need
-
Tool used on this step:Phillips #00 Screwdriver$5.49
-
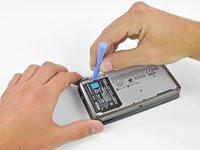
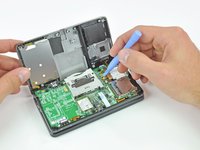
Use a Phillips PH00 screwdriver to loosen the four screws along the top of the back cover.
 Ask FixBot
-
-
-
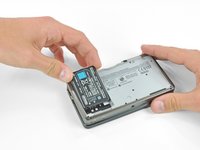
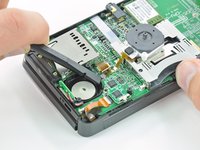
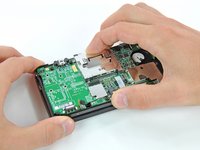
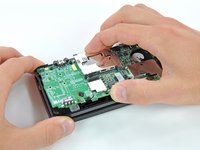
Grab the top edge of the back cover with your opposite hand so that the cover does not fall back into place.
-
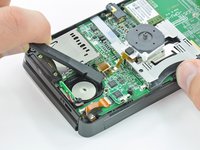
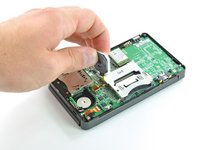
Pull the back cover up and away from the rest of the device to remove it.
-
-
-
Insert a plastic opening tool into the notch in the lower case above the battery.
-
Pry the battery up with the plastic opening tool.
-
Grab the top edge of the battery and lift it out of the lower case.
-
-
-
Use a JIS #00 screwdriver to remove the nine 6.3 mm black screws from the lower case.
-
Use a JIS #00 screwdriver to remove the 2.4 mm silver screw above the game cartridge slot.
-
-
-
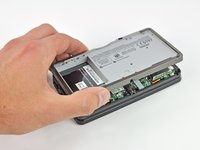
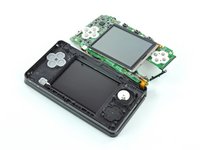
Lift the bottom edge of the lower case off the rest of the 3DS.
-
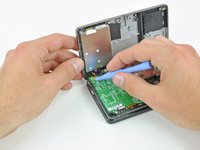
Use a plastic opening tool to pry the shoulder button ribbon cables off their sockets on the motherboard.
-
Remove the lower case from the device.
-
-
-
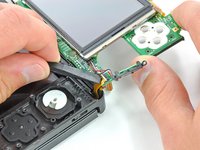
Remove the two 7.7 mm Phillips screws securing the back of the Circle Pad to the motherboard.
-
-
-
Use the flat end of a spudger to pry the back of the Circle Pad off the motherboard.
-
Lift the Circle Pad joystick off the motherboard and lay it on its back so that the ribbon cable connector is accessible.
-
-
-
Use the flat end of a spudger or your fingernail to flip up the retaining flap on the Circle Pad ribbon cable ZIF socket.
-
Lift the Circle Pad joystick off the motherboard.
-
-
-
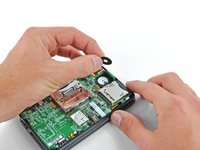
Use a spudger or screwdriver to lift the pads up and remove them from the device.
-
-
-
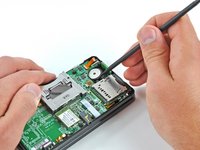
Remove the two 4.5 mm Phillips screws securing the SD board to the motherboard.
-
-
-
-
Use the flat end of a spudger to pry the SD board ribbon cable connector off its socket on the motherboard.
-
-
-
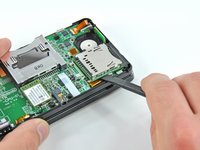
Insert the flat end of a spudger between the SD board and the motherboard.
-
Pry up slowly to loosen the SD board from the RF shield underneath it. If you pry too quickly, you may tear the shield or break its solder points.
-
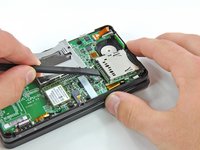
Run the spudger along the sides of the SD board to free it from the adhesive holding it in place.
-
Once completely freed, lift the SD board straight off the motherboard.
-
-
-
Slide the flat end of a spudger under the corner of the Wi-Fi board, and lift it away from the motherboard.
-
-
-
Use the flat end of a spudger to pry the Wi-Fi antenna cable connector off its socket on the Wi-Fi board.
-
Remove the Wi-Fi board from the device.
-
-
Tool used on this step:Tweezers$4.99
-
Grasp the microphone ribbon cable near the microphone with a pair of tweezers.
-
Pull the microphone straight up out of the upper case.
-
-
-
Use the flat end of a spudger or your fingernail to flip up the retaining flap on the speaker assembly ribbon cable ZIF socket.
-
Disconnect the speaker assembly ribbon cable with a pair of tweezers.
-
-
-
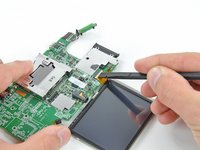
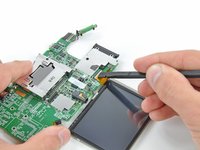
Use the flat end of a spudger or your fingernail to flip up the retaining flap on the camera ribbon cable ZIF socket.
-
-
-
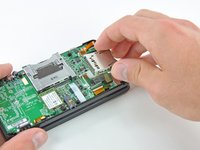
Remove seven Phillips screws securing the motherboard to the upper case:
-
Four 2.5 mm gold screws
-
Two 3.5 mm black screws
-
One 2.5 mm silver screw
-
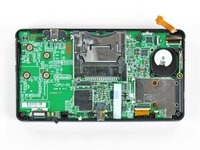
Lift the side of the motherboard that sits along the bottom edge of the 3DS.
-
-
-
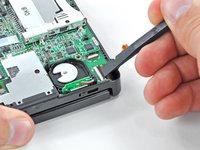
Use the flat end of a spudger or your fingernail to flip up the retaining flap on the LCD ribbon cable ZIF socket.
-
-
-
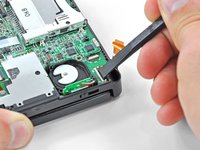
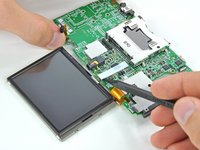
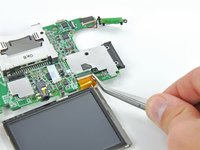
Use the tip of a spudger or your fingers to peel back the white tape covering the touchscreen ribbon cable connector.
-
-
-
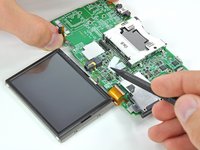
Use the flat end of a spudger or your fingernail to flip up the retaining flap on the touchscreen ribbon cable ZIF socket.
-
-
Tool used on this step:Tweezers$4.99
-
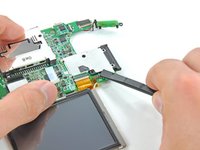
Use the flat end of a spudger or your fingernail to flip up the retaining flap on the lower LCD power ribbon cable ZIF socket.
-
Pull the ribbon cable out of the connector with a pair of tweezers.
-
-
-
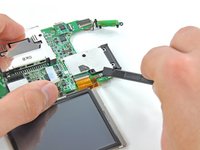
Use the flat end of a spudger or your fingernail to flip up the retaining flap on the lower LCD data ribbon cable ZIF socket.
-
-
-
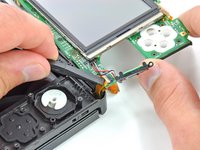
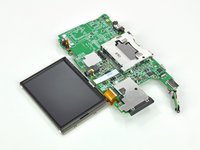
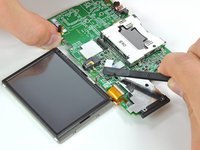
Grasp the lower display assembly and pull it directly away from the motherboard.
-
-
-
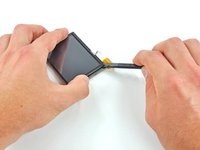
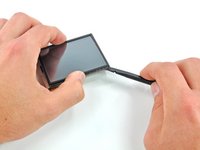
Starting at the bottom right corner, insert the flat end of a spudger between the touchscreen and LCD frame and gently pry the touchscreen off the LCD.
-
Insert the spudger into the top right corner between the two pieces and pry the touchscreen off the LCD frame.
-
-
-
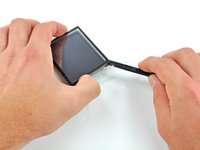
Repeat the above procedure for the remaining two corners to pry the touchscreen off the LCD frame.
-
-
-
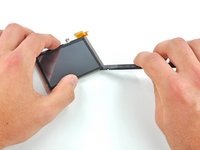
Gently lift the touchscreen up to completely separate it from the lower LCD.
-


To reassemble your device, follow these instructions in reverse order.
Cancel: I did not complete this guide.
43 other people completed this guide.

19 Guide Comments
I had no problem with the screws. A while ago I invested in a multi bit precision screwdriver. If you are going to be taking apart electronics this is worth the $20-$30 investment in the long run. If you strip a screw then you have the wrong bit, stop what your doing and wait until you can get the right tool.
This guide could have at least some tips on putting the 3ds back together. It is a true test of your patience. I got mine back together with lots of swearing and having to remove the motherboard several times. It could have been mentioned to keep in eye on your volume and wifi switch position. because I got mine back together and the volume is stuck on full blast and the wifi switch is stuck on. I am going to wait to strip it down again because I have to replace a shoulder button soon anyway.
Also removing the frame on the touch screen was not mentioned and it is really easy to break because it is taped down onto the touch screen.
Overall an excellent guide. Thanks to the author!
we're having trouble trying to put the lcd board's small ribbon cable back into the motherboard. if anyone could help we would be very grateful. thank you
all right, we got that, but now we're having trouble with redoing step 18--it's impossible to put the very short ribbon cable under the flap. any suggestions?
Fantastic guide and pictures. Just finished replacing the touch screen in my daughter's 3DS. I had to take the unit apart again and re seat the top screen connector but otherwise no problems.
Okay now does this fix the screen entirely because my friend can't use his screen anymore it is just black.