
Motorola Droid Turbo Motherboard Replacement

What you need

  1. Motorola Droid Turbo Motherboard Replacement, Rear Case: step 1, image 1 of 1
    • Prepare an iOpener and lay it over the rear case to soften the adhesive on securing the rear case to the phone.

  2. Motorola Droid Turbo Motherboard Replacement: step 2, image 1 of 2 Motorola Droid Turbo Motherboard Replacement: step 2, image 2 of 2
    • Use a plastic opening tool to pry the rear case off of the rest of the device.

    • Remove the rear case.

    • The wireless charging coil may try to stick to the rear case, so make sure to remove it from the case before fully separating the rear case from the rest of the device.

  3. Motorola Droid Turbo Motherboard Replacement, Midframe: step 3, image 1 of 1
    • Remove the midframe bezel.

  4. Motorola Droid Turbo Motherboard Replacement: step 4, image 1 of 1
    • Remove the four Torx T5 screws securing the midframe plate.

  5. Motorola Droid Turbo Motherboard Replacement: step 5, image 1 of 1
    • Remove the midframe.

  6. Motorola Droid Turbo Motherboard Replacement, Battery: step 6, image 1 of 2 Motorola Droid Turbo Motherboard Replacement, Battery: step 6, image 2 of 2
    • Use the point of a spudger to pop up the battery connector.

  7. Motorola Droid Turbo Motherboard Replacement: step 7, image 1 of 2 Motorola Droid Turbo Motherboard Replacement: step 7, image 2 of 2
    • Fold the wireless charging coil away from the battery.

  8. Motorola Droid Turbo Motherboard Replacement: step 8, image 1 of 2 Motorola Droid Turbo Motherboard Replacement: step 8, image 2 of 2
    • Use a spudger to gently pry the battery up from the rest of the device.

    • The battery is secured with some moderate adhesive, so some force may be necessary.

  9. Motorola Droid Turbo Motherboard Replacement, Motherboard: step 9, image 1 of 1
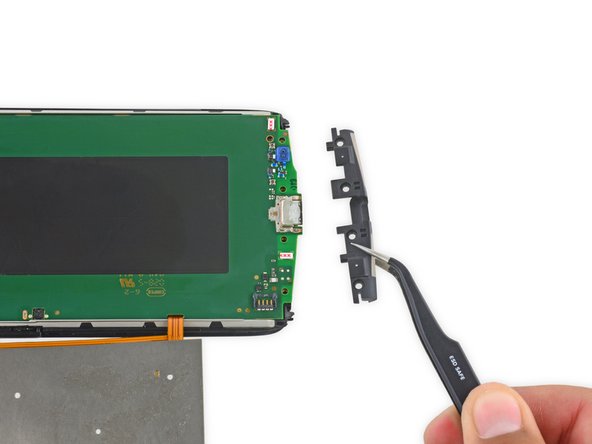
    • Remove the four Torx T5 screws securing the lower antenna board to the motherboard.

  10. Motorola Droid Turbo Motherboard Replacement: step 10, image 1 of 2 Motorola Droid Turbo Motherboard Replacement: step 10, image 2 of 2
    • Remove the lower antenna board.

  11. Motorola Droid Turbo Motherboard Replacement: step 11, image 1 of 2 Motorola Droid Turbo Motherboard Replacement: step 11, image 2 of 2
    • Remove the SIM card holder/volume button rocker.

  12. Motorola Droid Turbo Motherboard Replacement: step 12, image 1 of 2 Motorola Droid Turbo Motherboard Replacement: step 12, image 2 of 2
    • Carefully lift up the motherboard to expose the display connector.

  13. Motorola Droid Turbo Motherboard Replacement: step 13, image 1 of 2 Motorola Droid Turbo Motherboard Replacement: step 13, image 2 of 2
    • Use the flat end of a spudger to flip up the retaining flap on the display ZIF connector.

    • Pull the display ribbon cable free of the connector.

    • At this point, the motherboard has been removed from the phone. The following steps will detail removing the wireless charging coil, as well as both cameras so that they can be transferred to the replacement motherboard.

  14. Motorola Droid Turbo Motherboard Replacement: step 14, image 1 of 2 Motorola Droid Turbo Motherboard Replacement: step 14, image 2 of 2
    • Use the flat end of a spudger to disconnect the wireless charging coil connector from the motherboard.

  15. Motorola Droid Turbo Motherboard Replacement: step 15, image 1 of 2 Motorola Droid Turbo Motherboard Replacement: step 15, image 2 of 2
    • Use the flat end of a spudger to flip up the black retaining flap on the front-facing camera ZIF connector.

  16. Motorola Droid Turbo Motherboard Replacement: step 16, image 1 of 2 Motorola Droid Turbo Motherboard Replacement: step 16, image 2 of 2
    • Remove the front-facing camera.

  17. Motorola Droid Turbo Motherboard Replacement: step 17, image 1 of 2 Motorola Droid Turbo Motherboard Replacement: step 17, image 2 of 2
    • Use the flat end of a spudger to flip up the tan retaining flap on the rear-facing camera ZIF connector.

  18. Motorola Droid Turbo Motherboard Replacement: step 18, image 1 of 3 Motorola Droid Turbo Motherboard Replacement: step 18, image 2 of 3 Motorola Droid Turbo Motherboard Replacement: step 18, image 3 of 3
    • Remove the rear-facing camera.

Conclusion

To reassemble your device, follow these instructions in reverse order.

6 other people completed this guide.

Luis Arangu

Member since: 01/20/16

1,127 Reputation

3 Guides authored

Team

USF Tampa, Team 15-5, Remmell Spring 2016 Member of USF Tampa, Team 15-5, Remmell Spring 2016

USFT-REMMELL-S16S15G5

3 Members

6 Guides authored

0 Comments

Add Comment

View Statistics:

Past 24 Hours: 0

Past 7 Days: 2

Past 30 Days: 16

All Time: 7,312