
MacBook Pro 15" Unibody Mid 2009 Display Replacement

What you need

  1. MacBook Pro 15" Unibody Mid 2009 Display Replacement, Lower Case: step 1, image 1 of 1
    • Remove the following ten screws securing the lower case to the upper case:

    • Seven 3 mm Phillips screws.

    • Three 13.5 mm Phillips screws.

  2. MacBook Pro 15" Unibody Mid 2009 Display Replacement: step 2, image 1 of 2 MacBook Pro 15" Unibody Mid 2009 Display Replacement: step 2, image 2 of 2
    • Using both hands, lift the lower case near the vent to pop it off two clips securing it to the upper case.

    • Remove the lower case and set it aside.

  3. MacBook Pro 15" Unibody Mid 2009 Display Replacement, Battery: step 3, image 1 of 1
    Tool used on this step:
    P6 Pentalobe Screwdriver 2009 15" MacBook Pro Battery
    $5.49
    Buy
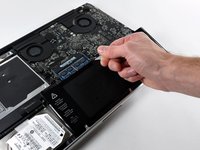
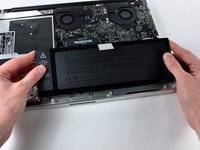
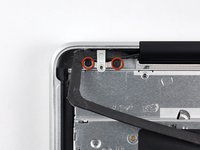
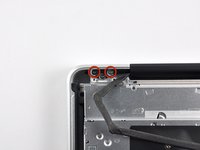
    • Remove the two 5-Point Pentalobe screws along the top edge of the battery.

    • You do not necessarily have to follow steps 3-6 to remove the battery in order to replace the hard drive. However it is recommended to remove all power sources from electronics before working on them.

  4. MacBook Pro 15" Unibody Mid 2009 Display Replacement: step 4, image 1 of 1
    • Use the tip of a spudger to bend back the finger of the "Warning: Do not remove the battery" sticker while you remove third five-point Pentalobe screw hidden underneath.

  5. MacBook Pro 15" Unibody Mid 2009 Display Replacement: step 5, image 1 of 2 MacBook Pro 15" Unibody Mid 2009 Display Replacement: step 5, image 2 of 2
    • Lift the battery by its plastic pull tab and slide it away from the long edge of the upper case.

    • Do not try to completely remove the battery just yet.

  6. MacBook Pro 15" Unibody Mid 2009 Display Replacement: step 6, image 1 of 1
    • Tilt the battery back enough to access the battery cable connector.

    • Pull the battery cable connector away from its socket on the logic board and remove the battery from the upper case.

    • If you're installing a new battery, you should calibrate it after installation.

  7. MacBook Pro 15" Unibody Mid 2009 Display Replacement, Display: step 7, image 1 of 1
    • Apple sticks a small strip of clear plastic with adhesive applied to one side of the logic board behind the camera cable connector to keep it in its socket. When moving it out of the way, be sure not to break any surface-mount components off the logic board.

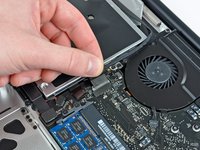
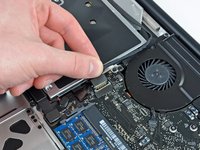
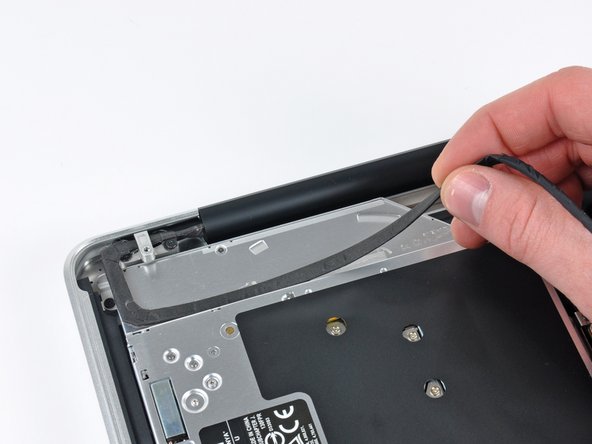
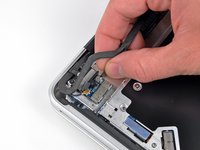
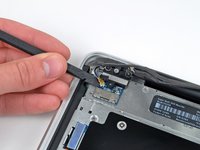
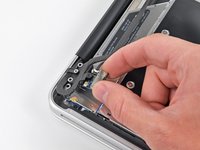
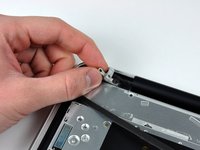
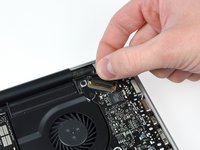
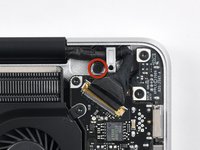
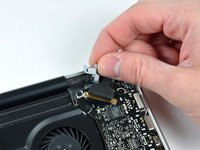
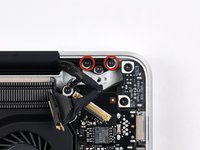
    • Use the tip of a spudger to rotate the plastic retainer away from the camera cable connector.

  8. MacBook Pro 15" Unibody Mid 2009 Display Replacement: step 8, image 1 of 2 MacBook Pro 15" Unibody Mid 2009 Display Replacement: step 8, image 2 of 2
    • Pull the camera cable away from its socket on the logic board.

    • Pull the connector parallel to the face of the logic board, not straight up.

  9. MacBook Pro 15" Unibody Mid 2009 Display Replacement: step 9, image 1 of 1
    • Peel the camera cable off the adhesive securing it to the body of the optical drive.

  10. MacBook Pro 15" Unibody Mid 2009 Display Replacement: step 10, image 1 of 2 MacBook Pro 15" Unibody Mid 2009 Display Replacement: step 10, image 2 of 2
    • This step is only required if you have an anti-glare display. If you have a glossy display, skip to step 12.

    • Disconnect the Bluetooth cable by pulling the male end straight away from its socket.

    • Pull the connector parallel to the face of the logic board, not straight up.

    • Use the flat end of a spudger to pry the Bluetooth antenna cable up from its socket on the board.

  11. MacBook Pro 15" Unibody Mid 2009 Display Replacement: step 11, image 1 of 2 MacBook Pro 15" Unibody Mid 2009 Display Replacement: step 11, image 2 of 2
    • This step is only required if you have an anti-glare display.

    • Remove the two 8 mm Phillips screws securing the Bluetooth/camera cable retainer to the upper case.

    • One of the screws may remain captive in the Bluetooth/camera cable ground loop. If replacing the display, be sure to transfer this screw to the new unit.

    • Lift the Bluetooth board/cable retainer assembly out of the upper case.

  12. MacBook Pro 15" Unibody Mid 2009 Display Replacement: step 12, image 1 of 2 MacBook Pro 15" Unibody Mid 2009 Display Replacement: step 12, image 2 of 2
    • This step is only for glossy display machines. If you have an anti-glare display, skip this step.

    • Remove the two 8 mm Phillips screws securing the camera cable retainer to the upper case.

    • One of the screws may remain captive in the camera cable ground loop. If replacing the display, be sure to transfer this screw to the new unit.

    • Lift the camera cable retainer out of the upper case.

  13. MacBook Pro 15" Unibody Mid 2009 Display Replacement: step 13, image 1 of 2 MacBook Pro 15" Unibody Mid 2009 Display Replacement: step 13, image 2 of 2
    • Grab the plastic pull tab secured to the display data cable lock and rotate it toward the DC-In side of the computer.

  14. MacBook Pro 15" Unibody Mid 2009 Display Replacement: step 14, image 1 of 2 MacBook Pro 15" Unibody Mid 2009 Display Replacement: step 14, image 2 of 2
    • Remove the single 7 mm Phillips screw securing the display data cable retainer to the upper case.

    • This screw may remain captive in the display data cable ground loop. If replacing the display, be sure to transfer this screw to the new unit.

    • Remove the display data cable retainer from the upper case.

  15. MacBook Pro 15" Unibody Mid 2009 Display Replacement: step 15, image 1 of 1
    • Be sure the display data cable lock is rotated toward the DC-In board before proceeding.

    • Pull the display data cable connector straight away from its socket.

    • Make sure to pull the connector parallel to the face of the logic board, not straight up from its socket.

  16. MacBook Pro 15" Unibody Mid 2009 Display Replacement: step 16, image 1 of 2 MacBook Pro 15" Unibody Mid 2009 Display Replacement: step 16, image 2 of 2
    • Remove the outer two T6 Torx screws securing both display hinges to the upper case (four screws total).

  17. MacBook Pro 15" Unibody Mid 2009 Display Replacement: step 17, image 1 of 1
    • Open your MacBook Pro so the display is perpendicular to the upper case.

    • Place your opened MacBook Pro on a table as pictured.

    • While holding the display and upper case together with your left hand, remove the remaining T6 Torx screw from the lower display bracket.

  18. MacBook Pro 15" Unibody Mid 2009 Display Replacement: step 18, image 1 of 1
    • Be sure to hold the display and upper case together with your left hand. Failure to do so may cause the freed display/upper case to fall, potentially damaging each component.

    • Remove the last remaining T6 Torx screw securing the display to the upper case.

  19. MacBook Pro 15" Unibody Mid 2009 Display Replacement: step 19, image 1 of 3 MacBook Pro 15" Unibody Mid 2009 Display Replacement: step 19, image 2 of 3 MacBook Pro 15" Unibody Mid 2009 Display Replacement: step 19, image 3 of 3
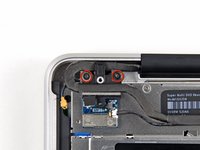
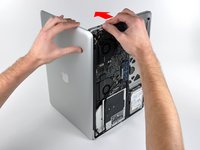
    • Grab the upper case with your right hand and rotate it slightly toward the top of the display so the upper display bracket clears the edge of the upper case.

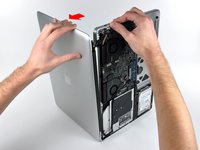
    • Rotate the display slightly away from the upper case.

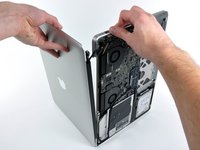
    • Lift the display up and away from the upper case, minding any brackets or cables that may get caught.

Conclusion

To reassemble your device, follow these instructions in reverse order.

43 other people completed this guide.

0 Comments

Add Comment

View Statistics:

Past 24 Hours: 1

Past 7 Days: 15

Past 30 Days: 42

All Time: 45,625