
MacBook Pro 15" Unibody Early 2011 RAMの交換

What you need

  1. MacBook Pro 15" Unibody Early 2011 RAMの交換, 底ケース: step 1, image 1 of 1
    • 底ケースを固定している以下の10本のネジを外します。

    • 13.5(14.1)mm プラスネジー3本

    • 3 mm プラスネジー7本

    • このネジを外すときには、ネジが少し斜めに装着されていることに注意してください。再インストールの際は、同じように取り付けてください。

  2. MacBook Pro 15" Unibody Early 2011 RAMの交換: step 2, image 1 of 1
    • 両手を使用して排気口の近くから底ケースを持ち上げて、上部ケースに固定している2本のクリップを外します。

    • 底ケースを取り外して脇に置きます。

  3. MacBook Pro 15" Unibody Early 2011 RAMの交換, バッテリーコネクタ: step 3, image 1 of 2 MacBook Pro 15" Unibody Early 2011 RAMの交換, バッテリーコネクタ: step 3, image 2 of 2
    • ※特定の修理(ハードディスクドライブなど)の場合はバッテリーを取り外す必要はありませんが、マザーボード上で誤ってショートさせてしまうのを防ぐ事が出来るので推奨されます。バッテリーを外さない場合は、マザーボード上の部品が帯電している可能性があるので注意してください。

    • ナイロンスパッジャーの端を使って、バッテリーコネクターをメイン基板上のソケットから持ち上げてください。

    • ソケットから接続を外す際、コネクターの縦側の両サイドを上向きに持ち上げると簡単です。

  4. MacBook Pro 15" Unibody Early 2011 RAMの交換: step 4, image 1 of 1
    • バッテリケーブルをソケットから離すように少し曲げておき、作業中に誤ってメイン基板に接触しないようにします。

  5. MacBook Pro 15" Unibody Early 2011 RAMの交換, RAM: step 5, image 1 of 3 MacBook Pro 15" Unibody Early 2011 RAMの交換, RAM: step 5, image 2 of 3 MacBook Pro 15" Unibody Early 2011 RAMの交換, RAM: step 5, image 3 of 3
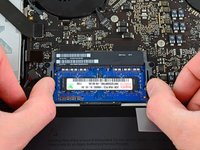
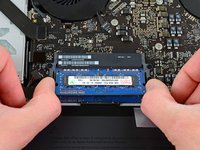
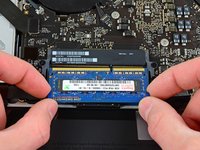
    • RAMモジュールから両側のタブを同時に両サイドへ引き、RAMチップの各サイドに付いているタブを解放します。

    • これらのタブがチップを固定し、外すときは”飛び出す”ようにチップが外れます。

    • RAMが飛び出した後は、まっすぐソケットから引っ張ります。

    • 2番目のRAMチップをインストールする場合はこのプロセスを繰り返します。

Conclusion

デバイスを再組み立てする際は、これらのインストラクションを逆の順番に従って作業を進めてください。

213 other people completed this guide.

Special thanks to these translators:

en jp

100%

Midori Doi is helping us fix the world! Want to contribute?
Start translating ›

3 Comments

Great guide. Comments @ the screws gave me a heads-up on what to look for. No problems, no hassles, & in a short time, my memory is doubled. Wish I could do that for my brain. Thanks!

dashbran1 - Reply

Hi,

thanks for the guide, I plan to upgrade my 15” early 2011 2.3 GHz MBP today. I am changing my 750GB HDD to a Firecuda 2TB SSHD (can’t afford the SSD I wish I could get into currently), and I plan to upgrade my RAM from the 8GB to 16GB as well to give my 2011 a little sprucing up. I have performed a full time machine backup to my 2TB WD passport pro external HD (It’s set up as a RAID 0 device and has a thunderbolt 1 interface, which I was glad for bc a USB 2.0 interface would have taken like 3 days or blown up my computer.

My questions are:

1. Is there a preferred order to switch out the internal hard drive and memory? Do I need to switch out one first then boot up and shutdown, or can you safely upgrade the HD and RAM at the same time?

2. Is there anything else I need to do before upgrading the HD besides a time machine backup? Do I need a “bootable OS?” Whatever that is? Thanks!

Dustin - Reply

I completed this several years ago, sorry for just now giving credit. I was able to upgrade my MacBook Pro 15” Early 2011 with 16GB of RAM. It has been running great ever since. Probably 4 years now maybe longer?? Thank you!

jayfish - Reply

Add Comment

View Statistics:

Past 24 Hours: 8

Past 7 Days: 20

Past 30 Days: 67

All Time: 141,168