Introduction
Hier wird gezeigt, wie die SSD in einem MacBook Pro 13” Late 2012 upgegradet oder ausgetauscht. Dieses MacBook Pro benutzt proprietäre Stecker am Speichermedium und ist deshalb ohne Adapter nicht kompatibel mit herkömmlichen M.2 Laufwerken.
Führe, wenn irgend möglich, vor der Reparatur ein Backup deiner SSD durch. Mache dich dann mit der Wiederherstellung über das Internet vertraut oder erstelle ein bootfähiges externes Laufwerk, so dass du macOS auf dein neues Laufwerk installieren und deine Daten auf die neue SSD übertragen kannst.
Wir empfehlen sehr die Installation von macOS 10.13 High Sierra (oder eine neuere Version), bevor du die originale SSD deines MacBook Pro austauschst. Die meisten neueren SSD erfordern neuere Laufwerkstreiber, die es in macOS Versionen vor HighSierra noch nicht gibt.
What you need
-
Tool used on this step:Magnetic Project Mat$19.95
-
Entferne die folgenden zehn Schrauben, mit denen das untere Gehäuse am oberen Gehäuse befestigt ist:
-
Zwei 2,3 mm P5 Pentalobe Schrauben
-
Acht 3,0 mm P5 Pentalobe Schrauben
-
-
-
Tool used on this step:Tweezers$4.99
-
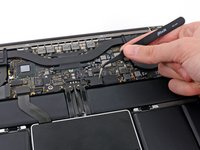
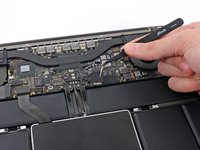
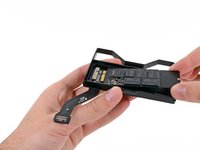
Greife den Interposer mit einer Pinzette.
-
Hebe den Interposer aus dem Logic Board heraus und entferne ihn.
-
-
-
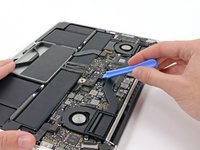
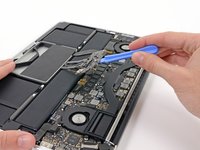
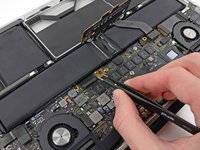
Heble den Stecker des SSD Kabels mit dem flachen Ende eines Spudgers aus seinem Sockel auf dem Logic Board.
-


Um dein Gerät wieder zusammenzusetzen, folge den Schritten in umgekehrter Reihenfolge.
Cancel: I did not complete this guide.
106 other people completed this guide.
Special thanks to these translators:
100%


These translators are helping us fix the world! Want to contribute?
Start translating ›

9 Guide Comments
I followed the guide and was able to upgrade my wife's MacBook from 128GB to 240 GB!
One thing I noticed was that when I removed the plastic clip in step 6, it left behind a glue dot on the screw head I had to remove in step 7. I wasn't sure why my screwdriver kept rotating until I realized the clear dot was covering the screwed! Then I tweeze the dot off, and put it in the recess on the underside of the clip and all was good.
Everything went to the letter after, until it came time to restart and initialize the new disk. It turns out the old disk had some directory damage, so when it was copied to the new internal SSD, then the Mac wouldn't boot from it until I did a couple FSCK and Repair Disk fixes.
Vignesh,
Here is an option to recover your data and get a tiny speedy external SSD drive for 28.85
Sam,
The 2012 MacBook Pro uses an PCI Express Mini Card connection between the logic board and the SSD.
"Some notebooks (notably the Asus Eee PC, the MacBook Air, and the Dell mini9 and mini10) use a variant of the PCI Express Mini Card as an SSD. This variant uses the reserved and several non-reserved pins to implement SATA and IDE interface passthrough, keeping only USB, ground lines, and sometimes the core PCIe 1x bus intact.[11] This makes the 'miniPCIe' flash and solid state drives sold for netbooks largely incompatible with true PCI Express Mini implementations."
I fully agree, Especially as it turned out to be a little tricky to get the connector back in his position properly. Don't think there is a higher risk of damage through electric shock or so. Next time I will for sure skip it ;-)
Timpetou -
Aren’t steps 4-10 completely unnecessary?