Introduction
Use this guide to replace a worn-out battery.
Note: If there is a thin plastic film on your replacement battery, do not attempt to remove it. It is glued on and protects the battery pack while it is inside the MacBook.
What you need
-
Tool used on this step:P5 Pentalobe Screwdriver Retina MacBook Pro and Air$5.99
-
Use a P5 Pentalobe driver to remove ten screws securing the lower case, of the following lengths:
-
Two 9 mm screws
-
Eight 2.6 mm screws
 Ask FixBot
-
-
-
Wedge your fingers between the display and the lower case and pull upward to pop the lower case off the Air.
-
Remove the lower case and set it aside.
-
-
-
-
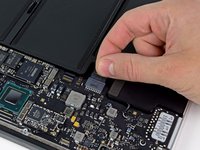
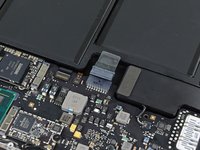
Grab the clear plastic pull tab attached to the battery connector and pull it toward the front edge of the Air to disconnect the battery from the logic board.
-
-
-
Remove the following five screws securing the battery to the upper case:
-
Three 6.3 mm T5 Torx screws
-
Two 2.4 mm T5 Torx screws
-
-
-
Lift the battery from its edge nearest the logic board and remove it from the upper case.
-
Charge it to 100%, and then keep charging it for at least 2 more hours. Then, unplug and use it normally to drain the battery. When you see the low battery warning, save your work, and keep your laptop on until it goes to sleep due to low battery. Wait at least 5 hours, then charge your laptop uninterrupted to 100%.
-
If you notice any unusual behavior or problems after installing your new battery, you may need to reset your MacBook's SMC.
-


To reassemble your device, follow the above steps in reverse order.
Take your e-waste to an R2 or e-Stewards certified recycler.
Repair didn’t go as planned? Check out our Answers community for troubleshooting help.
Cancel: I did not complete this guide.
504 other people completed this guide.

73 Guide Comments
Done! Now my Macbook Air has a new lease on life! I travel a lot and need good battery life on my Macbook so that I can work on flights, work throughout the day in meetings, do presentations etc.,
I ordered the battery and a pentelobe screwdriver from iFixit - they arrived quickly and as as promised in South Africa. The replacement took just a few minutes. The guide was very helpful and easy to follow. Now I have 6 hours of battery life again (or maybe a few minutes less ;-)
Thanks guys. I am very happy!
@digitaldion, Could you share what is time on a single charge now, after almost a year of active(?) use?
I had spilled Iced Tea all over my new laptop. Soaked it in rice, but it only would work when it was plugged in. I read replacing the battery would fix it. Ordered the battery...came in 2 days, and I used the repair guide. Worked with 100% success and now my laptop runs like it's brand new.