Introduction
Use this guide to replace a faulty battery in your MacBook Air 13" Early 2015.
Note: If there is a thin plastic film on your replacement battery, do not attempt to remove it. It is glued on and protects the battery pack while it is inside the MacBook.
What you need
Video Overview
-
-
Use a P5 Pentalobe driver to remove ten screws securing the lower case, of the following lengths:
-
Two 9 mm screws
-
Eight 2.6 mm screws
-
-
-
-
Grab the clear plastic pull tab attached to the battery connector and pull it parallel to the board toward the front edge of the Air.
-
-
-
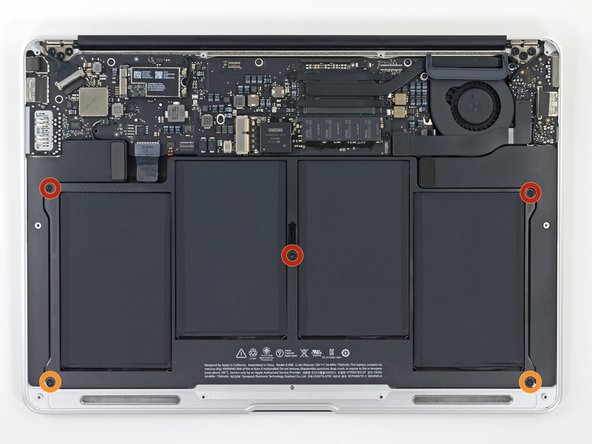
Remove the following five screws securing the battery to the upper case:
-
Three 6.9 mm T5 Torx screws
-
Two 3.0 mm T5 Torx screws
-
-
-
Lift the battery from its edge nearest the logic board and remove it from the upper case.
-
Charge it to 100%, and then keep charging it for at least 2 more hours. Then, unplug and use it normally to drain the battery. When you see the low battery warning, save your work, and keep your laptop on until it goes to sleep due to low battery. Wait at least 5 hours, then charge your laptop uninterrupted to 100%.
-
If you notice any unusual behavior or problems after installing your new battery, you may need to reset your MacBook's SMC.
-
To reassemble your device, follow these instructions in reverse order.
To reassemble your device, follow these instructions in reverse order.
Cancel: I did not complete this guide.
383 other people completed this guide.
58 Comments
Do I have to allow the battery to completely discharge and then recharge after replacement? One site said that was appropriate way to do it.
Yes, for best results you should calibrate your battery by draining it completely and then charging it uninterrupted to 100%. Once it hits 100%, leave it plugged in for a couple more hours. Then drain it again until it shuts off automatically (make sure it doesn't go to sleep). After that, charge it up and use it normally.
But thats a myth … if I’m not wrong, only nickel battery can be calibrated, the os-systems of theses days take care of it, like with all smartphones nowadays.
@mrgrdn You might be thinking of memory effect. Calibration is still very much a thing and quite important, particularly on a new battery. Here’s some reading if you are curious!
Génial pour la livraison et pour ce tuto… j’ai un mac tout neuf ! Et un grand merci pour les bonbons :-)


