Introduction
Der Austausch des RAM ist leicht ohne Werkzeug durchzuführen. Du kannst deinen Mini von Mitte 2010 leistungsfähiger machen.
What you need
-
-
Lege deine Daumen in die Vertiefungen der unteren Abdeckung.
-
Drehe die untere Abdeckung entgegen dem Uhrzeigersinn, bis der weiße Markierungspunkt am Rand der Abdeckung dem kleinen Kreis am Gehäuse gegenübersteht.
-
-
-
-
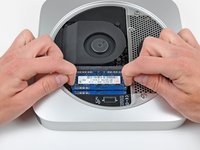
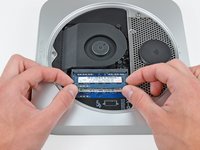
Löse die Rasten auf jeder Seite des RAM Riegels, indem du gleichzeitig jede Rasten weg vom RAM drückst.
-
Wenn der Riegel sich gelöst hat, kannst du ihn aus dem Sockel ziehen.
-


Um dein Gerät wieder zusammenzusetzen, folge den Schritten in umgekehrter Reihenfolge.
Cancel: I did not complete this guide.
101 other people completed this guide.
Special thanks to these translators:
100%

These translators are helping us fix the world! Want to contribute?
Start translating ›

15 Guide Comments
Do the RAM chips have to be paired, or could I replace a one gig bar with a 4 gig bar?
Thanks for any hints!
They don't need to be paired, although that is the optimum. Just remember, it is best to make sure they are the same speed, or the Mac will just operate both RAMs at the speed of the slowest stick. For example, if you have 2x 1GB PC8500 sticks in there, and you replace one of them with a 4GB PC10600 stick (fastest speed this Mac Mini will run) you will get a benefit form the extra memory, but not the full speed upgrade as both RAMs will operate at the speed of the 8500 stick. Does that make sense? So replacing both with 2x 2GB PC10600 will give you better performance.
This Mac Mini will run PC10600 RAM sticks, although I believe only 4GB per slot.
This Mac can run 16GB of RAM, mine does. Just FYI.
Interesting. I want to try that.