Shop the Holiday Gift Guide
Free Shipping on Domestic Orders $75+

Logitech Zone 300 Battery steps

Views: 147

View statistics:

Past 24 Hours:
3
Past 7 Days:
10
Past 30 Days:
21
All Time:
147
Comments: 0

No one has left comments on this guide. Will you be first?

Go to guide comments
Completed: 0

No one has marked this guide "completed." Will you be the first?

Favorites: 0

No one has favorited (and subscribed to) this guide. Will you be the first?

Time Required: No estimate
Difficulty: Moderate
Prerequisite Only

This is a prerequisite-only guide! This guide is part of another procedure and isn’t meant to be used alone.

Logitech Zone 300 Battery steps

Introduction

Go to step 1 ↓

Logitech Zone 300 battery removal and installation steps prereq

What you need

Parts

Tools

    1. Logitech Zone 300 Battery steps, Separate the speaker plate: step 1, image 1 of 3 Logitech Zone 300 Battery steps, Separate the speaker plate: step 1, image 2 of 3 Logitech Zone 300 Battery steps, Separate the speaker plate: step 1, image 3 of 3
      • Insert the point of an opening pick into the seam between the speaker plate and ear cup.

      • Slide the pick along the seam to release the four speaker plate clips.

      Ask FixBot

      Add Comment

    2. Logitech Zone 300 Battery steps: step 2, image 1 of 2 Logitech Zone 300 Battery steps: step 2, image 2 of 2
      • Don't try to fully remove the speaker plate, as a wire connects it to the ear cup.

      • Use your fingers to move the speaker plate towards the right side of the ear cup so you can access the screws.

      Ask FixBot

      Add Comment

    3. Logitech Zone 300 Battery steps, Separate the speaker housing: step 3, image 1 of 1
      • Use a Phillips screwdriver to remove the 7.1 mm‑long pancake screw securing the speaker housing.

      Ask FixBot

      Add Comment

    4. Logitech Zone 300 Battery steps: step 4, image 1 of 1
      • This step reattaches the speaker plate temporarily to keep it from wobbling during repairs.

      • Align the speaker plate to the speaker housing and squeeze firmly to engage two of the four clips.

      Ask FixBot

      Add Comment

    5. Logitech Zone 300 Battery steps: step 5, image 1 of 2 Logitech Zone 300 Battery steps: step 5, image 2 of 2
      • Use your fingers to grab the speaker housing from the back.

      • Pull firmly to pop the housing off from its ball joint.

      • Be careful not to pull more than 1 cm apart—a speaker wire still connects the housing and the ear cup.

      Ask FixBot

      Add Comment

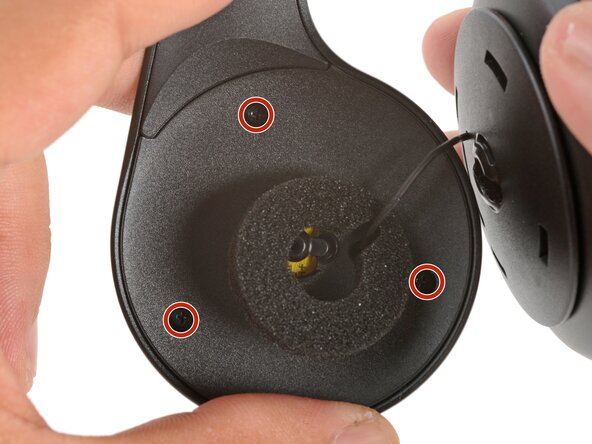
    6. Logitech Zone 300 Battery steps, Remove the midplate screws: step 6, image 1 of 1
      • Use a Phillips screwdriver to remove the three 5.3 mm‑long screws securing the midplate.

      Ask FixBot

      Add Comment

    7. Logitech Zone 300 Battery steps, Reposition the midplate: step 7, image 1 of 2 Logitech Zone 300 Battery steps, Reposition the midplate: step 7, image 2 of 2
      • Be careful not to strain the speaker and battery cables during this step.

      • Use your fingers to swing the midplate away from the ear cup.

      Ask FixBot

      Add Comment

    8. Logitech Zone 300 Battery steps, Remove the battery: step 8, image 1 of 3 Logitech Zone 300 Battery steps, Remove the battery: step 8, image 2 of 3 Logitech Zone 300 Battery steps, Remove the battery: step 8, image 3 of 3
      • The battery's lightly adhered to the midplate.

      • Slide the tip of an opening pick under the battery and pry gently to separate it from the midplate.

      Ask FixBot

      Add Comment

    9. Logitech Zone 300 Battery steps: step 9, image 1 of 2 Logitech Zone 300 Battery steps: step 9, image 2 of 2
      • Use your fingers to peel and remove the foam pad covering the circuit board.

      • Store this pad in a clean location for reassembly.

      Ask FixBot

      Add Comment

    10. Logitech Zone 300 Battery steps: step 10, image 1 of 3 Logitech Zone 300 Battery steps: step 10, image 2 of 3 Logitech Zone 300 Battery steps: step 10, image 3 of 3
      • Use angled tweezers to grip the edges of the battery connector.

      • Gently rock the connector side-to-side and slide the battery connector out of its socket.

      • This connector can be difficult to disconnect. Squeeze the tweezers close to the tips to help grip the connector.

      • Push down on the socket with your finger while you rock the connector to prevent the socket from breaking off the circuit board.

      Ask FixBot

      Add Comment

    11. Logitech Zone 300 Battery steps: step 11, image 1 of 1
      • Remove the battery.

      • Remove any adhesive residue from the battery well.

      Ask FixBot

      Add Comment

    12. Logitech Zone 300 Battery steps, Install the battery: step 12, image 1 of 2 Logitech Zone 300 Battery steps, Install the battery: step 12, image 2 of 2
      Tool used on this step:
      Tesa 61395 Tape
      $2.95
      Buy
      • The remaining instructions show how to reassemble the headset.

      • Cut and attach a small strip of double-sided tape onto the battery.

      • Remove the adhesive liner to expose the adhesive.

      Ask FixBot

      Add Comment

    13. Logitech Zone 300 Battery steps: step 13, image 1 of 2 Logitech Zone 300 Battery steps: step 13, image 2 of 2
      • Use your fingers to slide the battery connector fully into its circuit board socket.

      Ask FixBot

      Add Comment

    14. Logitech Zone 300 Battery steps: step 14, image 1 of 1
      • Place the foam pad over the circuit board and use your finger to press it in place.

      Ask FixBot

      Add Comment

    15. Logitech Zone 300 Battery steps: step 15, image 1 of 1
      • Align the battery in the midplate recess such that the battery cable reaches its circuit board connector.

      • Use your fingers to press the battery onto the midplate.

      Ask FixBot

      Add Comment

    16. Logitech Zone 300 Battery steps, Install the midplate: step 16, image 1 of 2 Logitech Zone 300 Battery steps, Install the midplate: step 16, image 2 of 2
      • Swing the midplate back in place over the ear cup.

      Ask FixBot

      Add Comment

    17. Logitech Zone 300 Battery steps: step 17, image 1 of 1
      • Use a Phillips screwdriver to install the three 5.3 mm‑long screws to secure the midplate.

      • Make sure the midplate isn't pinching any wires.

      Ask FixBot

      Add Comment

    18. Logitech Zone 300 Battery steps, Install the speaker housing: step 18, image 1 of 1
      • At this point, you'll need to separate the speaker plate you partially reattached earlier to reinstall the pancake screw.

      • Use your fingers to unclip the speaker plate from the housing.

      Ask FixBot

      Add Comment

    19. Logitech Zone 300 Battery steps: step 19, image 1 of 1
      • Align the speaker housing to the midplate such that the speaker wire threads through both parts without twisting.

      • Align the foam piece so that it's centered around the ball joint.

      Ask FixBot

      Add Comment

    20. Logitech Zone 300 Battery steps: step 20, image 1 of 2 Logitech Zone 300 Battery steps: step 20, image 2 of 2
      • Align the ball joint to the speaker housing's center cutout.

      • Use your fingers to firmly press the speaker housing onto the ball joint to pop it back in place.

      Ask FixBot

      Add Comment

    21. Logitech Zone 300 Battery steps: step 21, image 1 of 1
      • Use a Phillips screwdriver to install the 7.1 mm‑long pancake screw to secure the speaker housing.

      Ask FixBot

      Add Comment

    22. Logitech Zone 300 Battery steps, Install the speaker plate: step 22, image 1 of 2 Logitech Zone 300 Battery steps, Install the speaker plate: step 22, image 2 of 2
      • Use your fingers to move the speaker plate back over the speaker housing.

      • The top clip is wider than the rest of the clips and is located above a set of vent holes. Use this to help align the speaker plate to the housing.

      Ask FixBot

      Add Comment

    23. Logitech Zone 300 Battery steps: step 23, image 1 of 3 Logitech Zone 300 Battery steps: step 23, image 2 of 3 Logitech Zone 300 Battery steps: step 23, image 3 of 3
      • Use your fingers to squeeze and engage the four clips to secure the speaker plate to the housing.

      Ask FixBot

      Add Comment

Conclusion

To reassemble your device, follow these instructions in reverse order.

Cancel: I did not complete this guide.

Author

with

Arthur Shi

Member since: 01/03/18

353,975 Reputation

938 Guides authored

0 Guide Comments

Add Comment

View Statistics:

Past 24 Hours: 3

Past 7 Days: 10

Past 30 Days: 21

All Time: 147