Free Shipping on Domestic Orders $75+

Logitech RS50 Base Slip Ring Removal

Prerequisite Only
This is a prerequisite-only guide! This guide is part of another procedure and isn’t meant to be used alone.

What you need

    1. Logitech RS50 Base Slip Ring Removal, Safety precautions: step 1, image 1 of 2 Logitech RS50 Base Slip Ring Removal, Safety precautions: step 1, image 2 of 2
      • Disconnect all cables from the base.

      • Unmount the base from your setup and remove any accessories so you're left with just the base.

      Ask FixBot

      Add Comment

    2. Logitech RS50 Base Slip Ring Removal, Remove the QR adapter screws: step 2, image 1 of 1
      • Use a 2.5 mm hex driver to remove the two 23 mm‑long screws securing the QR (Quick Release) adapter.

      Ask FixBot

      Add Comment

    3. Logitech RS50 Base Slip Ring Removal, Pull out the QR adapter: step 3, image 1 of 3 Logitech RS50 Base Slip Ring Removal, Pull out the QR adapter: step 3, image 2 of 3 Logitech RS50 Base Slip Ring Removal, Pull out the QR adapter: step 3, image 3 of 3
      • Don't try to remove the QR adapter—it's still connected by a cable.

      • Carefully pull the adapter out of the shaft as far as possible.

      • Use your fingers to separate the spring from the adapter.

      Ask FixBot

      Add Comment

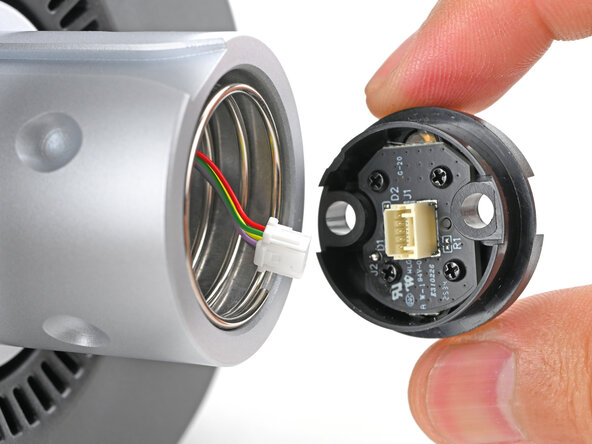
    4. Logitech RS50 Base Slip Ring Removal, Disconnect the QR adapter: step 4, image 1 of 2 Logitech RS50 Base Slip Ring Removal, Disconnect the QR adapter: step 4, image 2 of 2
      • Use tweezers to squeeze the base of the slip ring connector and gently pull it out of its socket.

      Ask FixBot

      Add Comment

    5. Logitech RS50 Base Slip Ring Removal: step 5, image 1 of 2 Logitech RS50 Base Slip Ring Removal: step 5, image 2 of 2
      • Remove the QR adapter and store it for reassembly.

      • Remove the spring and store it for reassembly.

      Ask FixBot

      Add Comment

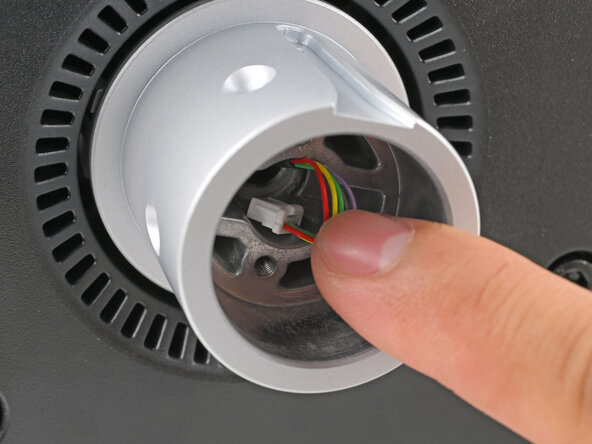
    6. Logitech RS50 Base Slip Ring Removal, Tuck the slip ring connector: step 6, image 1 of 1
      • Tuck the slip ring connector into the shaft to keep it out of the way.

      Ask FixBot

      Add Comment

    7. Logitech RS50 Base Slip Ring Removal, Remove the back cover: step 7, image 1 of 1
      • Use a 5 mm hex driver to remove the four 28 mm‑long bolts securing the back cover.

      Ask FixBot

      Add Comment

    8. Logitech RS50 Base Slip Ring Removal: step 8, image 1 of 2 Logitech RS50 Base Slip Ring Removal: step 8, image 2 of 2
      • Remove the back cover.

      Ask FixBot

      Add Comment

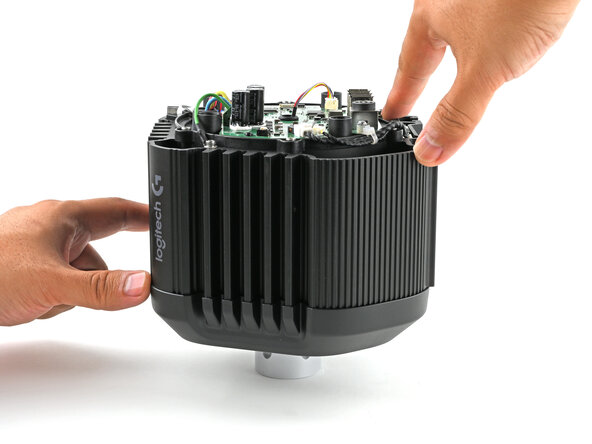
    9. Logitech RS50 Base Slip Ring Removal, Tilt the base: step 9, image 1 of 2 Logitech RS50 Base Slip Ring Removal, Tilt the base: step 9, image 2 of 2
      • Tilt the base forward so it rests squarely on the shaft.

      Ask FixBot

      Add Comment

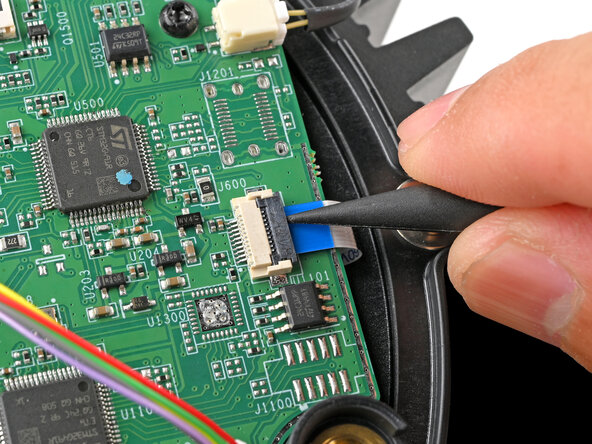
    10. Logitech RS50 Base Slip Ring Removal, Disconnect the encoder: step 10, image 1 of 3 Logitech RS50 Base Slip Ring Removal, Disconnect the encoder: step 10, image 2 of 3 Logitech RS50 Base Slip Ring Removal, Disconnect the encoder: step 10, image 3 of 3
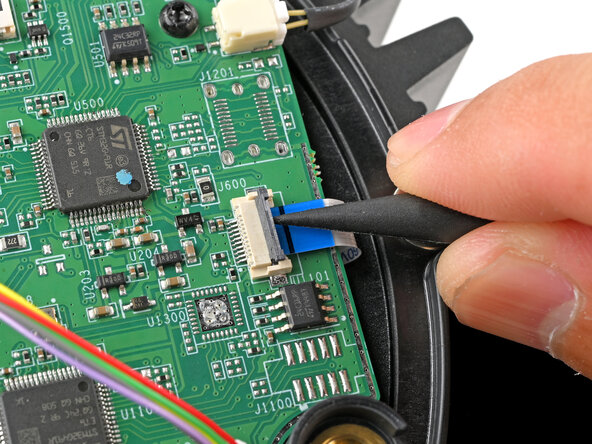
      • Use the tip of a spudger or your fingernail to flip up the small, hinged locking flap on the encoder ZIF connector.

      Ask FixBot

      Add Comment

    11. Logitech RS50 Base Slip Ring Removal: step 11, image 1 of 2 Logitech RS50 Base Slip Ring Removal: step 11, image 2 of 2
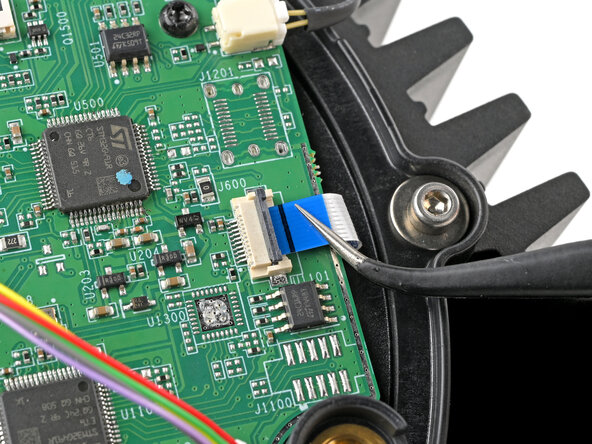
      • Slide the encoder cable out of the socket.

      Ask FixBot

      Add Comment

    12. Logitech RS50 Base Slip Ring Removal, Disconnect the case temperature sensor: step 12, image 1 of 3 Logitech RS50 Base Slip Ring Removal, Disconnect the case temperature sensor: step 12, image 2 of 3 Logitech RS50 Base Slip Ring Removal, Disconnect the case temperature sensor: step 12, image 3 of 3
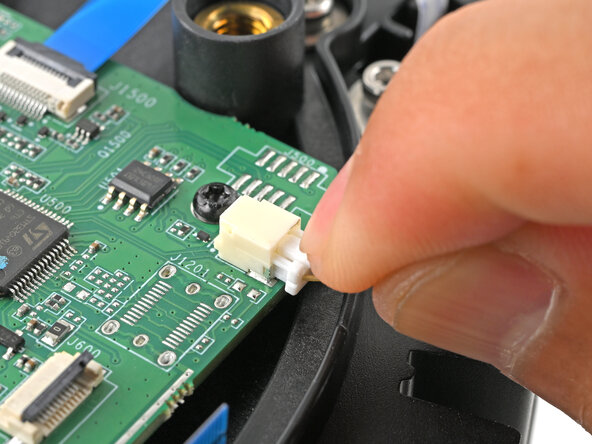
      • Use your finger to press the tab at the base of the case temperature connector and gently slide it out of its socket.

      Ask FixBot

      Add Comment

    13. Logitech RS50 Base Slip Ring Removal, Disconnect the slip ring: step 13, image 1 of 3 Logitech RS50 Base Slip Ring Removal, Disconnect the slip ring: step 13, image 2 of 3 Logitech RS50 Base Slip Ring Removal, Disconnect the slip ring: step 13, image 3 of 3
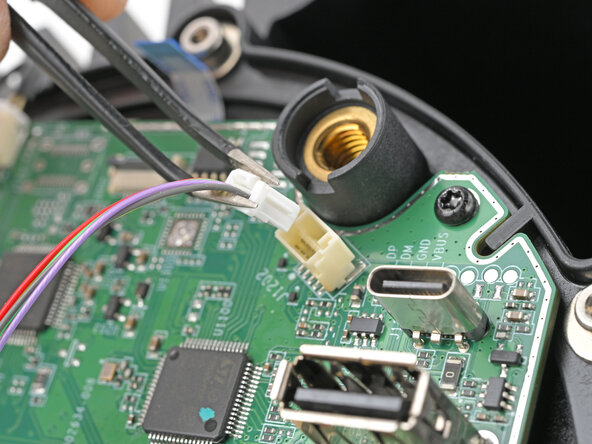
      • Use tweezers to squeeze the tab at the base of the slip ring connector and gently pull it out of its socket.

      Ask FixBot

      Add Comment

    14. Logitech RS50 Base Slip Ring Removal, Disconnect the ballast: step 14, image 1 of 3 Logitech RS50 Base Slip Ring Removal, Disconnect the ballast: step 14, image 2 of 3 Logitech RS50 Base Slip Ring Removal, Disconnect the ballast: step 14, image 3 of 3
      • With one hand, hold the ballast connector socket with your fingers to keep it from breaking off.

      • With your other hand, squeeze the top of the ballast connector to unlock it and slide it out of its socket.

      Ask FixBot

      Add Comment

    15. Logitech RS50 Base Slip Ring Removal: step 15, image 1 of 2 Logitech RS50 Base Slip Ring Removal: step 15, image 2 of 2
      • Use tweezers to squeeze the tab at the base of the ballast temperature connector and slide it out of its socket.

      Ask FixBot

      Add Comment

    16. Logitech RS50 Base Slip Ring Removal, Remove the circuit board screws: step 16, image 1 of 1
      • Use a Torx T8 driver to remove the four screws securing the circuit board:

      • Three 7.6 mm‑long screws

      • One 12 mm‑long silver screw

      Ask FixBot

      Add Comment

    17. Logitech RS50 Base Slip Ring Removal, Flip the circuit board up: step 17, image 1 of 3 Logitech RS50 Base Slip Ring Removal, Flip the circuit board up: step 17, image 2 of 3 Logitech RS50 Base Slip Ring Removal, Flip the circuit board up: step 17, image 3 of 3
      • The circuit board is still connected along the top edge by various cables. Make sure not to strain these cables as you follow this step.

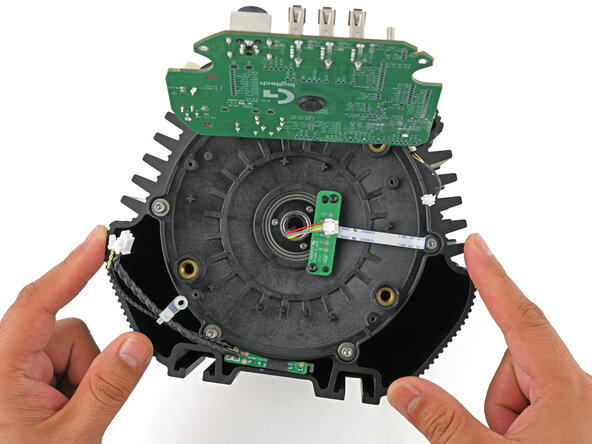
      • Slowly lift the bottom edge to flip the board up, threading the slip ring cable through its cutout, until the board sits perpendicular to the base.

      Ask FixBot

      Add Comment

    18. Logitech RS50 Base Slip Ring Removal, Align the slip ring adapter: step 18, image 1 of 3 Logitech RS50 Base Slip Ring Removal, Align the slip ring adapter: step 18, image 2 of 3 Logitech RS50 Base Slip Ring Removal, Align the slip ring adapter: step 18, image 3 of 3
      • Rotate the base to align the slip ring adapter so that its flange can slide past the sensor board.

      Ask FixBot

      Add Comment

    19. Logitech RS50 Base Slip Ring Removal, Remove the slip ring adapter screws: step 19, image 1 of 1
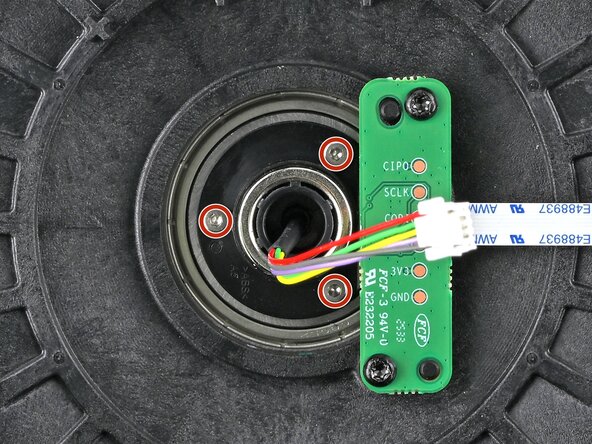
      • Use a 1.5 mm hex driver to remove the three 7 mm‑long screws securing the slip ring adapter.

      Ask FixBot

      Add Comment

    20. Logitech RS50 Base Slip Ring Removal, Remove the slip ring: step 20, image 1 of 3 Logitech RS50 Base Slip Ring Removal, Remove the slip ring: step 20, image 2 of 3 Logitech RS50 Base Slip Ring Removal, Remove the slip ring: step 20, image 3 of 3
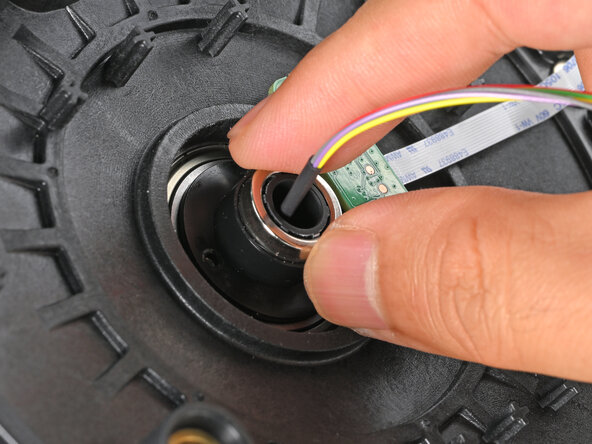
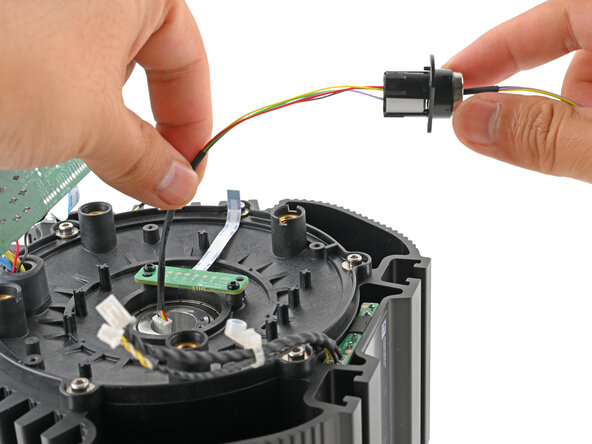
      • Pull the slip ring adapter out of the shaft and remove it.

      • The slip ring is adhered inside the plastic adapter and will come out with it.

      Ask FixBot

      Add Comment

    21. Logitech RS50 Base Slip Ring Removal, Identify the adhesive: step 21, image 1 of 2 Logitech RS50 Base Slip Ring Removal, Identify the adhesive: step 21, image 2 of 2
      • If the slip ring adhesive is white and thin, proceed to the next step to remove it.

      • If the slip ring adhesive is black and feels like foam, skip down one step.

      Ask FixBot

      Add Comment

    22. Logitech RS50 Base Slip Ring Removal, Remove the white adhesive strip: step 22, image 1 of 1
      • Use tweezers to pull the white adhesive strip out between the slip ring adapter and the slip ring.

      • Skip the next step.

      Ask FixBot

      Add Comment

    23. Logitech RS50 Base Slip Ring Removal, Remove the black adhesive strip: step 23, image 1 of 3 Logitech RS50 Base Slip Ring Removal, Remove the black adhesive strip: step 23, image 2 of 3 Logitech RS50 Base Slip Ring Removal, Remove the black adhesive strip: step 23, image 3 of 3
      • Use an opening pick to gently slice between the adapter arms to separate the black adhesive strip from them.

      • Be careful not to apply too much force, or you may damage the adapter arms.

      Ask FixBot

      Add Comment

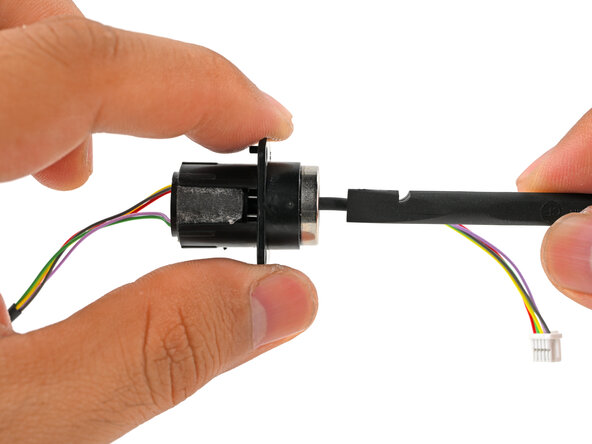
    24. Logitech RS50 Base Slip Ring Removal, Remove the slip ring adapter: step 24, image 1 of 3 Logitech RS50 Base Slip Ring Removal, Remove the slip ring adapter: step 24, image 2 of 3 Logitech RS50 Base Slip Ring Removal, Remove the slip ring adapter: step 24, image 3 of 3
      • Use the flat end of a spudger to push the top of the slip ring (the end with the shorter cable) until it slides out of the adapter.

      Ask FixBot

      Add Comment

    25. Logitech RS50 Base Slip Ring Removal, Clean the slip ring adapter: step 25, image 1 of 1
      • Use the point of a spudger to scrape away any remaining adhesive from the inside of the adapter.

      Ask FixBot

      Add Comment

Conclusion

To reassemble your device, follow these instructions in reverse order.

Cancel: I did not complete this guide.

Arthur Shi

Member since: 01/03/18

350,754 Reputation

938 Guides authored

0 Guide Comments

Add Comment

View Statistics:

Past 24 Hours: 1

Past 7 Days: 3

Past 30 Days: 6

All Time: 69