
Free Shipping on Domestic Orders $75+

Logitech MX Master 4 Feet Replacement

What you need

  1. Logitech MX Master 4 Feet Replacement, Prepare your mouse for disassembly: step 1, image 1 of 3 Logitech MX Master 4 Feet Replacement, Prepare your mouse for disassembly: step 1, image 2 of 3 Logitech MX Master 4 Feet Replacement, Prepare your mouse for disassembly: step 1, image 3 of 3
    • Flip the mouse's power switch down into the OFF position and unplug any cables.

    • The mouse's unique shape prevents it from laying flat. If you need to, lay it down on a soft towel to prevent wobble.

  2. Logitech MX Master 4 Feet Replacement, Heat the mouse feet: step 2, image 1 of 2 Logitech MX Master 4 Feet Replacement, Heat the mouse feet: step 2, image 2 of 2
    • Mild adhesive secures the mouse feet. Heating them will soften the adhesive, making it easier to cleanly remove the feet.

    • Heat an iOpener and lay it on each of the mouse feet for one minute.

    • Alternatively, you can use a hair dryer to soften the mouse feet adhesive.

    • When using a hair dryer, don't heat the feet for more than a couple seconds at a time or you risk melting or warping the plastic case.

  3. Logitech MX Master 4 Feet Replacement, Mouse feet information: step 3, image 1 of 2 Logitech MX Master 4 Feet Replacement, Mouse feet information: step 3, image 2 of 2
    • Each mouse foot recess has a small notch. Insert your tool near the notch to cleanly remove the feet.

  4. Logitech MX Master 4 Feet Replacement, Remove the mouse feet: step 4, image 1 of 3 Logitech MX Master 4 Feet Replacement, Remove the mouse feet: step 4, image 2 of 3 Logitech MX Master 4 Feet Replacement, Remove the mouse feet: step 4, image 3 of 3
    • If any of the feet feel stuck when removing them, apply more heat and try again.

    • Slowly slide the tip of an opening pick under one of the feet.

    • Make sure the pick slides under both the foot and its adhesive pad—the two layers can easily separate.

    • Slide the pick farther under the foot and lift until you can grip the foot with your fingers.

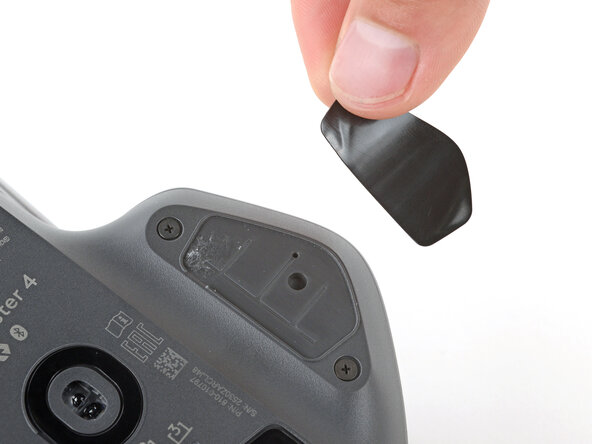
    • Use your fingers to peel up and remove the foot.

    • If the foot separated from its adhesive pad, use the same process to remove the pad.

  5. Logitech MX Master 4 Feet Replacement: step 5, image 1 of 3 Logitech MX Master 4 Feet Replacement: step 5, image 2 of 3 Logitech MX Master 4 Feet Replacement: step 5, image 3 of 3
    • Repeat the previous step to remove the remaining mouse feet.

  6. Logitech MX Master 4 Feet Replacement, Install new mouse feet: step 6, image 1 of 2 Logitech MX Master 4 Feet Replacement, Install new mouse feet: step 6, image 2 of 2
    • To install new mouse feet:

    • Thoroughly clean all the foot recesses with isopropyl alcohol and a lint‑free or microfiber cloth. Allow the surface to dry completely.

    • Peel your new mouse feet off their adhesive liners and press them firmly into place.

Conclusion

Congratulations on completing your repair!

Repair didn’t go as planned? Try some basic troubleshooting, or ask our Answers community for help.

Spencer Day

Member since: 09/14/22

161,146 Reputation

1,045 Guides authored

0 Guide Comments

Add Comment

View Statistics:

Past 24 Hours: 4

Past 7 Days: 40

Past 30 Days: 174

All Time: 254