
Logitech G PRO Wireless Opening Procedure

What you need

  1. Logitech G PRO Wireless Opening Procedure, Turn off the PRO Wireless: step 1, image 1 of 3 Logitech G PRO Wireless Opening Procedure, Turn off the PRO Wireless: step 1, image 2 of 3 Logitech G PRO Wireless Opening Procedure, Turn off the PRO Wireless: step 1, image 3 of 3
    • Shift the power switch down to turn off your mouse (when the PRO Wireless label is oriented right-side up).

    • The color behind the switch should be red when the mouse is switched off.

  2. Logitech G PRO Wireless Opening Procedure, Apply heat to the upper mouse foot: step 2, image 1 of 1
    • If you plan to reuse the mouse feet, you'll need to apply heat to loosen the adhesive and remove the feet with minimal bending.

    • Heat an iOpener and apply it to the upper mouse foot for one minute.

    • A hair dryer or heat gun may also be used, but be careful not to overheat the mouse—the internal battery is susceptible to heat damage. If you use a hair dryer or heat gun, set it to the lowest temperature setting and apply heat for 10 seconds.

  3. Logitech G PRO Wireless Opening Procedure, Insert the spudger under the upper mouse foot: step 3, image 1 of 2 Logitech G PRO Wireless Opening Procedure, Insert the spudger under the upper mouse foot: step 3, image 2 of 2
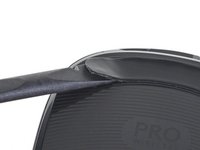
    • Insert the flat end of a spudger under the upper mouse foot.

    • Each mouse foot has a gap in its recess that you can use to insert the spudger.

    • The mouse feet are made of two layers. Make sure you insert the spudger under the bottom layer to completely remove the foot.

  4. Logitech G PRO Wireless Opening Procedure, Remove the upper mouse foot: step 4, image 1 of 3 Logitech G PRO Wireless Opening Procedure, Remove the upper mouse foot: step 4, image 2 of 3 Logitech G PRO Wireless Opening Procedure, Remove the upper mouse foot: step 4, image 3 of 3
    • Slide the spudger under the length of the upper mouse foot to cut through the adhesive and detach it from the mouse.

    • Work slowly to avoid bending the mouse foot. If the adhesive becomes difficult to cut through, remove the spudger and apply more heat.

  5. Logitech G PRO Wireless Opening Procedure, Apply heat to the lower mouse feet: step 5, image 1 of 1
    • Apply the iOpener to the lower mouse feet for one minute.

    • Alternatively, use a hair dryer or heat gun to apply heat for ten seconds.

  6. Logitech G PRO Wireless Opening Procedure, Remove the lower mouse feet: step 6, image 1 of 2 Logitech G PRO Wireless Opening Procedure, Remove the lower mouse feet: step 6, image 2 of 2
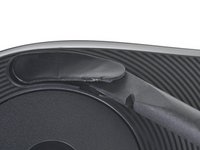
    • Insert the flat end of a spudger under the left lower mouse foot.

  7. Logitech G PRO Wireless Opening Procedure: step 7, image 1 of 3 Logitech G PRO Wireless Opening Procedure: step 7, image 2 of 3 Logitech G PRO Wireless Opening Procedure: step 7, image 3 of 3
    • Slide the spudger under the length of the left lower mouse foot to cut through the adhesive and detach it from the mouse.

  8. Logitech G PRO Wireless Opening Procedure: step 8, image 1 of 2 Logitech G PRO Wireless Opening Procedure: step 8, image 2 of 2
    • Repeat the procedure to remove the two remaining lower mouse feet.

  9. Logitech G PRO Wireless Opening Procedure, Adhesive information: step 9, image 1 of 1
    • If you are going to install replacement mouse feet or apply new adhesive, use the flat edge of a spudger to remove the remaining adhesive in the mouse foot recesses.

    • During reassembly, follow this guide if you are using a pre-cut adhesive card to secure the mouse feet.

  10. Logitech G PRO Wireless Opening Procedure, Remove the lower case screws: step 10, image 1 of 1
    • Use a Phillips screwdriver to remove the seven 4.4 mm-long screws securing the lower case.

  11. Logitech G PRO Wireless Opening Procedure, Lift the bottom end of the lower case: step 11, image 1 of 2 Logitech G PRO Wireless Opening Procedure, Lift the bottom end of the lower case: step 11, image 2 of 2
    • Don't try to remove the lower case from the upper case yet. They are still attached by the battery cables and input cable.

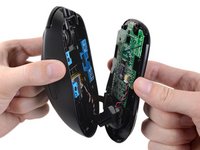
    • Lift the bottom end of the lower case about 1 cm away from the upper case.

  12. Logitech G PRO Wireless Opening Procedure, Pull the lower case down: step 12, image 1 of 2 Logitech G PRO Wireless Opening Procedure, Pull the lower case down: step 12, image 2 of 2
    • The lower case has clips on its top edge attaching it to the upper case.

    • Pull the lower case down about 0.5 cm to detach the lower case from the upper case.

  13. Logitech G PRO Wireless Opening Procedure, Swing the lower case away from the upper case: step 13, image 1 of 3 Logitech G PRO Wireless Opening Procedure, Swing the lower case away from the upper case: step 13, image 2 of 3 Logitech G PRO Wireless Opening Procedure, Swing the lower case away from the upper case: step 13, image 3 of 3
    • The battery cables and input cable are connected to the bottom right of the lower case (when the PRO Wireless logo is facing you).

    • Swing the lower case left to right away from the upper case.

  14. Logitech G PRO Wireless Opening Procedure, Place the mouse on your work surface: step 14, image 1 of 1
    • Place the lower case on your work surface.

    • Lean the upper case against a sturdy object (such as a box) to prevent straining the cables.

  15. Logitech G PRO Wireless Opening Procedure, Disconnect the battery: step 15, image 1 of 2 Logitech G PRO Wireless Opening Procedure, Disconnect the battery: step 15, image 2 of 2
    • Use a pair of blunt tweezers to pull the battery connector straight out of its slot.

    • Pull up with a rocking motion to "walk" the battery connector out of its slot.

    • During reassembly, make sure the battery connector is oriented correctly when you insert it into its slot. The red wire should be on the side where the motherboard is marked with a plus sign (+).

  16. Logitech G PRO Wireless Opening Procedure, Disconnect the input cable: step 16, image 1 of 2 Logitech G PRO Wireless Opening Procedure, Disconnect the input cable: step 16, image 2 of 2
    • Use the pointed end of a spudger or your fingernail to flip up the small, hinged locking flap on the input cable ZIF connector.

  17. Logitech G PRO Wireless Opening Procedure: step 17, image 1 of 2 Logitech G PRO Wireless Opening Procedure: step 17, image 2 of 2
    • Use a pair of tweezers to pull the input cable out of its ZIF connector.

    • The white line on this ribbon cable marks the edge of the connection area. To reinstall, insert the cable into the connector up to this line, and then close the locking flap. If the cable doesn’t insert easily up to (or very near to) this line, it’s probably misaligned and needs to be gently removed and repositioned.

  18. Logitech G PRO Wireless Opening Procedure, Remove the upper case: step 18, image 1 of 1
    • Remove the upper case from the lower case.

Conclusion

To reassemble your device, follow these instructions in reverse order.

5 other people completed this guide.

Kyle Smith

Member since: 02/01/21

41,023 Reputation

123 Guides authored

3 Comments

Hm... hope the wired version is not too different, it doesn't seem to have an entry on here...

ailuridae - Reply

Any help on getting the scroll wheel fixed? Looks like eventually all G Pro have an issue with scrolling both directions anytime you touch the scroll wheel, or when scrolling down, it can actually scroll up, does cleaning the wheel help with this? This doesn't show how to get the wheel out.

Xenthoxin - Reply

For anyone looking how to clean the scroll wheel - https://www.youtube.com/watch?v=P2OiLJBI...

you have to remove the battery held by the tab with the screw, unscrew 2 screws for each of the buttons and then you can access the scroll wheel daughter board.

Gregorein -

Add Comment

View Statistics:

Past 24 Hours: 34

Past 7 Days: 207

Past 30 Days: 900

All Time: 25,836