
Lenovo 500e Chromebook 2nd Gen Wi-Fi Card Replacement

What you need

  1. Lenovo 500e Chromebook 2nd Gen Wi-Fi Card Replacement, Back Panel: step 1, image 1 of 1
    • Remove nine 6 mm screws from the bottom cover of the laptop using a Phillips #0 screwdriver.

  2. Lenovo 500e Chromebook 2nd Gen Wi-Fi Card Replacement: step 2, image 1 of 2 Lenovo 500e Chromebook 2nd Gen Wi-Fi Card Replacement: step 2, image 2 of 2
    • Remove stylus from the lower left corner of the back panel.

  3. Lenovo 500e Chromebook 2nd Gen Wi-Fi Card Replacement: step 3, image 1 of 2 Lenovo 500e Chromebook 2nd Gen Wi-Fi Card Replacement: step 3, image 2 of 2
    • Go along the edge of the back panel with an iFixit opening tool until it pops loose.

    • Remove the back panel from the laptop.

  4. Lenovo 500e Chromebook 2nd Gen Wi-Fi Card Replacement, Battery: step 4, image 1 of 1
    • Remove the four 4 mm Phillips #00 screws holding the battery in.

  5. Lenovo 500e Chromebook 2nd Gen Wi-Fi Card Replacement: step 5, image 1 of 2 Lenovo 500e Chromebook 2nd Gen Wi-Fi Card Replacement: step 5, image 2 of 2
    • Use the iFixit opening tool to unplug the battery from the motherboard.

    • Potential for device damage: Make sure to be gentle while removing the wire.

  6. Lenovo 500e Chromebook 2nd Gen Wi-Fi Card Replacement: step 6, image 1 of 1
    • Remove the battery from the laptop.

  7. Lenovo 500e Chromebook 2nd Gen Wi-Fi Card Replacement, Wi-Fi Card: step 7, image 1 of 2 Lenovo 500e Chromebook 2nd Gen Wi-Fi Card Replacement, Wi-Fi Card: step 7, image 2 of 2
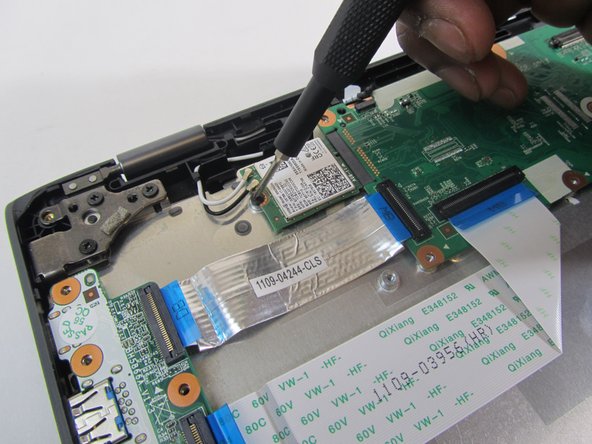
    • Remove the single 2 mm screw from the Wi-Fi card using a Phillips #00 screwdriver.

  8. Lenovo 500e Chromebook 2nd Gen Wi-Fi Card Replacement: step 8, image 1 of 2 Lenovo 500e Chromebook 2nd Gen Wi-Fi Card Replacement: step 8, image 2 of 2
    • Detach the Wi-Fi card from the motherboard using an iFixit opening tool.

  9. Lenovo 500e Chromebook 2nd Gen Wi-Fi Card Replacement: step 9, image 1 of 2 Lenovo 500e Chromebook 2nd Gen Wi-Fi Card Replacement: step 9, image 2 of 2
    • Using tweezers, disconnect the two wires from the Wi-Fi card.

    • Remove the Wi-Fi card from the laptop.

Conclusion

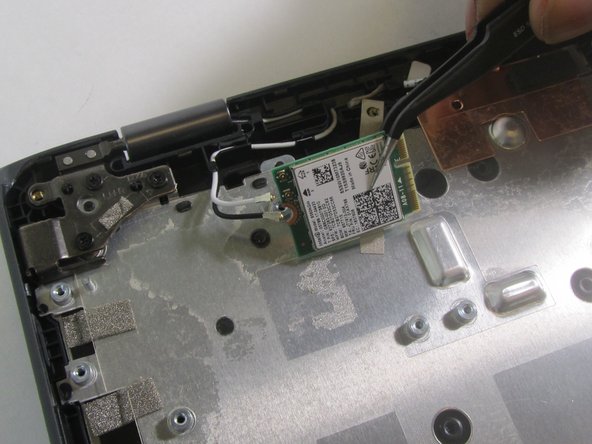
To reassemble your device, follow these instructions in reverse order.

One other person completed this guide.

0 Comments

Add Comment

View Statistics:

Past 24 Hours: 1

Past 7 Days: 11

Past 30 Days: 44

All Time: 777