Shop the Holiday Gift Guide
Free Shipping on Domestic Orders $75+

Kindle Fire HDX 7" Power Button Replacement

Views: 1.4K

View statistics:

Past 24 Hours:
1
Past 7 Days:
16
Past 30 Days:
46
All Time:
1,445
Comments: 2

2 comments on steps.

Completed: 0

No one has marked this guide "completed." Will you be the first?

Favorites: 1

1 person has favorited (and subscribed to) this guide. Will you be next?

Time Required: 1 - 2 hours
Difficulty: Moderate
Kindle Fire HDX 7" Power Button Replacement

Introduction

Go to step 1 ↓

The first step to every electronic repair is to turn it off and back on again. But, this is only possible if your power button works.

If it’s broken, follow this guide to replace the power button on your Kindle Fire HDX 7” tablet.

What you need

Parts

Tools

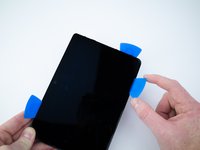
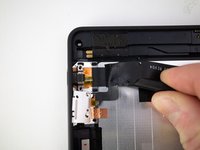
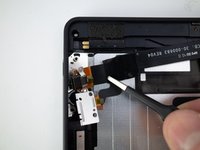
    1. Kindle Fire HDX 7" Power Button Replacement, Speaker Bezel: step 1, image 1 of 3 Kindle Fire HDX 7" Power Button Replacement, Speaker Bezel: step 1, image 2 of 3 Kindle Fire HDX 7" Power Button Replacement, Speaker Bezel: step 1, image 3 of 3
      • Insert an opening pick underneath the speaker bezel, and slide it along the perimeter to separate it from the tablet.

      • The adhesive is strong and may require an iOpener, or heat gun, to soften.

      Ask FixBot

      Add Comment

    2. Kindle Fire HDX 7" Power Button Replacement: step 2, image 1 of 1
      • Remove the speaker bezel.

      Ask FixBot

      Add Comment

    1. Kindle Fire HDX 7" Power Button Replacement, Rear Panel: step 3, image 1 of 1
      • Remove the six pink 3mm T3 Torx screws from the back case.

      Ask FixBot

      Add Comment

    2. Kindle Fire HDX 7" Power Button Replacement: step 4, image 1 of 2 Kindle Fire HDX 7" Power Button Replacement: step 4, image 2 of 2
      • Wedge opening picks around the perimeter between the display and back case.

      • Work the opening picks around the perimeter until the two halves disengage from each other.

      • Don't completely separate as the display ribbon cable still connects the two.

      Ask FixBot

      Add Comment

    3. Kindle Fire HDX 7" Power Button Replacement: step 5, image 1 of 1
      • Use the flat end of a spudger to pry up and disconnect the rear panel press-fit connector from the motherboard.

      Ask FixBot

      Add Comment

      • There may be a glue strip between the battery and the outside case. Gently pry the case open and use the flat end of a spudger to separate the glue strip.

      Ask FixBot

      Add Comment

    1. Kindle Fire HDX 7" Power Button Replacement, Micro USB Charging Port: step 7, image 1 of 1
      • Remove the four 2.3mm T5 Torx screws from the micro USB port and power button assembly.

      Ask FixBot

      Add Comment

    2. Kindle Fire HDX 7" Power Button Replacement: step 8, image 1 of 2 Kindle Fire HDX 7" Power Button Replacement: step 8, image 2 of 2
      • Pry up the ribbon cable from the rear panel with the flat end of a spudger.

      • Remove the micro USB port and power button ribbon cable.

      Ask FixBot

      Add Comment

    1. Kindle Fire HDX 7" Power Button Replacement, Power Button: step 9, image 1 of 1
      • Remove the power button from the rear panel.

      Ask FixBot

      Add Comment

Conclusion

To reassemble your device, follow these instructions in reverse order.

Cancel: I did not complete this guide.

Blake Klein

Member since: 01/29/17

75,532 Reputation

49 Guides authored

0 Guide Comments

Add Comment

View Statistics:

Past 24 Hours: 1

Past 7 Days: 16

Past 30 Days: 46

All Time: 1,445